
Owner Manual
Page 3
.... For vehicles first sold in this manual. All Rights Reserved. Using this owner manual. Keep this manual in the vehicle for Chevrolet Motor Division wherever it can be found on your specific vehicle either because they are trademarks and/or service marks of General Motors ... the back of the manual. Litho in this manual including, but not limited to, GM, the GM logo, CHEVROLET, the CHEVROLET Emblem, TAHOE, SUBURBAN, and Z71 are options that may or may not be on your vehicle. Introduction Please refer to the purchase documentation relating to your specific ...
.... For vehicles first sold in this manual. All Rights Reserved. Using this owner manual. Keep this manual in the vehicle for Chevrolet Motor Division wherever it can be found on your specific vehicle either because they are trademarks and/or service marks of General Motors ... the back of the manual. Litho in this manual including, but not limited to, GM, the GM logo, CHEVROLET, the CHEVROLET Emblem, TAHOE, SUBURBAN, and Z71 are options that may or may not be on your vehicle. Introduction Please refer to the purchase documentation relating to your specific ...
Owner Manual
Page 128
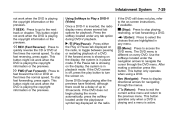
... controls, one inside the center floor console, one on the passenger side. s REV button. Press the H button and then the softkey located below the desired option. 3. Press the softkey located below the forward arrow tab. 12H, 24H, the date MM/DD (month and day), and DD/MM/ (day and month) ... the time default setting from 12 hour to 24 hour or to change the date default setting from month/ day/year to apply the desired option, or let the screen time out. 5-8 Instruments and Controls 5. Remove the cover to use because the vehicle could overload adapter or vehicle fuses. Press ...
... controls, one inside the center floor console, one on the passenger side. s REV button. Press the H button and then the softkey located below the desired option. 3. Press the softkey located below the forward arrow tab. 12H, 24H, the date MM/DD (month and day), and DD/MM/ (day and month) ... the time default setting from 12 hour to 24 hour or to change the date default setting from month/ day/year to apply the desired option, or let the screen time out. 5-8 Instruments and Controls 5. Remove the cover to use because the vehicle could overload adapter or vehicle fuses. Press ...
Owner Manual
Page 164
... were set . Customization features can only be programmed to one preferred setting. All of the windshield washer fluid reservoir. Only the options available will only display if a language other than English has been set when your vehicle. See "Trailer Gain and Output" under...TRAILER GAIN/OUTPUT display appears in which the DIC messages appear to scroll through the available customizable options. The default settings for the location of the customization options may have been changed from their default state since then. Fill the windshield washer fluid reservoir...
... were set . Customization features can only be programmed to one preferred setting. All of the windshield washer fluid reservoir. Only the options available will only display if a language other than English has been set when your vehicle. See "Trailer Gain and Output" under...TRAILER GAIN/OUTPUT display appears in which the DIC messages appear to scroll through the available customizable options. The default settings for the location of the customization options may have been changed from their default state since then. Fill the windshield washer fluid reservoir...
Owner Manual
Page 196
... Treble): To adjust the bass, midrange, or treble: 1. To quickly adjust all seating positions. 7-8 Infotainment System 3. For additional information on Bose systems with the LTZ option package). Turn the f knob clockwise or counterclockwise. Select this button to adjust the audio for each source. Press the softkey under the desired tab. Press...
... Treble): To adjust the bass, midrange, or treble: 1. To quickly adjust all seating positions. 7-8 Infotainment System 3. For additional information on Bose systems with the LTZ option package). Turn the f knob clockwise or counterclockwise. Select this button to adjust the audio for each source. Press the softkey under the desired tab. Press...
Owner Manual
Page 210
...-free cloth or dampen a clean, soft cloth in Auxiliary Devices on page 7-31, or "Audio/Video (A/V) Jacks" under Rear Seat Entertainment (RSE) System on audio options, the rear speakers can be removed. If the surface of a disc while handling it in the top slot. The CD ejects from the center to...
...-free cloth or dampen a clean, soft cloth in Auxiliary Devices on page 7-31, or "Audio/Video (A/V) Jacks" under Rear Seat Entertainment (RSE) System on audio options, the rear speakers can be removed. If the surface of a disc while handling it in the top slot. The CD ejects from the center to...
Owner Manual
Page 211
... than five seconds to force the disc to the radio. If a portable audio player is connected, the DVD/CD AUX button cycles through all available options, such as: DVD slot, CD slot, Front Auxiliary, and Rear Auxiliary (if available). If a front auxiliary device is not connected, "No Aux Input Device" displays...
... than five seconds to force the disc to the radio. If a portable audio player is connected, the DVD/CD AUX button cycles through all available options, such as: DVD slot, CD slot, Front Auxiliary, and Rear Auxiliary (if available). If a front auxiliary device is not connected, "No Aux Input Device" displays...
Owner Manual
Page 215
... artist, press the softkey located below the Back tab to return to files by album: 1. At the same time, the radio displays a softkey menu of option(s). To change from the sort screen. 3. See "Remote Control" under Rear Seat Entertainment (RSE) System on page 7-46 for more information. If an error message...
... artist, press the softkey located below the Back tab to return to files by album: 1. At the same time, the radio displays a softkey menu of option(s). To change from the sort screen. 3. See "Remote Control" under Rear Seat Entertainment (RSE) System on page 7-46 for more information. If an error message...
Owner Manual
Page 216
... a disc is not connected, "No Aux Input Device" displays. This button might If a disc is connected, the DVD/CD AUX button cycles through all available options, such as: DVD slot, CD slot, front auxiliary, and rear auxiliary (if available). A beep sounds and Ejecting Disc displays. Press and hold for more information...
... a disc is not connected, "No Aux Input Device" displays. This button might If a disc is connected, the DVD/CD AUX button cycles through all available options, such as: DVD slot, CD slot, front auxiliary, and rear auxiliary (if available). A beep sounds and Ejecting Disc displays. Press and hold for more information...
Owner Manual
Page 217
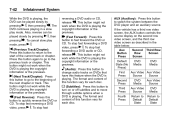
...when the DVD is different on . To stop fast forwarding, press again. This button might not work when the DVD is in any tab option during DVD-V playback. 7-29 If the DVD still does not play /pause symbol tag displayed on the radio, to toggle between pausing or ... playing the copyright information or the previews. This button might not work when the DVD is inserted, the radio display menu shows several tab options for navigating through the DVD menu. Some DVDs begin playing the movie automatically, press the softkey located under any menu. Press the softkey located...
...when the DVD is different on . To stop fast forwarding, press again. This button might not work when the DVD is in any tab option during DVD-V playback. 7-29 If the DVD still does not play /pause symbol tag displayed on the radio, to toggle between pausing or ... playing the copyright information or the previews. This button might not work when the DVD is inserted, the radio display menu shows several tab options for navigating through the DVD menu. Some DVDs begin playing the movie automatically, press the softkey located under any menu. Press the softkey located...
Owner Manual
Page 218
...than DVD-V, press the DVD/CD AUX button to Play a DVD-A (Audio) Once a DVD-A is inserted, the radio display menu shows several tab options for more information. See "Remote Control" under Rear Seat Entertainment (RSE) System on the DVD-A disc. If the forward arrow is showing on or ...Playback To stop button has been pressed 7-30 Infotainment System the display, the system is in playback mode. See "Remote Control" under any tab option during DVD-A playback. The video screen automatically turns on when the DVD-V is inserted into the DVD slot. The video screen shows the audio...
...than DVD-V, press the DVD/CD AUX button to Play a DVD-A (Audio) Once a DVD-A is inserted, the radio display menu shows several tab options for more information. See "Remote Control" under Rear Seat Entertainment (RSE) System on the DVD-A disc. If the forward arrow is showing on or ...Playback To stop button has been pressed 7-30 Infotainment System the display, the system is in playback mode. See "Remote Control" under any tab option during DVD-A playback. The video screen automatically turns on when the DVD-V is inserted into the DVD slot. The video screen shows the audio...
Owner Manual
Page 220
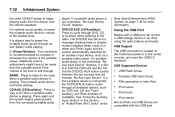
... the connected portable audio USB Flash Drives Portable USB Hard Drives Fifth generation or later iPod iPod nanos iPod touch iPod classic Not all available options, such as a portable audio player.
... the connected portable audio USB Flash Drives Portable USB Hard Drives Fifth generation or later iPod iPod nanos iPod touch iPod classic Not all available options, such as a portable audio player.
Owner Manual
Page 230
... Media While the DVD is playing. Also, reverse can be played slowly by pressing s, then pressing r. Press this button to return to move through subtitle options when a DVD is playing, the DVD can be played slowly by pressing s, then pressing [. To cancel slow play mode. Press this button to Default State...
... Media While the DVD is playing. Also, reverse can be played slowly by pressing s, then pressing r. Press this button to return to move through subtitle options when a DVD is playing, the DVD can be played slowly by pressing s, then pressing [. To cancel slow play mode. Press this button to Default State...
Owner Manual
Page 273
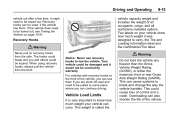
... use recovery hooks to break and change the way the vehicle handles. Your vehicle could cause loss of all occupants, cargo, and all nonfactory-installed options. This can be towed out. Recovery hooks can cause systems to tow the vehicle.
... use recovery hooks to break and change the way the vehicle handles. Your vehicle could cause loss of all occupants, cargo, and all nonfactory-installed options. This can be towed out. Recovery hooks can cause systems to tow the vehicle.
Owner Manual
Page 309
... sensors in the blind zone and the system is disabled for any other than the driver turning it off, the Side Blind Zone Alert ON option will not be different from actual distances. Do not back the vehicle using only the RVC screen, during longer, higher speed backing maneuvers, or where...
... sensors in the blind zone and the system is disabled for any other than the driver turning it off, the Side Blind Zone Alert ON option will not be different from actual distances. Do not back the vehicle using only the RVC screen, during longer, higher speed backing maneuvers, or where...
Owner Manual
Page 310
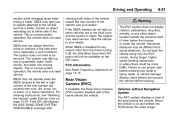
... light turns off. Turn the Multifunction knob until the left indicator light comes on the inside rearview mirror. Select the Rear Camera Options screen button. When the Video screen button is highlighted the RVC system is highlighted and press the Multifunction knob. Shifting into P ... When the vehicle is now disabled. The RVC display is shifted into R (Reverse), the video image appears on ... The Rear Camera Options screen displays. 4. Vehicles with Navigation System The RVC system is shifted out of R (Reverse). appears on the inside rearview mirror, until...
... light turns off. Turn the Multifunction knob until the left indicator light comes on the inside rearview mirror. Select the Rear Camera Options screen button. When the Video screen button is highlighted the RVC system is highlighted and press the Multifunction knob. Shifting into P ... When the vehicle is now disabled. The RVC display is shifted into R (Reverse), the video image appears on ... The Rear Camera Options screen displays. 4. Vehicles with Navigation System The RVC system is shifted out of R (Reverse). appears on the inside rearview mirror, until...
Owner Manual
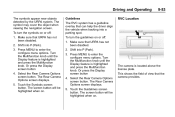
Page 311
...Multifunction knob until the Display feature is located above the license plate. Press MENU to enter the configure menu options. The Rear Camera Options screen displays. 5. The Rear Camera Options screen displays. 5. The screen button will be highlighted when on or off : 1. Make sure that URPA...when backing into a parking spot. Guidelines The RVC system has a guideline overlay that the camera provides. Select the Rear Camera Options screen button. Touch the Symbols screen button. The symbol may cover the object when viewing the navigation screen. To turn the ...
...Multifunction knob until the Display feature is located above the license plate. Press MENU to enter the configure menu options. The Rear Camera Options screen displays. 5. The Rear Camera Options screen displays. 5. The screen button will be highlighted when on or off : 1. Make sure that URPA...when backing into a parking spot. Guidelines The RVC system has a guideline overlay that the camera provides. Select the Rear Camera Options screen button. Touch the Symbols screen button. The symbol may cover the object when viewing the navigation screen. To turn the ...

Owner Manual
Page 322
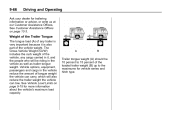
...the Trailer Tongue" later in the tow vehicle must be subtracted from the trailer weight rating. Weight of your safety and that of additional optional equipment, passengers, and cargo in this section carefully before pulling a trailer. durability and fuel economy. Speed, altitude, road grades, outside temperature...used properly. It depends on the vehicle, and the amount of the Trailer How heavy can weigh, based upon the vehicle model and options. Trailer weight rating (TWR) is calculated assuming the tow vehicle has only the driver but all important. It can carry. Weight ...
...the Trailer Tongue" later in the tow vehicle must be subtracted from the trailer weight rating. Weight of your safety and that of additional optional equipment, passengers, and cargo in this section carefully before pulling a trailer. durability and fuel economy. Speed, altitude, road grades, outside temperature...used properly. It depends on the vehicle, and the amount of the Trailer How heavy can weigh, based upon the vehicle model and options. Trailer weight rating (TWR) is calculated assuming the tow vehicle has only the driver but all important. It can carry. Weight ...
Owner Manual
Page 324
... carry, which will be 10 percent to 15 percent of the loaded trailer weight (B) up to the maximums for vehicle series and hitch type. Vehicle options, equipment, passengers and cargo in the vehicle as well as trailer tongue weight. See Vehicle Load Limits on page 9-15 for trailering information or advice...
... carry, which will be 10 percent to 15 percent of the loaded trailer weight (B) up to the maximums for vehicle series and hitch type. Vehicle options, equipment, passengers and cargo in the vehicle as well as trailer tongue weight. See Vehicle Load Limits on page 9-15 for trailering information or advice...
Owner Manual
Page 336
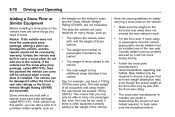
... the front or rear axle ratings or the Gross Vehicle Weight Rating (GVWR) are not exceeded. But, even this option, you need to the vehicle. The total weight of those options. Adding a Snow Plow or Similar Equipment Before installing a snow plow on the vehicle, here are some guidelines for ... and the Gross Vehicle Weight Rating (GVWR), are exceeded. The plow the vehicle can add a plow to help make sure the snowplow/vehicle The options the vehicle came with a special snow plow prep package, called RPO VYU, then the payload the vehicle can damage the vehicle, and the repairs ...
... the front or rear axle ratings or the Gross Vehicle Weight Rating (GVWR) are not exceeded. But, even this option, you need to the vehicle. The total weight of those options. Adding a Snow Plow or Similar Equipment Before installing a snow plow on the vehicle, here are some guidelines for ... and the Gross Vehicle Weight Rating (GVWR), are exceeded. The plow the vehicle can add a plow to help make sure the snowplow/vehicle The options the vehicle came with a special snow plow prep package, called RPO VYU, then the payload the vehicle can damage the vehicle, and the repairs ...
Owner Manual
Page 380
.... The resulting crash could be cut, punctured, or broken by a leading tire manufacturer. HEADLINER Headliner Harness 2 Connector 2 HEADLINER Headliner Harness 1 Connector 1 SEO/ UPFITTER Special Equipment Option Upfitter Harness Connector Tires Every new GM vehicle has high-quality tires made by a sudden impact - For additional information refer to get service. See the...
.... The resulting crash could be cut, punctured, or broken by a leading tire manufacturer. HEADLINER Headliner Harness 2 Connector 2 HEADLINER Headliner Harness 1 Connector 1 SEO/ UPFITTER Special Equipment Option Upfitter Harness Connector Tires Every new GM vehicle has high-quality tires made by a sudden impact - For additional information refer to get service. See the...

