
Owner Manual
Page 1
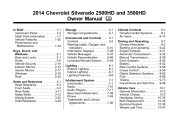
2014 Chevrolet Silverado 2500HD and 3500HD Owner Manual M In Brief ...1-1 Instrument Panel ...1-2 Initial Drive Information ...1-7 Vehicle Features ...1-25 Performance and Maintenance ...1-32 Keys, Doors, and Windows ...2-1 Keys and Locks ...2-1 Doors ...2-8 Vehicle Security...2-10 Exterior Mirrors ...2-13 Interior... ...5-28 Vehicle Messages ...5-37 Vehicle Personalization ...5-46 Universal Remote System ...5-54 Lighting ...6-1 Exterior Lighting ...6-1 Interior Lighting ...6-7 Lighting Features ...6-8 Infotainment System ...7-1 Introduction ...7-1 Radio ...7-10 Audio Players ...7-17 Rear Seat ...
2014 Chevrolet Silverado 2500HD and 3500HD Owner Manual M In Brief ...1-1 Instrument Panel ...1-2 Initial Drive Information ...1-7 Vehicle Features ...1-25 Performance and Maintenance ...1-32 Keys, Doors, and Windows ...2-1 Keys and Locks ...2-1 Doors ...2-8 Vehicle Security...2-10 Exterior Mirrors ...2-13 Interior... ...5-28 Vehicle Messages ...5-37 Vehicle Personalization ...5-46 Universal Remote System ...5-54 Lighting ...6-1 Exterior Lighting ...6-1 Interior Lighting ...6-7 Lighting Features ...6-8 Infotainment System ...7-1 Introduction ...7-1 Radio ...7-10 Audio Players ...7-17 Rear Seat ...
Owner Manual
Page 7
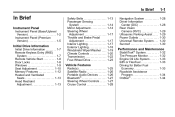
... ...1-12 Heated and Ventilated Seats ...1-13 Head Restraint Adjustment ...1-13 Safety Belts ...Passenger Sensing System ...Mirror Adjustment ...Steering Wheel Adjustment ...Throttle and Brake Pedal Adjustment ...Interior Lighting ...Exterior Lighting ...Windshield Wiper/Washer ...Climate Controls ...Transmission ...Four-Wheel Drive ... 1-13 1-14 1-14 1-17 1-17 1-17 1-18 1-19 1-20 1-22 1-23 1-25 1-26...
... ...1-12 Heated and Ventilated Seats ...1-13 Head Restraint Adjustment ...1-13 Safety Belts ...Passenger Sensing System ...Mirror Adjustment ...Steering Wheel Adjustment ...Throttle and Brake Pedal Adjustment ...Interior Lighting ...Exterior Lighting ...Windshield Wiper/Washer ...Climate Controls ...Transmission ...Four-Wheel Drive ... 1-13 1-14 1-14 1-17 1-17 1-17 1-18 1-19 1-20 1-22 1-23 1-25 1-26...

Owner Manual
Page 22
... visibility when towing a trailer. The lower convex part of the towing mirrors is not heated. Manually pull out the mirror head to heat the mirrors. Interior Mirror Adjustment Hold the rearview mirror in R (Reverse).
... visibility when towing a trailer. The lower convex part of the towing mirrors is not heated. Manually pull out the mirror head to heat the mirrors. Interior Mirror Adjustment Hold the rearview mirror in R (Reverse).

Owner Manual
Page 23
Release the lever to move the pedals away. Press the top of the control to lock the wheel in the overhead console. Interior Lighting Dome Lamps The dome lamps are closed. The control used to your body. Press the bottom of the control to move the pedals closer ...
Release the lever to move the pedals away. Press the top of the control to lock the wheel in the overhead console. Interior Lighting Dome Lamps The dome lamps are closed. The control used to your body. Press the bottom of the control to move the pedals closer ...
Owner Manual
Page 24
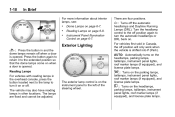
... on the headlamps, parking lamps, taillamps, instrument panel lights, roof marker lamps (if equipped), and license plate lamps. 1-18 In Brief For more information about interior lamps, see: ... There are fixed and cannot be adjusted. Dome Lamps on page 6-8. Turn the headlamp control to the off the automatic headlamps and Daytime...
... on the headlamps, parking lamps, taillamps, instrument panel lights, roof marker lamps (if equipped), and license plate lamps. 1-18 In Brief For more information about interior lamps, see: ... There are fixed and cannot be adjusted. Dome Lamps on page 6-8. Turn the headlamp control to the off the automatic headlamps and Daytime...
Owner Manual
Page 41
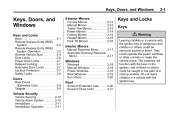
... be caught in the path of a closing window. Interior Mirrors Manual Rearview Mirror ...2-17 Automatic Dimming Rearview Mirror ...2-17 Windows Windows ...Manual Windows ...Power Windows ...Rear Windows ...Sun Visors ...2-18 2-18 2-18 2-19 2-20 Doors Rear Doors (Extended Cab) ...2-8 Tailgate ...2-9 Roof Sunroof (Extended Cab) ...2-20 Sunroof (Crew Cab) ...2-21 Vehicle Security Vehicle Security ...2-10 Vehicle...
... be caught in the path of a closing window. Interior Mirrors Manual Rearview Mirror ...2-17 Automatic Dimming Rearview Mirror ...2-17 Windows Windows ...Manual Windows ...Power Windows ...Rear Windows ...Sun Visors ...2-18 2-18 2-18 2-19 2-20 Doors Rear Doors (Extended Cab) ...2-8 Tailgate ...2-9 Roof Sunroof (Extended Cab) ...2-20 Sunroof (Crew Cab) ...2-21 Vehicle Security Vehicle Security ...2-10 Vehicle...

Owner Manual
Page 43
If enabled through the DIC, the turn signal lamps flash twice to indicate unlocking has occurred. The interior lamps may turn signal lamps flash once to this vehicle, all the If enabled through the Driver Information Center (DIC), the turn on. Programming Transmitters ...
If enabled through the DIC, the turn signal lamps flash twice to indicate unlocking has occurred. The interior lamps may turn signal lamps flash once to this vehicle, all the If enabled through the Driver Information Center (DIC), the turn on. Programming Transmitters ...
Owner Manual
Page 57
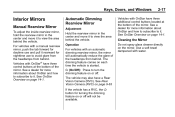
... Rearview Mirror Adjustment Hold the rearview mirror in the center and move it to view the area behind the vehicle. Keys, Doors, and Windows 2-17 Interior Mirrors Manual Rearview Mirror To adjust the inside rearview mirror, hold the rearview mirror in the center and move it to view the area behind...
... Rearview Mirror Adjustment Hold the rearview mirror in the center and move it to view the area behind the vehicle. Keys, Doors, and Windows 2-17 Interior Mirrors Manual Rearview Mirror To adjust the inside rearview mirror, hold the rearview mirror in the center and move it to view the area behind...
Owner Manual
Page 80
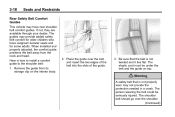
... through your dealer. The elastic cord must be seriously injured. The person wearing the belt could be under the belt and the guide on the interior body. 2. The shoulder belt should go over the belt and insert the two edges of the belt into the slots of the guide. 3. When installed...
... through your dealer. The elastic cord must be seriously injured. The person wearing the belt could be under the belt and the guide on the interior body. 2. The shoulder belt should go over the belt and insert the two edges of the belt into the slots of the guide. 3. When installed...

Owner Manual
Page 90
... in the vehicle, such as anything more information. Airbags should never be at least partially inflated for several minutes. on the interior lamps and hazard warning flashers, and shut off the interior lamps and hazard warning flashers by opening a window or a door. Some components of the windshield or being able to inflate...
... in the vehicle, such as anything more information. Airbags should never be at least partially inflated for several minutes. on the interior lamps and hazard warning flashers, and shut off the interior lamps and hazard warning flashers by opening a window or a door. Some components of the windshield or being able to inflate...

Owner Manual
Page 191
... instrument panel to -Pass ...6-3 Daytime Running Lamps (DRL) ...6-3 Automatic Headlamp System ...6-3 Hazard Warning Flashers ...6-5 Turn and Lane-Change Signals ...6-5 Fog Lamps ...6-6 Auxiliary Roof-Mounted Lamp ...6-6 Interior Lighting Instrument Panel Illumination Control ...Cargo Lamp ...Dome Lamps ...Reading Lamps ...6-7 6-7 6-7 6-8 6-8 6-8 6-8 6-9 Exterior Lighting Exterior Lamp Controls Lighting Features Entry Lighting ...Exit Lighting ...Battery Load Management...
... instrument panel to -Pass ...6-3 Daytime Running Lamps (DRL) ...6-3 Automatic Headlamp System ...6-3 Hazard Warning Flashers ...6-5 Turn and Lane-Change Signals ...6-5 Fog Lamps ...6-6 Auxiliary Roof-Mounted Lamp ...6-6 Interior Lighting Instrument Panel Illumination Control ...Cargo Lamp ...Dome Lamps ...Reading Lamps ...6-7 6-7 6-7 6-8 6-8 6-8 6-8 6-9 Exterior Lighting Exterior Lamp Controls Lighting Features Entry Lighting ...Exit Lighting ...Battery Load Management...
Owner Manual
Page 197
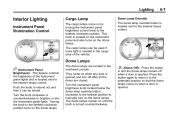
... brightness knob located below the dome lamp override button, clockwise to the farthest position to the farthest clockwise position. This knob is turned counterclockwise. Lighting 6-7 Interior Lighting Instrument Panel Illumination Control Cargo Lamp The cargo lamps come on by turning the instrument panel brightness control knob to manually turn off after...
... brightness knob located below the dome lamp override button, clockwise to the farthest position to the farthest clockwise position. This knob is turned counterclockwise. Lighting 6-7 Interior Lighting Instrument Panel Illumination Control Cargo Lamp The cargo lamps come on by turning the instrument panel brightness control knob to manually turn off after...

Owner Manual
Page 198
... off . 6-8 Lighting Reading Lamps For vehicles with reading lamps, they are on, such as: headlamps, high beams, fog lamps, rear window defogger, Exit Lighting The interior lamps come on. It then adjusts the voltage for all the power that estimates the battery's temperature and state A high electrical load occurs when several...
... off . 6-8 Lighting Reading Lamps For vehicles with reading lamps, they are on, such as: headlamps, high beams, fog lamps, rear window defogger, Exit Lighting The interior lamps come on. It then adjusts the voltage for all the power that estimates the battery's temperature and state A high electrical load occurs when several...
Owner Manual
Page 249
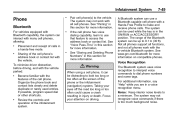
... feature to access the address book or contact list. See www.gm.com/bluetooth for more information. . Taking your attention on compatible phones. Noise: Keep interior noise levels to dial phone numbers and name tags. If the cell phone has voice dialing capability, learn to use a Bluetooth-capable cell phone with...
... feature to access the address book or contact list. See www.gm.com/bluetooth for more information. . Taking your attention on compatible phones. Noise: Keep interior noise levels to dial phone numbers and name tags. If the cell phone has voice dialing capability, learn to use a Bluetooth-capable cell phone with...
Owner Manual
Page 266
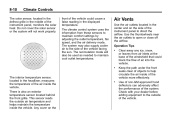
... Use the air outlets located in the headliner, measures the temperature of the air inside of the instrument panel to maintain cool outlet temperatures. The interior temperature sensor, located in the center and on the . This sensor reads the outside of the instrument panel, monitors the solar heat. The climate control...
... Use the air outlets located in the headliner, measures the temperature of the air inside of the instrument panel to maintain cool outlet temperatures. The interior temperature sensor, located in the center and on the . This sensor reads the outside of the instrument panel, monitors the solar heat. The climate control...

Owner Manual
Page 277
... and they could crash. If you do not shift down, the brakes could get so hot that they actually ride on the water. Keep the interior temperature cool. Pass with proper tread depth. See Tires on steep hills or through mountains is dangerous. Check the rearview mirror and vehicle instruments often...
... and they could crash. If you do not shift down, the brakes could get so hot that they actually ride on the water. Keep the interior temperature cool. Pass with proper tread depth. See Tires on steep hills or through mountains is dangerous. Check the rearview mirror and vehicle instruments often...
Owner Manual
Page 368
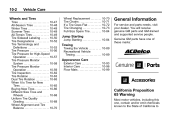
... these marks: Jump Starting Jump Starting ...10-84 Towing Towing the Vehicle ...10-89 Recreational Vehicle Towing ...10-89 Appearance Care Exterior Care ...10-93 Interior Care ...10-96 Floor Mats ...10-99 California Proposition 65 Warning Most motor vehicles, including this one, contain and/or emit chemicals known to the...
... these marks: Jump Starting Jump Starting ...10-84 Towing Towing the Vehicle ...10-89 Recreational Vehicle Towing ...10-89 Appearance Care Exterior Care ...10-93 Interior Care ...10-96 Floor Mats ...10-99 California Proposition 65 Warning Most motor vehicles, including this one, contain and/or emit chemicals known to the...
Owner Manual
Page 412
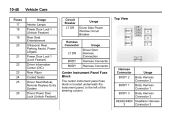
10-46 Fuses 17 18 19 20 Vehicle Care Usage Interior Lamps Power Door Lock 1 (Unlock Feature) Rear Seat Entertainment Ultrasonic Rear Parking Assist, Power Liftgate Power Door Lock 1 (Lock Feature) Driver Information Center (DIC) Rear ...
10-46 Fuses 17 18 19 20 Vehicle Care Usage Interior Lamps Power Door Lock 1 (Unlock Feature) Rear Seat Entertainment Ultrasonic Rear Parking Assist, Power Liftgate Power Door Lock 1 (Lock Feature) Driver Information Center (DIC) Rear ...

Owner Manual
Page 462
...Lubricate all cleaners directly to prevent permanent damage. Visually check constant velocity joints, rubber boots, and axle seals for cleaning the interior. Your dealer or an underbody car washing system can fall upon and attack painted vehicle surfaces causing blotchy, ring-shaped discolorations, .... Chemical Paint Spotting Airborne pollutants can do this. 10-96 Vehicle Care material to parts repaired or replaced to the vehicle's interior. Original manufacturer replacement parts will make sure the body repair shop applies anti-corrosion leaks, cracks, chafing, etc. Note that ...
...Lubricate all cleaners directly to prevent permanent damage. Visually check constant velocity joints, rubber boots, and axle seals for cleaning the interior. Your dealer or an underbody car washing system can fall upon and attack painted vehicle surfaces causing blotchy, ring-shaped discolorations, .... Chemical Paint Spotting Airborne pollutants can do this. 10-96 Vehicle Care material to parts repaired or replaced to the vehicle's interior. Original manufacturer replacement parts will make sure the body repair shop applies anti-corrosion leaks, cracks, chafing, etc. Note that ...
Owner Manual
Page 463
... behind with excessive pressure. Abrasive cleaners or aggressive cleaning may be used, if necessary, after cleaning the interior glass with water. For liquid cleaners, use a terry cloth fabric dampened with plain water. To prevent damage, do not clean ...cleaning. Notice: To prevent scratching, never use solutions that can become concentrated in the interior. Never rub any interior surface. Do not use abrasive cleaners on automotive glass. While cleaning the interior, maintain adequate ventilation by opening the doors and windows. A concentrated soap solution will ...
... behind with excessive pressure. Abrasive cleaners or aggressive cleaning may be used, if necessary, after cleaning the interior glass with water. For liquid cleaners, use a terry cloth fabric dampened with plain water. To prevent damage, do not clean ...cleaning. Notice: To prevent scratching, never use solutions that can become concentrated in the interior. Never rub any interior surface. Do not use abrasive cleaners on automotive glass. While cleaning the interior, maintain adequate ventilation by opening the doors and windows. A concentrated soap solution will ...