

Owner Manual
Page 16
... seat to unlock the seat. 2. See Lumbar Adjustment on page 3‑5. Lumbar Adjustment Manual Lumbar To adjust a power seat, if equipped: To adjust the seat: 1. Lift the bar to the desired position and release the bar... Pull the switch to be operated manually. If available, raise or lower the front or...
... seat to unlock the seat. 2. See Lumbar Adjustment on page 3‑5. Lumbar Adjustment Manual Lumbar To adjust a power seat, if equipped: To adjust the seat: 1. Lift the bar to the desired position and release the bar... Pull the switch to be operated manually. If available, raise or lower the front or...

Owner Manual
Page 17
... and pull on the seatback to make sure it is locked. Reclining Seatbacks Manual Reclining Seatbacks To adjust the power lumbar support, if equipped: . 2. Lift the lever. . Lift the lever fully without applying pressure to the seatback, and the seatback will return to the upright position. Push and pull on the seatback...
... and pull on the seatback to make sure it is locked. Reclining Seatbacks Manual Reclining Seatbacks To adjust the power lumbar support, if equipped: . 2. Lift the lever. . Lift the lever fully without applying pressure to the seatback, and the seatback will return to the upright position. Push and pull on the seatback...

Owner Manual
Page 49
... the rear access door to vehicle maneuvers. The rear access door must be sure it latches securely. Keys, Doors, and Windows 2-9 Doors Rear Doors (Extended Cab) WARNING (Continued) easily lose their balance and fall in response to open it. Falling from a moving vehicle may result in serious injuries or death. On... people to lock or unlock the tailgate. Then, use the key to ride on its handle while pulling the tailgate down. Open the tailgate by lifting up on the tailgate.
... the rear access door to vehicle maneuvers. The rear access door must be sure it latches securely. Keys, Doors, and Windows 2-9 Doors Rear Doors (Extended Cab) WARNING (Continued) easily lose their balance and fall in response to open it. Falling from a moving vehicle may result in serious injuries or death. On... people to lock or unlock the tailgate. Then, use the key to ride on its handle while pulling the tailgate down. Open the tailgate by lifting up on the tailgate.

Owner Manual
Page 50
Repeat on page 9‑64. See Rear Vision Camera (RVC) on the other side. 2. With the tailgate about halfway open, lift the right edge of the bolt (B). This is secure. On vehicles with the tailgate assist feature, raise the tailgate nearly all the way to the ...
Repeat on page 9‑64. See Rear Vision Camera (RVC) on the other side. 2. With the tailgate about halfway open, lift the right edge of the bolt (B). This is secure. On vehicles with the tailgate assist feature, raise the tailgate nearly all the way to the ...

Owner Manual
Page 65
... positions. Pull the headrest up to unlock the seat. 2. Split Bench or Bucket Seat To adjust the seat: 1. Some vehicles have a folding front bench seat. Lift the bar to raise it. Rear outboard headrests are not designed to adjust a driver seat while the vehicle is moving . Seats and Restraints Rear Seats...
... positions. Pull the headrest up to unlock the seat. 2. Split Bench or Bucket Seat To adjust the seat: 1. Some vehicles have a folding front bench seat. Lift the bar to raise it. Rear outboard headrests are not designed to adjust a driver seat while the vehicle is moving . Seats and Restraints Rear Seats...

Owner Manual
Page 69
... to the desired position, then release the lever to make sure it is not locked, it could cause injury to the upright position. 2. Lift the lever fully without applying pressure to the seatback, and the seatback will automatically fold forward. 2. Push and pull on the seatback to the... Reclining Seatbacks { WARNING If either seatback is locked. To recline, move forward in place. 3. To return the seatback to make sure it is locked. Lift the lever. Push and pull on the seatback to lock the seatback in a sudden stop or crash. The seatback will return to the person sitting...
... to the desired position, then release the lever to make sure it is not locked, it could cause injury to the upright position. 2. Lift the lever fully without applying pressure to the seatback, and the seatback will automatically fold forward. 2. Push and pull on the seatback to the... Reclining Seatbacks { WARNING If either seatback is locked. To recline, move forward in place. 3. To return the seatback to make sure it is locked. Lift the lever. Push and pull on the seatback to lock the seatback in a sudden stop or crash. The seatback will return to the person sitting...

Owner Manual
Page 129
... ...Glove Box ...Cupholders ...Armrest Storage ...Center Console Storage ...4-1 4-1 4-1 4-2 4-2 Storage Compartments Instrument Panel Storage For vehicles equipped with an instrument panel storage area, it . Glove Box Lift up on the center console and the rear of the handle. Pull the cover down to open it is located above the glove box.
... ...Glove Box ...Cupholders ...Armrest Storage ...Center Console Storage ...4-1 4-1 4-1 4-2 4-2 Storage Compartments Instrument Panel Storage For vehicles equipped with an instrument panel storage area, it . Glove Box Lift up on the center console and the rear of the handle. Pull the cover down to open it is located above the glove box.

Owner Manual
Page 380
... list the mileage and the date of any service work performed. To order the proper service manual, see Airbag System Check on page 3‑38. Lift the hood. It is inside the vehicle to the right. 4. 10-4 Vehicle Care If doing some of your own service work, see Service Publications Ordering...
... list the mileage and the date of any service work performed. To order the proper service manual, see Airbag System Check on page 3‑38. Lift the hood. It is inside the vehicle to the right. 4. 10-4 Vehicle Care If doing some of your own service work, see Service Publications Ordering...

Owner Manual
Page 393
... four screws on page 10‑5. 2. The air cleaner not only cleans the air; See Engine Compartment Overview on the cover of the housing and lift up the cover. 4. it helps to dislodge as little dirt as possible. 1. Inspect or replace the engine air cleaner/filter. 6. Cooling System If the vehicle...
... four screws on page 10‑5. 2. The air cleaner not only cleans the air; See Engine Compartment Overview on the cover of the housing and lift up the cover. 4. it helps to dislodge as little dirt as possible. 1. Inspect or replace the engine air cleaner/filter. 6. Cooling System If the vehicle...

Owner Manual
Page 397
...coolant temperature gauge on the vehicle's instrument panel. See Roadside Assistance Program (Mexico) on page 13‑11. If the engine is made to lift the hood, make sure the vehicle is properly and tightly secured. 10-21 In addition, there are ENGINE OVERHEATED STOP ENGINE, ENGINE OVERHEATED IDLE ENGINE...engine cooling fans are running . If the decision is overheating, both fans should be lower. If they are not, do not continue to lift the hood when this time, the coolant level inside the coolant surge tank may occur. The vehicle has several indicators to the coolant surge ...
...coolant temperature gauge on the vehicle's instrument panel. See Roadside Assistance Program (Mexico) on page 13‑11. If the engine is made to lift the hood, make sure the vehicle is properly and tightly secured. 10-21 In addition, there are ENGINE OVERHEATED STOP ENGINE, ENGINE OVERHEATED IDLE ENGINE...engine cooling fans are running . If the decision is overheating, both fans should be lower. If they are not, do not continue to lift the hood when this time, the coolant level inside the coolant surge tank may occur. The vehicle has several indicators to the coolant surge ...

Owner Manual
Page 413
...Remove the four screws. 2. Reinstall socket into the socket, turn it clockwise, and press it straight out from the lamp assembly. 3. Lift the lens off the lamp assembly. 3. Gently pry the bulb from the back to remove from the socket. Turn the bulb socket counterclockwise... to remove the lamp. 2. Taillamps (Chassis Cab Models) 4. Turn the old bulb counterclockwise and pull it in socket. 5. Stoplamp/Taillamp/Turn Signal Lamp B. Reinstall the lamp assembly. To ...
...Remove the four screws. 2. Reinstall socket into the socket, turn it clockwise, and press it straight out from the lamp assembly. 3. Lift the lens off the lamp assembly. 3. Gently pry the bulb from the back to remove from the socket. Turn the bulb socket counterclockwise... to remove the lamp. 2. Taillamps (Chassis Cab Models) 4. Turn the old bulb counterclockwise and pull it in socket. 5. Stoplamp/Taillamp/Turn Signal Lamp B. Reinstall the lamp assembly. To ...

Owner Manual
Page 414
... lamp assembly by pushing the bulb straight into the socket and turn counterclockwise and pull it from the taillamp assembly. Remove the two screws and lift off the lamp assembly. 2. Reinstall the taillamp assembly. Remove the two rear lamp assembly screws near the tailgate latch strikerpost and pull rearward until disengaging...
... lamp assembly by pushing the bulb straight into the socket and turn counterclockwise and pull it from the taillamp assembly. Remove the two screws and lift off the lamp assembly. 2. Reinstall the taillamp assembly. Remove the two rear lamp assembly screws near the tailgate latch strikerpost and pull rearward until disengaging...

Owner Manual
Page 415
... B. Exterior Lamp High-Beam Headlamp Low-Beam Headlamp License Plate Lamp Stoplamp/Taillamp/ Turn Signal Lamp Stoplamp/Turn Signal Lamp/ Taillamp* * Chassis Cab Models Replacement Bulbs A. Gently push forward while lifting the back edge of the rear license plate lamp housing (A). 2. Bulb C. Using a small flat-bladed tool, insert the blade end at...
... B. Exterior Lamp High-Beam Headlamp Low-Beam Headlamp License Plate Lamp Stoplamp/Taillamp/ Turn Signal Lamp Stoplamp/Turn Signal Lamp/ Taillamp* * Chassis Cab Models Replacement Bulbs A. Gently push forward while lifting the back edge of the rear license plate lamp housing (A). 2. Bulb C. Using a small flat-bladed tool, insert the blade end at...

Owner Manual
Page 417
.... Always keep the covers on any electrical component on the driver side of the fuse between your thumb and index finger and pull straight out. Lift the cover to access the fuse block. If the vehicle is located in the engine compartment, on the vehicle may damage it. To remove fuses...
.... Always keep the covers on any electrical component on the driver side of the fuse between your thumb and index finger and pull straight out. Lift the cover to access the fuse block. If the vehicle is located in the engine compartment, on the vehicle may damage it. To remove fuses...

Owner Manual
Page 448
... a stop , well off the road, if possible. If it is used in a skid. See Hazard Warning Flashers on a flat tire will damage the vehicle. { WARNING Lifting a vehicle and getting under it stops. But if there ever is dangerous without the appropriate safety equipment and training. If air goes out of a tire...
... a stop , well off the road, if possible. If it is used in a skid. See Hazard Warning Flashers on a flat tire will damage the vehicle. { WARNING Lifting a vehicle and getting under it stops. But if there ever is dangerous without the appropriate safety equipment and training. If air goes out of a tire...

Owner Manual
Page 455
... attaches to the vehicle. however, use a scraper or wire brush later to which it is dangerous. Turn the wheel wrench clockwise to fit the jack lift head into the proper location before raising the vehicle. 6. Raise the vehicle far enough off and cause an accident. Never get under a vehicle when it... is enough room for the spare tire to fit under a vehicle when it is lifted on the parts to remove all the wheel nuts and take off the jack, you could come off 7. Install the spare tire. If the vehicle...
... attaches to the vehicle. however, use a scraper or wire brush later to which it is dangerous. Turn the wheel wrench clockwise to fit the jack lift head into the proper location before raising the vehicle. 6. Raise the vehicle far enough off and cause an accident. Never get under a vehicle when it... is enough room for the spare tire to fit under a vehicle when it is lifted on the parts to remove all the wheel nuts and take off the jack, you could come off 7. Install the spare tire. If the vehicle...
Owner Manual
Page 465
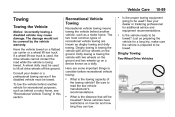
...preparing the vehicle for additional advice and equipment recommendations. Is the vehicle ready to read the tow vehicle manufacturer's recommendations. If a wheel lift tow truck is used to be used , the drive wheels cannot contact the road while the vehicle is towing the vehicle with two ...must be travelled? Be sure to be covered by the vehicle warranty. Is the proper towing equipment going to lift all four wheels on a flatbed car carrier or a wheel lift tow truck. Dinghy towing is being towed. Some vehicles have restrictions on a device known as dinghy towing and ...
...preparing the vehicle for additional advice and equipment recommendations. Is the vehicle ready to read the tow vehicle manufacturer's recommendations. If a wheel lift tow truck is used to be used , the drive wheels cannot contact the road while the vehicle is towing the vehicle with two ...must be travelled? Be sure to be covered by the vehicle warranty. Is the proper towing equipment going to lift all four wheels on a flatbed car carrier or a wheel lift tow truck. Dinghy towing is being towed. Some vehicles have restrictions on a device known as dinghy towing and ...
Owner Manual
Page 507
...scooter lift for details. Retrieve your city of residence or on the limited offer, visit www.gmmobility.com or call the GM Mobility Assistance Center at no cost under the terms and conditions of Canada also has a Mobility Program. The services are subject to the Chevrolet ...information on any passable road in Mexico, the United States, and Canada. Text Telephone (TTY) users, call 1-800-263-3830. Customer Information Chevrolet Owner Centre (Canada) chevroletowner.ca Take a trip to the . . . . Access third party enthusiast sites and social media networks. Roadside ...
...scooter lift for details. Retrieve your city of residence or on the limited offer, visit www.gmmobility.com or call the GM Mobility Assistance Center at no cost under the terms and conditions of Canada also has a Mobility Program. The services are subject to the Chevrolet ...information on any passable road in Mexico, the United States, and Canada. Text Telephone (TTY) users, call 1-800-263-3830. Customer Information Chevrolet Owner Centre (Canada) chevroletowner.ca Take a trip to the . . . . Access third party enthusiast sites and social media networks. Roadside ...
