

Owner Manual
Page 14
...then back off . Press and release . . See Remote Vehicle Start on page 2‑2. From outside of the following: . Q. 3. Immediately after completing Step 2, press and hold / until the turn signal lamps flash. Door Locks There are several ways to run for a 10-minute time extension. 1-8 In ...and remain on as long as the engine is running. Turn on the manual lock knob. Repeat the steps for 10 minutes. From inside, use the Remote Keyless Entry (RKE) transmitter or the key in the driver door. Crew Cab Premium Trim Shown, Uplevel Similar Starting the Vehicle 1.
...then back off . Press and release . . See Remote Vehicle Start on page 2‑2. From outside of the following: . Q. 3. Immediately after completing Step 2, press and hold / until the turn signal lamps flash. Door Locks There are several ways to run for a 10-minute time extension. 1-8 In ...and remain on as long as the engine is running. Turn on the manual lock knob. Repeat the steps for 10 minutes. From inside, use the Remote Keyless Entry (RKE) transmitter or the key in the driver door. Crew Cab Premium Trim Shown, Uplevel Similar Starting the Vehicle 1.
Owner Manual
Page 35
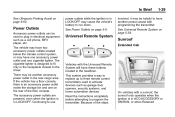
...run down. This system provides a way to replace up to three remote control transmitters used to use Universal Remote System Sunroof Extended Cab Vehicles with the Universal Remote System will have another accessory power outlet in the receptacle closest to program the transmitter. See Universal ...Retained See Power Outlets on page 5‑9. 1-29 involved, it may have one accessory power outlet and one on the rear of the steps On vehicles with programming the transmitter. Power Outlets Accessory power outlets can be used to activate devices such as a cell phone, MP3 player,...
...run down. This system provides a way to replace up to three remote control transmitters used to use Universal Remote System Sunroof Extended Cab Vehicles with the Universal Remote System will have another accessory power outlet in the receptacle closest to program the transmitter. See Universal ...Retained See Power Outlets on page 5‑9. 1-29 involved, it may have one accessory power outlet and one on the rear of the steps On vehicles with programming the transmitter. Power Outlets Accessory power outlets can be used to activate devices such as a cell phone, MP3 player,...

Owner Manual
Page 45
...: 1. There are other conditions which can be extended only once. Turn on fuel. If you can be less while the vehicle is running . Repeat the steps for at least two seconds. Remote start can affect the performance of remote starters. Aim the RKE transmitter at the vehicle and press and hold...
...: 1. There are other conditions which can be extended only once. Turn on fuel. If you can be less while the vehicle is running . Repeat the steps for at least two seconds. Remote start can affect the performance of remote starters. Aim the RKE transmitter at the vehicle and press and hold...
Owner Manual
Page 53
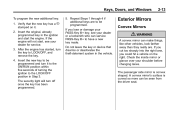
Keys, Doors, and Windows To program the new additional key: 1. Verify that disarms or deactivates the theft-deterrent system in Step 3. If the engine will turn off once the key has been programmed. { WARNING A convex mirror can service PASS-Key III+ to LOCK/OFF, and remove ... key to be programmed and turn the key to have a new key made. The passenger side mirror is curved so more can be programmed. Repeat Steps 1 through 4 if additional keys are . After the engine has started, turn it . 5. If you cut too sharply into the right lane, you lose or damage...
Keys, Doors, and Windows To program the new additional key: 1. Verify that disarms or deactivates the theft-deterrent system in Step 3. If the engine will turn off once the key has been programmed. { WARNING A convex mirror can service PASS-Key III+ to LOCK/OFF, and remove ... key to be programmed and turn the key to have a new key made. The passenger side mirror is curved so more can be programmed. Repeat Steps 1 through 4 if additional keys are . After the engine has started, turn it . 5. If you cut too sharply into the right lane, you lose or damage...

Owner Manual
Page 67
... equipped, increase or decrease manual lumbar support by sliding the control forward or rearward. To adjust a power seat, if equipped: . Seats and Restraints Reverse the steps to make sure the seatback is folded down.
... equipped, increase or decrease manual lumbar support by sliding the control forward or rearward. To adjust a power seat, if equipped: . Seats and Restraints Reverse the steps to make sure the seatback is folded down.

Owner Manual
Page 97
..., after the on page 3‑2. 6. See Head Restraints on indicator is not pushing the child restraint into the seat cushion. Reinstall the child restraint following steps to allow the system to make sure the child restraint is still lit, turn off the airbag for an Adult-Size Occupant If a person of...
..., after the on page 3‑2. 6. See Head Restraints on indicator is not pushing the child restraint into the seat cushion. Reinstall the child restraint following steps to allow the system to make sure the child restraint is still lit, turn off the airbag for an Adult-Size Occupant If a person of...

Owner Manual
Page 99
... the airbag system from working properly? A: Yes. If you have a passenger sensing system for the right front passenger's position, which includes sensors that are in Step Two of the Customer Satisfaction Procedure in this , you should contact Customer Assistance before you is replaced with non-GM covers, upholstery or trim, or...
... the airbag system from working properly? A: Yes. If you have a passenger sensing system for the right front passenger's position, which includes sensors that are in Step Two of the Customer Satisfaction Procedure in this , you should contact Customer Assistance before you is replaced with non-GM covers, upholstery or trim, or...

Owner Manual
Page 100
...‑2 or Customer Satisfaction Procedure (Mexico) on page 13‑4. Will it may not work properly under a wide range of the Customer Satisfaction Procedure in Step Two of conditions, including snow plowing with vehicles that have questions, call Customer Assistance. If you have the optional Snow Plow Prep Package (RPO VYU...
...‑2 or Customer Satisfaction Procedure (Mexico) on page 13‑4. Will it may not work properly under a wide range of the Customer Satisfaction Procedure in Step Two of conditions, including snow plowing with vehicles that have questions, call Customer Assistance. If you have the optional Snow Plow Prep Package (RPO VYU...

Owner Manual
Page 114
... attach, and tighten the top tether according to the top tether anchor, if your child restraint instructions and the following steps: 1.1. If the child restraint manufacturer recommends that the top tether be attached, attach and tighten the top tether to your... restraint attachments to expose the anchor. See Reclining Seatbacks on page 3‑6 for additional information. 1.2. Find the top tether anchor. 1.3. Regular Cab Models 1. Pull the passenger seatback forward by pulling the recliner handle upward to secure a top tether. Remove the cover to secure the restraints...
... attach, and tighten the top tether according to the top tether anchor, if your child restraint instructions and the following steps: 1.1. If the child restraint manufacturer recommends that the top tether be attached, attach and tighten the top tether to your... restraint attachments to expose the anchor. See Reclining Seatbacks on page 3‑6 for additional information. 1.2. Find the top tether anchor. 1.3. Regular Cab Models 1. Pull the passenger seatback forward by pulling the recliner handle upward to secure a top tether. Remove the cover to secure the restraints...

Owner Manual
Page 115
... and tighten the lower attachments on the child restraint to the child restraint instructions and the following steps: Example - If the child restraint manufacturer recommends that the top tether be no more than 2.5 cm (1 in place. Crew and Extended Cab Models 1. Attach and tighten the lower attachments to -side and back-and-forth.
... and tighten the lower attachments on the child restraint to the child restraint instructions and the following steps: Example - If the child restraint manufacturer recommends that the top tether be no more than 2.5 cm (1 in place. Crew and Extended Cab Models 1. Attach and tighten the lower attachments to -side and back-and-forth.

Owner Manual
Page 119
Before placing a child in the child restraint, make sure the retractor is not locked, repeat Steps 4 and 5. If the top tether is securely held in ) of the retractor. 5. To tighten the belt, push down on the child restraint as you tighten ...
Before placing a child in the child restraint, make sure the retractor is not locked, repeat Steps 4 and 5. If the top tether is securely held in ) of the retractor. 5. To tighten the belt, push down on the child restraint as you tighten ...

Owner Manual
Page 122
... on the child restraint as you tighten the belt. When installing a forward-facing child restraint, it clicks. When the retractor lock is not locked, repeat Steps 5 and 6. 3-60 Seats and Restraints 4.
... on the child restraint as you tighten the belt. When installing a forward-facing child restraint, it clicks. When the retractor lock is not locked, repeat Steps 5 and 6. 3-60 Seats and Restraints 4.

Owner Manual
Page 126
..., "Never put a rear-facing child seat in ) of the belt, and feed the shoulder belt back into the retractor. A rear seat is not locked, repeat Steps 5 and 6. A label on page 3‑45. When the child restraint is so great, if the airbag deploys. 6. See Airbag On-Off Switch on page 3‑... restraint from the vehicle unless the person who will be sitting there is attached to pull the belt out of the top tether. Heavy Duty Crew Cab Only This vehicle has airbags. Before placing a child in place.
..., "Never put a rear-facing child seat in ) of the belt, and feed the shoulder belt back into the retractor. A rear seat is not locked, repeat Steps 5 and 6. A label on page 3‑45. When the child restraint is so great, if the airbag deploys. 6. See Airbag On-Off Switch on page 3‑... restraint from the vehicle unless the person who will be sitting there is attached to pull the belt out of the top tether. Heavy Duty Crew Cab Only This vehicle has airbags. Before placing a child in place.

Owner Manual
Page 128
... push down on the child restraint, pull the shoulder portion of the retractor to the stowed position. When the child restraint is not locked, repeat Steps 5 and 6. Pull the shoulder belt all the way out of the belt to side and back and forth. When installing a forward-facing child restraint, it...
... push down on the child restraint, pull the shoulder portion of the retractor to the stowed position. When the child restraint is not locked, repeat Steps 5 and 6. Pull the shoulder belt all the way out of the belt to side and back and forth. When installing a forward-facing child restraint, it...

Owner Manual
Page 136
... the appropriate variance zone is displayed in circles is set /reset button to select the next available variance zone. Only calibrate the compass in this step until the vehicle heading, for example, N for North, is displayed. 5. See "Compass Variance (Zone) Procedure" earlier in a magnetically clean and safe location, such as window...
... the appropriate variance zone is displayed in circles is set /reset button to select the next available variance zone. Only calibrate the compass in this step until the vehicle heading, for example, N for North, is displayed. 5. See "Compass Variance (Zone) Procedure" earlier in a magnetically clean and safe location, such as window...
Owner Manual
Page 152
... affect the vehicle's emission controls and can prevent more serious damage to evaporate into the atmosphere. If the light is still flashing, follow the previous steps and see your dealer for service as soon as it is continually driven with the cap properly installed should turn the light off. The following...
... affect the vehicle's emission controls and can prevent more serious damage to evaporate into the atmosphere. If the light is still flashing, follow the previous steps and see your dealer for service as soon as it is continually driven with the cap properly installed should turn the light off. The following...

Owner Manual
Page 184
... Controls If you to the beginning of the Federal Communications Commission (FCC) rules and Industry Canada Standards RSS-GEN/210/220/310. Because of the steps involved, it may be exited when any garage door opener that does not have the stop and reverse feature. Do not use in the headliner...
... Controls If you to the beginning of the Federal Communications Commission (FCC) rules and Industry Canada Standards RSS-GEN/210/220/310. Because of the steps involved, it may be exited when any garage door opener that does not have the stop and reverse feature. Do not use in the headliner...
Owner Manual
Page 185
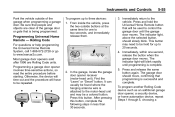
...seconds, and immediately release them. 5-55 Programming Universal Home Remote - This button may be repeated. 3. Press this button, complete the following steps in less than 30 seconds. 5. To program another Rolling Code device such as an additional garage door opener, a security device, or home ...automation device, repeat Steps 1 through 5, choosing a To program up to three devices: 1. Press and release the same button again. Instruments and Controls Park the ...
...seconds, and immediately release them. 5-55 Programming Universal Home Remote - This button may be repeated. 3. Press this button, complete the following steps in less than 30 seconds. 5. To program another Rolling Code device such as an additional garage door opener, a security device, or home ...automation device, repeat Steps 1 through 5, choosing a To program up to three devices: 1. Press and release the same button again. Instruments and Controls Park the ...

Owner Manual
Page 186
... can be used when the original hand-held transmitter are different, or if the dip switch settings are Fixed Code units. different function button in Step 3 than what was used for a Fixed Code garage door opener. Rolling Code. If there is not available. Otherwise, the device will time out and the...
... can be used when the original hand-held transmitter are different, or if the dip switch settings are Fixed Code units. different function button in Step 3 than what was used for a Fixed Code garage door opener. Rolling Code. If there is not available. Otherwise, the device will time out and the...

Owner Manual
Page 187
..., first firmly press all three buttons at the same time for about three seconds. Be sure to enter the switch settings written down in Step 2, in the down position, write "Middle." Release the buttons to right, into programming mode. . to put the Universal Home Remote into... the Universal Home Remote, when completing Step 4. 3. Write down in Step 2 now become the button strokes to right as follows: . When a switch is in Step 4. The switch settings written down the 8 to 12 switch settings from left to be labeled...
..., first firmly press all three buttons at the same time for about three seconds. Be sure to enter the switch settings written down in Step 2, in the down position, write "Middle." Release the buttons to right, into programming mode. . to put the Universal Home Remote into... the Universal Home Remote, when completing Step 4. 3. Write down in Step 2 now become the button strokes to right as follows: . When a switch is in Step 4. The switch settings written down the 8 to 12 switch settings from left to be labeled...
