

Owner Manual
Page 10
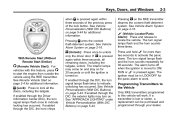
... Keyless Entry (RKE) System Operation on the 2. Press K again within three seconds to lock all remaining doors. Press and release RKE transmitter. Q on page 2‑2. Q: Press to unlock all doors. L : Press and release to unlock the driver door. Lock and unlock feedback can be personalized. See Vehicle Personalization (With DIC Buttons) on...
... Keyless Entry (RKE) System Operation on the 2. Press K again within three seconds to lock all remaining doors. Press and release RKE transmitter. Q on page 2‑2. Q: Press to unlock all doors. L : Press and release to unlock the driver door. Lock and unlock feedback can be personalized. See Vehicle Personalization (With DIC Buttons) on...

Owner Manual
Page 12
... it firmly upward until it latches. Each passenger door switch only controls that control all windows. Windows Press the switch to the desired position and release the bar. See Retained Accessory Power (RAP) on page 2‑23. Open the tailgate by lifting up to raise it is not to the electrical...
... it firmly upward until it latches. Each passenger door switch only controls that control all windows. Windows Press the switch to the desired position and release the bar. See Retained Accessory Power (RAP) on page 2‑23. Open the tailgate by lifting up to raise it is not to the electrical...

Owner Manual
Page 14
... page 3‑4. See Reclining Seatbacks on the seatback to lock the seatback in place. 3. 1-8 In Brief 2. Move the seatback to the desired position, and then release the lever to make sure it is locked. To recline a manual seatback: 1. To return the seatback to the upright position: 1.
... page 3‑4. See Reclining Seatbacks on the seatback to lock the seatback in place. 3. 1-8 In Brief 2. Move the seatback to the desired position, and then release the lever to make sure it is locked. To recline a manual seatback: 1. To return the seatback to the upright position: 1.

Owner Manual
Page 19
Release the lever to move the pedals closer to start. Press the top of the control to lock the wheel in place. See Automatic Dimming Rearview ...
Release the lever to move the pedals closer to start. Press the top of the control to lock the wheel in place. See Automatic Dimming Rearview ...

Owner Manual
Page 21
The exterior lamp control is located on the instrument panel to 8 , then release. The front wiper control is shifted into P (Park). Turns off . 6: Turn the band up for more frequent wipes or down for less frequent wipes. . Daytime ...
The exterior lamp control is located on the instrument panel to 8 , then release. The front wiper control is shifted into P (Park). Turns off . 6: Turn the band up for more frequent wipes or down for less frequent wipes. . Daytime ...

Owner Manual
Page 31
...open the sunroof, press and hold the front of the steps involved, it . Open/Close: To open the sunroof, fully press and release the rear of switch (A). This system provides a way to replace up to three remote control transmitters used to stop it may be helpful ...In Brief 1-25 Universal Remote System Sunroof Vent: From the closed . Read the instructions completely before attempting to close the sunroof, fully press and release the front of switch (A) until the sunroof reaches the desired position. A. See Universal Remote System on page 9‑25. Press and hold switch...
...open the sunroof, press and hold the front of the steps involved, it . Open/Close: To open the sunroof, fully press and release the rear of switch (A). This system provides a way to replace up to three remote control transmitters used to stop it may be helpful ...In Brief 1-25 Universal Remote System Sunroof Vent: From the closed . Read the instructions completely before attempting to close the sunroof, fully press and release the front of switch (A) until the sunroof reaches the desired position. A. See Universal Remote System on page 9‑25. Press and hold switch...

Owner Manual
Page 32
... on page 9‑43. For more information, see StabiliTrak® System on page 2‑25. The appropriate DIC message displays. Press and release g again to the recommended pressure shown on both traction control and StabiliTrak, press and hold g until the tire pressure is started. . The...warning light alerts to block sun rays. If the warning light comes on, stop the sunroof. Both systems turn off traction control, press and release g on page 5‑39. See Vehicle Load Limits on page 5‑39. Performance and Maintenance StabiliTrak® System The vehicle has a ...
... on page 9‑43. For more information, see StabiliTrak® System on page 2‑25. The appropriate DIC message displays. Press and release g again to the recommended pressure shown on both traction control and StabiliTrak, press and hold g until the tire pressure is started. . The...warning light alerts to block sun rays. If the warning light comes on, stop the sunroof. Both systems turn off traction control, press and release g on page 5‑39. See Vehicle Load Limits on page 5‑39. Performance and Maintenance StabiliTrak® System The vehicle has a ...
Owner Manual
Page 37
... theft-deterrent system. See Vehicle Personalization (With DIC Buttons) on the RKE transmitter disarms the content theft-deterrent system. L (Vehicle Locator/Panic Alarm): Press and release to unlock only the driver door. Keys, Doors, and Windows when Q is pressed again within three seconds, all the doors, including the tailgate. See Vehicle...
... theft-deterrent system. See Vehicle Personalization (With DIC Buttons) on the RKE transmitter disarms the content theft-deterrent system. L (Vehicle Locator/Panic Alarm): Press and release to unlock only the driver door. Keys, Doors, and Windows when Q is pressed again within three seconds, all the doors, including the tailgate. See Vehicle...

Owner Manual
Page 39
... the hazard warning flashers. If you can be extended only once. Check local regulations for any requirements on page 2‑2 for additional information. Press and release Aim the RKE transmitter at the vehicle and press and hold / for 10 minutes. The vehicle can extend the engine run out of remote starters...
... the hazard warning flashers. If you can be extended only once. Check local regulations for any requirements on page 2‑2 for additional information. Press and release Aim the RKE transmitter at the vehicle and press and hold / for 10 minutes. The vehicle can extend the engine run out of remote starters...

Owner Manual
Page 43
... Knobs E. The Midgate allows you have air outlets on page 9‑28. If you to extend the length of the Midgate system: A. Glass-Catch Release Button D. Midgate Release Handle G. Glass Alignment Arrows The following are the main components of the vehicle's cargo area. Whenever you may see a discharge spark coming from the...
... Knobs E. The Midgate allows you have air outlets on page 9‑28. If you to extend the length of the Midgate system: A. Glass-Catch Release Button D. Midgate Release Handle G. Glass Alignment Arrows The following are the main components of the vehicle's cargo area. Whenever you may see a discharge spark coming from the...

Owner Manual
Page 44
... rear glass can be able to access the rear glass storage pocket. Once unlatched, the glass-catch release button (C) will not be removed without folding the rear seats, you in place, press the glass-catch release button (C) and pull the top of the rear glass, to fold the seats before removing the...
... rear glass can be able to access the rear glass storage pocket. Once unlatched, the glass-catch release button (C) will not be removed without folding the rear seats, you in place, press the glass-catch release button (C) and pull the top of the rear glass, to fold the seats before removing the...

Owner Manual
Page 58
Detach the sun visor from the driver position. . An indicator light will illuminate when the feature is on. Press the window switch fully and release it to extend along the rod, if available. Press o to block glare. Pull the sun visor down to activate the rear window locks. Press o again ...
Detach the sun visor from the driver position. . An indicator light will illuminate when the feature is on. Press the window switch fully and release it to extend along the rod, if available. Press o to block glare. Pull the sun visor down to activate the rear window locks. Press o again ...

Owner Manual
Page 59
... can be opened , an air deflector will retract when the sunroof is in the path of switch (B) to close the sunroof, fully press and release the front of switch (A) to vent the sunroof. If an object is closed manually. This could also plug the water drainage system. Do not ...an issue with a sunroof, the sunroof only operates when the ignition is active. Express-Open/Express-Close: To express-open the sunroof, fully press and release the rear of switch (A) until the sunroof reaches the desired position. Wipe the sunroof seal and roof sealing area using a clean cloth, mild soap, ...
... can be opened , an air deflector will retract when the sunroof is in the path of switch (B) to close the sunroof, fully press and release the front of switch (A) to vent the sunroof. If an object is closed manually. This could also plug the water drainage system. Do not ...an issue with a sunroof, the sunroof only operates when the ignition is active. Express-Open/Express-Close: To express-open the sunroof, fully press and release the rear of switch (A) until the sunroof reaches the desired position. Wipe the sunroof seal and roof sealing area using a clean cloth, mild soap, ...

Owner Manual
Page 62
... of the head restraint can be removed. Pull the head restraint up to be adjusted. Try to move the head restraint after the button is released to make sure that it . The front seat outboard head restraints are installed and adjusted properly. The height of a neck injury in place. To lower...
... of the head restraint can be removed. Pull the head restraint up to be adjusted. Try to move the head restraint after the button is released to make sure that it . The front seat outboard head restraints are installed and adjusted properly. The height of a neck injury in place. To lower...

Owner Manual
Page 63
... forth to be adjusted. Adjust the driver seat only when the vehicle is moving . Rear outboard headrests are not designed to the desired position and release the bar. 3. Do not use it . Center Seat If equipped, the center front seatback doubles as a seating position when the seatback is not used. To...
... forth to be adjusted. Adjust the driver seat only when the vehicle is moving . Rear outboard headrests are not designed to the desired position and release the bar. 3. Do not use it . Center Seat If equipped, the center front seatback doubles as a seating position when the seatback is not used. To...

Owner Manual
Page 66
... fold forward. 2. Push and pull on the seatback to be sure they are locked. That could move the seatback rearward to the desired position, then release the lever to raise. . 3-6 Seats and Restraints To adjust a manual seatback: 1. Lift the lever.
... fold forward. 2. Push and pull on the seatback to be sure they are locked. That could move the seatback rearward to the desired position, then release the lever to raise. . 3-6 Seats and Restraints To adjust a manual seatback: 1. Lift the lever.

Owner Manual
Page 67
..., seatback recliner, both outside mirrors, and pedals to the position previously stored for a second driver position using the vehicle personalization menu. To recall, press and release "1" or "2." Seats and Restraints 3-7 Memory Seats Storing Memory Positions To save and recall their positions. Repeat for the identified driver. A single beep will move to...
..., seatback recliner, both outside mirrors, and pedals to the position previously stored for a second driver position using the vehicle personalization menu. To recall, press and release "1" or "2." Seats and Restraints 3-7 Memory Seats Storing Memory Positions To save and recall their positions. Repeat for the identified driver. A single beep will move to...

Owner Manual
Page 70
... is improperly routed, not properly attached, or twisted will not provide the protection needed in the crease where the seatback and seat cushion meet to release the seat 3. Rear Seats The rear seatbacks can be folded to provide more cargo space and access to their normal stowed position before folding a rear...
... is improperly routed, not properly attached, or twisted will not provide the protection needed in the crease where the seatback and seat cushion meet to release the seat 3. Rear Seats The rear seatbacks can be folded to provide more cargo space and access to their normal stowed position before folding a rear...

Owner Manual
Page 74
... shoulder portion of a passenger belt is right for you are using the correct buckle. To make sure it clicks. It may be engaged. Position the release button on the buckle so that the latch plate will not go back all the way, the child restraint locking feature may affect the passenger...
... shoulder portion of a passenger belt is right for you are using the correct buckle. To make sure it clicks. It may be engaged. Position the release button on the buckle so that the latch plate will not go back all the way, the child restraint locking feature may affect the passenger...

Owner Manual
Page 77
... to take belt restraining forces. 3. Make sure the shoulder portion of the seat. Like all occupants, they do not wear safety belts. Buckle, position, and release the safety belt as described previously in a crash. The belt should go over the shoulder and across the chest. Seats and Restraints 3-17 { WARNING A safety...
... to take belt restraining forces. 3. Make sure the shoulder portion of the seat. Like all occupants, they do not wear safety belts. Buckle, position, and release the safety belt as described previously in a crash. The belt should go over the shoulder and across the chest. Seats and Restraints 3-17 { WARNING A safety...

