
Owner's Manual
Page 1
2012 Chevrolet Tahoe/Suburban Owner Manual M In Brief ...1-1 Instrument Panel ...1-2 Initial Drive Information ...1-4 Vehicle Features ...1-21 Performance and Maintenance ...1-28 Keys, Doors, and Windows ...2-1 Keys and Locks ...2-2 Doors ...2-10 Vehicle Security...2-15 Exterior Mirrors ...2-18 Interior... ...5-28 Vehicle Messages ...5-37 Vehicle Personalization ...5-47 Universal Remote System ...5-56 Lighting ...6-1 Exterior Lighting ...6-1 Interior Lighting ...6-7 Lighting Features ...6-9 Infotainment System ...7-1 Introduction ...7-1 Radio ...7-8 Audio Players ...7-14 Rear Seat Infotainment...
2012 Chevrolet Tahoe/Suburban Owner Manual M In Brief ...1-1 Instrument Panel ...1-2 Initial Drive Information ...1-4 Vehicle Features ...1-21 Performance and Maintenance ...1-28 Keys, Doors, and Windows ...2-1 Keys and Locks ...2-2 Doors ...2-10 Vehicle Security...2-15 Exterior Mirrors ...2-18 Interior... ...5-28 Vehicle Messages ...5-37 Vehicle Personalization ...5-47 Universal Remote System ...5-56 Lighting ...6-1 Exterior Lighting ...6-1 Interior Lighting ...6-7 Lighting Features ...6-9 Infotainment System ...7-1 Introduction ...7-1 Radio ...7-8 Audio Players ...7-14 Rear Seat Infotainment...

Owner's Manual
Page 7
... ...1-11 Heated and Ventilated Seats ...1-11 Head Restraint Adjustment ...1-12 Safety Belts ...Passenger Sensing System ...Mirror Adjustment ...Steering Wheel Adjustment ...Throttle and Brake Pedal Adjustment ...Interior Lighting ...Exterior Lighting ...Windshield Wiper/Washer ...Climate Controls ...Transmission ...Four-Wheel Drive ... 1-12 1-12 1-13 1-15 1-15 1-16 1-17 1-17 1-18 1-19 1-20 1-21 1-23...
... ...1-11 Heated and Ventilated Seats ...1-11 Head Restraint Adjustment ...1-12 Safety Belts ...Passenger Sensing System ...Mirror Adjustment ...Steering Wheel Adjustment ...Throttle and Brake Pedal Adjustment ...Interior Lighting ...Exterior Lighting ...Windshield Wiper/Washer ...Climate Controls ...Transmission ...Four-Wheel Drive ... 1-12 1-12 1-13 1-15 1-15 1-16 1-17 1-17 1-18 1-19 1-20 1-21 1-23...

Owner's Manual
Page 21
... dimming rearview mirror. To adjust the steering wheel: 1. Release the lever to lock the wheel in the center and move the pedals away. In Brief Interior Mirror Adjustment Hold the rearview mirror in place. 1-15 Steering Wheel Adjustment Do not adjust the steering wheel while driving. See Automatic Dimming Rearview Mirror...
... dimming rearview mirror. To adjust the steering wheel: 1. Release the lever to lock the wheel in the center and move the pedals away. In Brief Interior Mirror Adjustment Hold the rearview mirror in place. 1-15 Steering Wheel Adjustment Do not adjust the steering wheel while driving. See Automatic Dimming Rearview Mirror...

Owner's Manual
Page 22
...console. 1-16 In Brief Dome Lamp Override The dome lamp override button is turned counterclockwise. Reading Lamps on page 6‑8. For more information about interior lamps, see: . . Turn the instrument panel brightness knob located below the dome lamp override button, clockwise to the farthest position to return it...have reading lamps in the overhead console, press the button located next to the lamp to turn it to the exterior lamps control. Interior Lighting Dome Lamps The dome lamps are closed. The dome lamps remain on until the knob is located next to the extended position ...
...console. 1-16 In Brief Dome Lamp Override The dome lamp override button is turned counterclockwise. Reading Lamps on page 6‑8. For more information about interior lamps, see: . . Turn the instrument panel brightness knob located below the dome lamp override button, clockwise to the farthest position to return it...have reading lamps in the overhead console, press the button located next to the lamp to turn it to the exterior lamps control. Interior Lighting Dome Lamps The dome lamps are closed. The dome lamps remain on until the knob is located next to the extended position ...
Owner's Manual
Page 37
... ...2-3 Remote Vehicle Start ...2-6 Door Locks ...2-8 Power Door Locks ...2-9 Delayed Locking ...2-9 Automatic Door Locks ...2-9 Lockout Protection ...2-9 Safety Locks ...2-10 Doors Liftgate ...2-10 Power Assist Steps ...2-14 Interior Mirrors Manual Rearview Mirror ...2-22 Automatic Dimming Rearview Mirror ...2-22 Vehicle Security Vehicle Security ...Anti-theft Alarm System ...Immobilizer ...Immobilizer Operation ...2-15 2-15 2-17 2-17...
... ...2-3 Remote Vehicle Start ...2-6 Door Locks ...2-8 Power Door Locks ...2-9 Delayed Locking ...2-9 Automatic Door Locks ...2-9 Lockout Protection ...2-9 Safety Locks ...2-10 Doors Liftgate ...2-10 Power Assist Steps ...2-14 Interior Mirrors Manual Rearview Mirror ...2-22 Automatic Dimming Rearview Mirror ...2-22 Vehicle Security Vehicle Security ...Anti-theft Alarm System ...Immobilizer ...Immobilizer Operation ...2-15 2-15 2-17 2-17...
Owner's Manual
Page 40
... page 5‑47 for 20 seconds or until the ignition is pressed again. The turn signal lamps flash once to indicate unlocking has occurred. The interior lamps may come on and stay on . The taillamps flash and a chime sounds to indicate when the liftgate is dark enough outside. See Anti-theft...
... page 5‑47 for 20 seconds or until the ignition is pressed again. The turn signal lamps flash once to indicate unlocking has occurred. The interior lamps may come on and stay on . The taillamps flash and a chime sounds to indicate when the liftgate is dark enough outside. See Anti-theft...
Owner's Manual
Page 58
... the headlamps from behind the vehicle. If the vehicle has a RVC, the O button for turning the dimming feature on page 5‑47 for more information. Interior Mirrors Manual Rearview Mirror To adjust the inside rearview mirror. See Rear Vision Camera (RVC) on page 14‑1. See Vehicle Personalization (With DIC Buttons...
... the headlamps from behind the vehicle. If the vehicle has a RVC, the O button for turning the dimming feature on page 5‑47 for more information. Interior Mirrors Manual Rearview Mirror To adjust the inside rearview mirror. See Rear Vision Camera (RVC) on page 14‑1. See Vehicle Personalization (With DIC Buttons...

Owner's Manual
Page 88
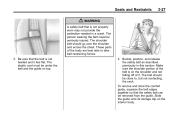
... the guide from the neck and head. When installed and properly adjusted, the comfort guide positions the belt away from its storage clip on the interior body. 2. There is how to install a comfort guide to the safety belt: 1. Place the guide over the belt, and insert the two edges of the...
... the guide from the neck and head. When installed and properly adjusted, the comfort guide positions the belt away from its storage clip on the interior body. 2. There is how to install a comfort guide to the safety belt: 1. Place the guide over the belt, and insert the two edges of the...
Owner's Manual
Page 89
... and store the comfort guide, squeeze the belt edges together so that the safety belt can be under the belt and the guide on the interior body.
... and store the comfort guide, squeeze the belt edges together so that the safety belt can be under the belt and the guide on the interior body.
Owner's Manual
Page 100
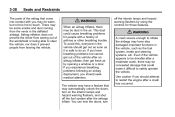
... get out as soon as the fuel system, brake and steering systems, etc. You can lock the doors, turn on the interior lamps and hazard warning flashers, and shut off the interior lamps and hazard warning flashers by opening a window or a door. 3-38 Seats and Restraints The parts of the airbag that...
... get out as soon as the fuel system, brake and steering systems, etc. You can lock the doors, turn on the interior lamps and hazard warning flashers, and shut off the interior lamps and hazard warning flashers by opening a window or a door. 3-38 Seats and Restraints The parts of the airbag that...
Owner's Manual
Page 199
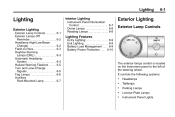
... Changer ...6-2 Flash-to-Pass ...6-3 Daytime Running Lamps (DRL) ...6-3 Automatic Headlamp System ...6-4 Hazard Warning Flashers ...6-5 Turn and Lane-Change Signals ...6-5 Fog Lamps ...6-6 Auxiliary Roof-Mounted Lamp ...6-7 Interior Lighting Instrument Panel Illumination Control ...6-7 Dome Lamps ...6-8 Reading Lamps ...6-8 Exterior Lighting Exterior Lamp Controls Lighting Features Entry Lighting ...6-9 Exit Lighting ...6-9 Battery Load Management ...6-9 Battery Power...
... Changer ...6-2 Flash-to-Pass ...6-3 Daytime Running Lamps (DRL) ...6-3 Automatic Headlamp System ...6-4 Hazard Warning Flashers ...6-5 Turn and Lane-Change Signals ...6-5 Fog Lamps ...6-6 Auxiliary Roof-Mounted Lamp ...6-7 Interior Lighting Instrument Panel Illumination Control ...6-7 Dome Lamps ...6-8 Reading Lamps ...6-8 Exterior Lighting Exterior Lamp Controls Lighting Features Entry Lighting ...6-9 Exit Lighting ...6-9 Battery Load Management ...6-9 Battery Power...

Owner's Manual
Page 205
... panel lights. Pressing the top of the button will turn off the roof‐mounted lamp and indicator. For more information on the dome lamps. Interior Lighting Instrument Panel Illumination Control D (Instrument Panel Brightness): This feature controls the brightness of the attached lamps should be turned. This button is located next...
... panel lights. Pressing the top of the button will turn off the roof‐mounted lamp and indicator. For more information on the dome lamps. Interior Lighting Instrument Panel Illumination Control D (Instrument Panel Brightness): This feature controls the brightness of the attached lamps should be turned. This button is located next...
Owner's Manual
Page 207
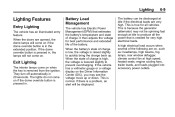
... idle if the electrical loads are on . When the state of the following are very high. This is removed from the ignition. Exit Lighting The interior lamps come on , such as: headlamps, high beams, fog lamps, rear window defogger, climate control fan at idle to quickly bring the charge back up...
... idle if the electrical loads are on . When the state of the following are very high. This is removed from the ignition. Exit Lighting The interior lamps come on , such as: headlamps, high beams, fog lamps, rear window defogger, climate control fan at idle to quickly bring the charge back up...

Owner's Manual
Page 257
... cell phone can be completed once, unless the pairing information on page 14‑1 for Bluetooth functions before it is moving. Infotainment System Noise: Keep interior noise levels to change the volume level.
... cell phone can be completed once, unless the pairing information on page 14‑1 for Bluetooth functions before it is moving. Infotainment System Noise: Keep interior noise levels to change the volume level.
Owner's Manual
Page 273
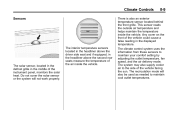
... the system will also be used as needed to maintain cool outlet temperatures. Any cover on the front of the air inside the vehicle. The interior temperature sensors located in the headliner above the driver side seat and if equipped, in the headliner above the second row seats measure the temperature...
... the system will also be used as needed to maintain cool outlet temperatures. Any cover on the front of the air inside the vehicle. The interior temperature sensors located in the headliner above the driver side seat and if equipped, in the headliner above the second row seats measure the temperature...

Owner's Manual
Page 290
... could crash. Have good tires with caution. If you do not shift down , other wet weather driving tips include: ... Allow extra following distance. Keep the interior temperature cool. Check the rearview mirror and vehicle instruments often. . . . . . . { WARNING If you become tired or sleepy, find a safe place to park the vehicle and...
... could crash. Have good tires with caution. If you do not shift down , other wet weather driving tips include: ... Allow extra following distance. Keep the interior temperature cool. Check the rearview mirror and vehicle instruments often. . . . . . . { WARNING If you become tired or sleepy, find a safe place to park the vehicle and...

Owner's Manual
Page 374
... these marks: Jump Starting Jump Starting ...10-89 Towing Towing the Vehicle ...10-93 Recreational Vehicle Towing ...10-93 Appearance Care Exterior Care ...10-99 Interior Care ...10-102 Floor Mats ...10-105 10-2 Vehicle Care When It Is Time for New Tires ...10-65 Buying New Tires ...10-66 Different...
... these marks: Jump Starting Jump Starting ...10-89 Towing Towing the Vehicle ...10-93 Recreational Vehicle Towing ...10-93 Appearance Care Exterior Care ...10-99 Interior Care ...10-102 Floor Mats ...10-105 10-2 Vehicle Care When It Is Time for New Tires ...10-65 Buying New Tires ...10-66 Different...
Owner's Manual
Page 419
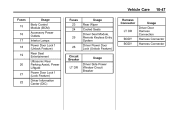
Vehicle Care Fuses 15 16 17 18 19 20 21 22 Usage Body Control Module (BCM) Accessory Power Outlets Interior Lamps Power Door Lock 1 (Unlock Feature) Rear Seat Entertainment Ultrasonic Rear Parking Assist, Power Liftgate Power Door Lock 1 (Lock Feature) Driver Information Center (DIC) 26 ...
Vehicle Care Fuses 15 16 17 18 19 20 21 22 Usage Body Control Module (BCM) Accessory Power Outlets Interior Lamps Power Door Lock 1 (Unlock Feature) Rear Seat Entertainment Ultrasonic Rear Parking Assist, Power Liftgate Power Door Lock 1 (Lock Feature) Driver Information Center (DIC) 26 ...

Owner's Manual
Page 474
...-102 Vehicle Care Use a soft bristle brush to remove dust from your dealer's body and paint shop. To prevent overspray, apply all interior surfaces or permanent damage may have products for the surfaces being cleaned to remain on the instrument cluster. Do not use a brush with ... and attracts dirt. Do not use approximately 20 drops per 3.78L (1 gal) of time. Your dealer may result. While cleaning the interior, maintain adequate ventilation by opening the doors and windows. Chemical Paint Spotting Airborne pollutants can also permanently transfer color to the cleaning cloth. ...
...-102 Vehicle Care Use a soft bristle brush to remove dust from your dealer's body and paint shop. To prevent overspray, apply all interior surfaces or permanent damage may have products for the surfaces being cleaned to remain on the instrument cluster. Do not use a brush with ... and attracts dirt. Do not use approximately 20 drops per 3.78L (1 gal) of time. Your dealer may result. While cleaning the interior, maintain adequate ventilation by opening the doors and windows. Chemical Paint Spotting Airborne pollutants can also permanently transfer color to the cleaning cloth. ...
Owner's Manual
Page 475
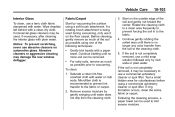
... use a commercial upholstery cleaner or spot lifter. Following the cleaning process, a paper towel can be used , if necessary, after cleaning the interior glass with plain water. To clean: 1. Wipe droplets left behind with water or club soda. For solid soils, remove as much of the... following techniques: . 3. Vehicle Care Interior Glass To clean, use a terry cloth fabric dampened with a paper towel. Continue gently rubbing the soiled area until there is not completely removed,...
... use a commercial upholstery cleaner or spot lifter. Following the cleaning process, a paper towel can be used , if necessary, after cleaning the interior glass with plain water. To clean: 1. Wipe droplets left behind with water or club soda. For solid soils, remove as much of the... following techniques: . 3. Vehicle Care Interior Glass To clean, use a terry cloth fabric dampened with a paper towel. Continue gently rubbing the soiled area until there is not completely removed,...


