

Owner's Manual
Page 1
2012 Chevrolet Colorado Owner Manual M In Brief ...1-1 Instrument Panel ...1-2 Initial Drive Information ...1-3 Vehicle Features ...1-15 Performance and Maintenance ...1-17 Keys, Doors, and Windows ...2-1 Keys and Locks ...2-2 Doors ...2-7 Vehicle Security...2-10 Exterior Mirrors ...2-13 Interior... Warning Lights, Gauges, and Indicators ...5-6 Information Displays ...5-20 Vehicle Messages ...5-23 Lighting ...6-1 Exterior Lighting ...6-1 Interior Lighting ...6-6 Lighting Features ...6-7 Infotainment System ...7-1 Introduction ...7-1 Radio ...7-7 Audio Players ...7-15 Phone ...7-21 Climate ...
2012 Chevrolet Colorado Owner Manual M In Brief ...1-1 Instrument Panel ...1-2 Initial Drive Information ...1-3 Vehicle Features ...1-15 Performance and Maintenance ...1-17 Keys, Doors, and Windows ...2-1 Keys and Locks ...2-2 Doors ...2-7 Vehicle Security...2-10 Exterior Mirrors ...2-13 Interior... Warning Lights, Gauges, and Indicators ...5-6 Information Displays ...5-20 Vehicle Messages ...5-23 Lighting ...6-1 Exterior Lighting ...6-1 Interior Lighting ...6-6 Lighting Features ...6-7 Infotainment System ...7-1 Introduction ...7-1 Radio ...7-7 Audio Players ...7-15 Phone ...7-21 Climate ...
Owner's Manual
Page 7
... Entry (RKE) System ...Door Locks ...Tailgate ...Windows ...Seat Adjustment ...Heated Seats ...Head Restraint Adjustment ...Safety Belts ...1-3 1-4 1-4 1-5 1-6 1-7 1-8 1-8 1-8 Passenger Sensing System ...1-9 Mirror Adjustment ...1-9 Steering Wheel Adjustment ...1-11 Interior Lighting ...1-11 Exterior Lighting ...1-12 Windshield Wiper/Washer ...1-12 Climate Controls ...1-13 Four-Wheel Drive ...1-14 Performance and Maintenance Traction Control System (TCS) ...1-17 StabiliTrak...
... Entry (RKE) System ...Door Locks ...Tailgate ...Windows ...Seat Adjustment ...Heated Seats ...Head Restraint Adjustment ...Safety Belts ...1-3 1-4 1-4 1-5 1-6 1-7 1-8 1-8 1-8 Passenger Sensing System ...1-9 Mirror Adjustment ...1-9 Steering Wheel Adjustment ...1-11 Interior Lighting ...1-11 Exterior Lighting ...1-12 Windshield Wiper/Washer ...1-12 Climate Controls ...1-13 Four-Wheel Drive ...1-14 Performance and Maintenance Traction Control System (TCS) ...1-17 StabiliTrak...
Owner's Manual
Page 16
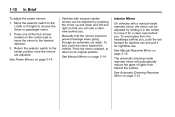
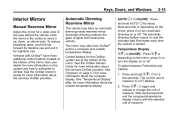
... rearview mirror will automatically reduce the glare of the four arrows located on the control pad to move it for a clear view behind the vehicle. Interior Mirror On vehicles with manual outside mirrors can see a clear view behind you . Move the selector switch to the L (left and right so that you...
... rearview mirror will automatically reduce the glare of the four arrows located on the control pad to move it for a clear view behind the vehicle. Interior Mirror On vehicles with manual outside mirrors can see a clear view behind you . Move the selector switch to the L (left and right so that you...
Owner's Manual
Page 17
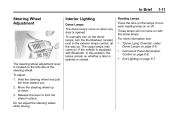
In Brief 1-11 Steering Wheel Adjustment Interior Lighting Dome Lamps The dome lamps come on with Bluetooth. These lamps will not come on page 6‑6. Exit Lighting on page 6‑6. Hold the ...
In Brief 1-11 Steering Wheel Adjustment Interior Lighting Dome Lamps The dome lamps come on with Bluetooth. These lamps will not come on page 6‑6. Exit Lighting on page 6‑6. Hold the ...
Owner's Manual
Page 29
...) System ...Remote Keyless Entry (RKE) System Operation ...Door Locks ...Power Door Locks ...Automatic Door Locks ...Lockout Protection ...Safety Locks (Crew Cab) ...2-2 2-2 2-3 2-5 2-6 2-6 2-6 2-6 Doors Rear Doors ...2-7 Tailgate ...2-8 Interior Mirrors Manual Rearview Mirror ...2-15 Automatic Dimming Rearview Mirror ...2-15 Vehicle Security Vehicle Security ...2-10 Anti-theft Alarm System ...2-10 Immobilizer ...2-11 Immobilizer Operation (PASS...
...) System ...Remote Keyless Entry (RKE) System Operation ...Door Locks ...Power Door Locks ...Automatic Door Locks ...Lockout Protection ...Safety Locks (Crew Cab) ...2-2 2-2 2-3 2-5 2-6 2-6 2-6 2-6 Doors Rear Doors ...2-7 Tailgate ...2-8 Interior Mirrors Manual Rearview Mirror ...2-15 Automatic Dimming Rearview Mirror ...2-15 Vehicle Security Vehicle Security ...2-10 Anti-theft Alarm System ...2-10 Immobilizer ...2-11 Immobilizer Operation (PASS...
Owner's Manual
Page 31
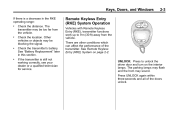
...: Press to 9 m (30 ft) away from the vehicle. The transmitter may be too far from the vehicle. See Remote Keyless Entry (RKE) System on the interior lamps. See "Battery Replacement" later in the RKE operating range: . 2-3 Check the distance. There are other conditions which can affect the performance of the doors...
...: Press to 9 m (30 ft) away from the vehicle. The transmitter may be too far from the vehicle. See Remote Keyless Entry (RKE) System on the interior lamps. See "Battery Replacement" later in the RKE operating range: . 2-3 Check the distance. There are other conditions which can affect the performance of the doors...
Owner's Manual
Page 43
... are at the bottom of lights from behind the vehicle. Automatic dimming reduces the glare of the mirror. Y b / O (On/Off): Keys, Doors, and Windows 2-15 Interior Mirrors Manual Rearview Mirror Adjust this mirror for more information about the services OnStar provides. The mirror may have OnStar® and/or a compass and...
... are at the bottom of lights from behind the vehicle. Automatic dimming reduces the glare of the mirror. Y b / O (On/Off): Keys, Doors, and Windows 2-15 Interior Mirrors Manual Rearview Mirror Adjust this mirror for more information about the services OnStar provides. The mirror may have OnStar® and/or a compass and...
Owner's Manual
Page 64
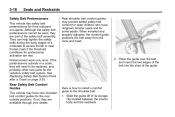
... once. Place the guide over the belt and insert the two edges of the belt into the slots of its storage clip located between the interior body and the seatback. Slide the guide off of the guide. Here is how to install a comfort guide to severe frontal or near frontal crash...
... once. Place the guide over the belt and insert the two edges of the belt into the slots of its storage clip located between the interior body and the seatback. Slide the guide off of the guide. Here is how to install a comfort guide to severe frontal or near frontal crash...

Owner's Manual
Page 65
... , but not contacting, the neck. The elastic cord must be removed from the guide. Slide the guide back on its storage clip located between the interior body and the seatback. These parts of it lies flat. Seats and Restraints 3-17 { WARNING A safety belt that is not properly worn may not provide...
... , but not contacting, the neck. The elastic cord must be removed from the guide. Slide the guide back on its storage clip located between the interior body and the seatback. These parts of it lies flat. Seats and Restraints 3-17 { WARNING A safety belt that is not properly worn may not provide...
Owner's Manual
Page 74
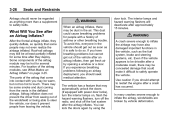
... the vehicle appears to be drivable after a moderate crash, there may be concealed damage that come into contact with power door locks), turn the interior lamps on page 3‑25. Use caution if you should seek medical attention. This dust could make it is safe to do so. The... doors (if equipped with you have also damaged important functions in the vehicle should get fresh air by opening a window or a door. The interior lamps and hazard warning flashers will deactivate after an airbag inflates, then get out as soon as the fuel system, brake and steering systems, etc...
... the vehicle appears to be drivable after a moderate crash, there may be concealed damage that come into contact with power door locks), turn the interior lamps on page 3‑25. Use caution if you should seek medical attention. This dust could make it is safe to do so. The... doors (if equipped with you have also damaged important functions in the vehicle should get fresh air by opening a window or a door. The interior lamps and hazard warning flashers will deactivate after an airbag inflates, then get out as soon as the fuel system, brake and steering systems, etc...
Owner's Manual
Page 141
O (Off): 2 (Headlamps): Turns on the headlamps, together with the following : Sidemarker Lamps Taillamps License Plate Lamps Instrument Panel Lights O (Exterior Lamps): Interior Lighting Instrument Panel Illumination Control ...6-6 Dome Lamps ...6-6 Turn the knob, located to the right of this symbol, to -Pass ...6-2 Daytime Running Lamps (DRL) ...6-3 Automatic Headlamp ...
O (Off): 2 (Headlamps): Turns on the headlamps, together with the following : Sidemarker Lamps Taillamps License Plate Lamps Instrument Panel Lights O (Exterior Lamps): Interior Lighting Instrument Panel Illumination Control ...6-6 Dome Lamps ...6-6 Turn the knob, located to the right of this symbol, to -Pass ...6-2 Daytime Running Lamps (DRL) ...6-3 Automatic Headlamp ...

Owner's Manual
Page 146
..., and radio display do not dim to the out position. Reading Lamps Press the lens on the lamps to make the dome lamps remain off . Interior Lighting Instrument Panel Illumination Control D (Instrument Panel Lights): Turn the thumbwheel up will turn on whether a door is equipped with the dome lamps. These lamps...
..., and radio display do not dim to the out position. Reading Lamps Press the lens on the lamps to make the dome lamps remain off . Interior Lighting Instrument Panel Illumination Control D (Instrument Panel Lights): Turn the thumbwheel up will turn on whether a door is equipped with the dome lamps. These lamps...
Owner's Manual
Page 147
... . If the vehicle has a voltmeter gauge or a voltage display on the Driver Information Center (DIC), you may be displayed. Lighting 6-7 Lighting Features Exit Lighting The interior lamps will not come on when the key is removed from running down . It can increase engine idle speed to quickly bring the charge back...
... . If the vehicle has a voltmeter gauge or a voltage display on the Driver Information Center (DIC), you may be displayed. Lighting 6-7 Lighting Features Exit Lighting The interior lamps will not come on when the key is removed from running down . It can increase engine idle speed to quickly bring the charge back...
Owner's Manual
Page 171
Noise: Keep interior noise levels to change the volume level. Use the audio system volume knob, during a call, to a minimum. Refer to the vehicle as a phone and an ...
Noise: Keep interior noise levels to change the volume level. Use the audio system volume knob, during a call, to a minimum. Refer to the vehicle as a phone and an ...
Owner's Manual
Page 180
... Mode Control: Turn the knob clockwise or counterclockwise to increase or decrease the fan speed. Cooler air is not available in this could cause the interior window to the position of fog or frost more quickly.
... Mode Control: Turn the knob clockwise or counterclockwise to increase or decrease the fan speed. Cooler air is not available in this could cause the interior window to the position of fog or frost more quickly.
Owner's Manual
Page 195
When the vehicle is to park the vehicle and rest. Other driving tips include: . . Allow extra following distance. See Tires on the water. Keep the interior temperature cool. This can build up under the vehicle's tires so they actually ride on page 10‑47. The best advice is hydroplaning, it ...
When the vehicle is to park the vehicle and rest. Other driving tips include: . . Allow extra following distance. See Tires on the water. Keep the interior temperature cool. This can build up under the vehicle's tires so they actually ride on page 10‑47. The best advice is hydroplaning, it ...
Owner's Manual
Page 252
... parts and GM-trained and supported service people. Towing Towing the Vehicle ...10-91 Recreational Vehicle Towing ...10-91 Appearance Care Exterior Care ...10-96 Interior Care ...10-99 Floor Mats ...10-102
... parts and GM-trained and supported service people. Towing Towing the Vehicle ...10-91 Recreational Vehicle Towing ...10-91 Appearance Care Exterior Care ...10-96 Interior Care ...10-99 Floor Mats ...10-102
Owner's Manual
Page 349
... grease on weatherstrips with touch-up , binding, leaks, cracks, chafing, etc. Immediately remove any soils. Interior Care To prevent dirt particle abrasions, regularly clean the vehicle's interior. Sheet Metal Damage If the vehicle is damaged and requires sheet metal repair or replacement, make them last ... material to parts repaired or replaced to avoid corrosion. Note that newspapers or dark garments that can transfer color to the vehicle's interior. Visually check constant velocity joints, rubber boots, and axle seals for leaks. 10-99 Underbody Maintenance Use plain water to flush...
... grease on weatherstrips with touch-up , binding, leaks, cracks, chafing, etc. Immediately remove any soils. Interior Care To prevent dirt particle abrasions, regularly clean the vehicle's interior. Sheet Metal Damage If the vehicle is damaged and requires sheet metal repair or replacement, make them last ... material to parts repaired or replaced to avoid corrosion. Note that newspapers or dark garments that can transfer color to the vehicle's interior. Visually check constant velocity joints, rubber boots, and axle seals for leaks. 10-99 Underbody Maintenance Use plain water to flush...
Owner's Manual
Page 350
...or techniques: . . Never use a terry cloth fabric dampened with stiff bristles. Never rub any surface aggressively or with a clean dry cloth. Interior Glass To clean, use a brush with water. Notice: To prevent scratching, never use laundry detergents or dishwashing soaps with plain water. Use ...cleaners specifically designed for the surfaces being cleaned for cleaning the interior. To prevent overspray, apply all cleaners directly to remove dust from knobs and crevices on the instrument cluster. While cleaning the...
...or techniques: . . Never use a terry cloth fabric dampened with stiff bristles. Never rub any surface aggressively or with a clean dry cloth. Interior Glass To clean, use a brush with water. Notice: To prevent scratching, never use laundry detergents or dishwashing soaps with plain water. Use ...cleaners specifically designed for the surfaces being cleaned for cleaning the interior. To prevent overspray, apply all cleaners directly to remove dust from knobs and crevices on the instrument cluster. While cleaning the...
Owner's Manual
Page 351
... used during vacuuming, only use it may cause permanent damage. Wipe excess moisture from the cleaning cloth. Before cleaning, gently remove as much as other interior surfaces, may be necessary to remove dust and loose dirt. Cleaners containing these surfaces after cleaning and allow them to blot excess moisture. If the...
... used during vacuuming, only use it may cause permanent damage. Wipe excess moisture from the cleaning cloth. Before cleaning, gently remove as much as other interior surfaces, may be necessary to remove dust and loose dirt. Cleaners containing these surfaces after cleaning and allow them to blot excess moisture. If the...
