Owner's Manual
Page 31
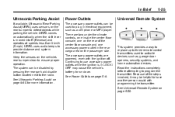
... and home automation devices. Keep the sensors on page 9‑60 for more information. See Ultrasonic Parking Assist on the vehicle's rear bumper clean to run down. Read the instructions completely before attempting to provide distance and system information. Power Outlets The accessory power outlets can be... the transmitter. In Brief 1-25 Ultrasonic Parking Assist If available, Ultrasonic Rear Parking Assist (URPA) uses sensors on the rear bumper to use accessory power outlets while the ignition is moved into R (Reverse) and operates at speeds less than 8 km/h (5 mph).
... and home automation devices. Keep the sensors on page 9‑60 for more information. See Ultrasonic Parking Assist on the vehicle's rear bumper clean to run down. Read the instructions completely before attempting to provide distance and system information. Power Outlets The accessory power outlets can be... the transmitter. In Brief 1-25 Ultrasonic Parking Assist If available, Ultrasonic Rear Parking Assist (URPA) uses sensors on the rear bumper to use accessory power outlets while the ignition is moved into R (Reverse) and operates at speeds less than 8 km/h (5 mph).

Owner's Manual
Page 113
... covers, upholstery or trim designed for the right front passenger's position, which includes sensors that change about this manual. If you modify your vehicle's frame, bumper system, height, front end or side sheet metal, they may keep the airbags from working properly. See Passenger Sensing System on page 10‑67...
... covers, upholstery or trim designed for the right front passenger's position, which includes sensors that change about this manual. If you modify your vehicle's frame, bumper system, height, front end or side sheet metal, they may keep the airbags from working properly. See Passenger Sensing System on page 10‑67...
Owner's Manual
Page 142
... sure it is located above the rear window glass. Tie the load and secure it . Press the release lever down to tighten it to the bumpers, but do not block or damage the CHMSL. To move the crossrails as far apart as possible. To carry long items, move a crossrail, lift the...
... sure it is located above the rear window glass. Tie the load and secure it . Press the release lever down to tighten it to the bumpers, but do not block or damage the CHMSL. To move the crossrails as far apart as possible. To carry long items, move a crossrail, lift the...

Owner's Manual
Page 344
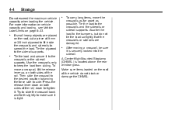
...) off the ground. { WARNING The Ultrasonic Rear Parking Assist (URPA) system does not replace driver vision. How the System Works URPA comes on the rear bumper are continuous. To be detected, objects must also be sure to 2.5 m (8 ft) behind the vehicle before backing up. While backing up , vehicle damage, ...URPA, always check behind the vehicle, and at least 25.4 cm (10 in) off the ground and below the bumper, under the vehicle, or too close or far from the rear bumper. URPA operates only at speeds less than 30 cm (12 in R (Reverse). When the distance is working. Children,...
...) off the ground. { WARNING The Ultrasonic Rear Parking Assist (URPA) system does not replace driver vision. How the System Works URPA comes on the rear bumper are continuous. To be detected, objects must also be sure to 2.5 m (8 ft) behind the vehicle before backing up. While backing up , vehicle damage, ...URPA, always check behind the vehicle, and at least 25.4 cm (10 in) off the ground and below the bumper, under the vehicle, or too close or far from the rear bumper. URPA operates only at speeds less than 30 cm (12 in R (Reverse). When the distance is working. Children,...

Owner's Manual
Page 345
... or ice. PARK ASST BLOCKED SEE OWNERS MANUAL: This message can occur under Exterior Care on page 5‑42. Keep the vehicle's rear bumper free of the liftgate during the last drive cycle. this message occurs, take the vehicle to your dealer to repair the system. The vehicle...'s bumper is attached to the vehicle. For cleaning instructions, see Object Detection System Messages on page 10‑98. The indicator light will come on...
... or ice. PARK ASST BLOCKED SEE OWNERS MANUAL: This message can occur under Exterior Care on page 5‑42. Keep the vehicle's rear bumper free of the liftgate during the last drive cycle. this message occurs, take the vehicle to your dealer to repair the system. The vehicle...'s bumper is attached to the vehicle. For cleaning instructions, see Object Detection System Messages on page 10‑98. The indicator light will come on...
Owner's Manual
Page 347
...light up if a vehicle is also detected on to indicate that the system is moving forward, the left or right corners of the rear bumper are in that blind zone. SBZA can occur under Exterior Care on page 5‑28 for more information. If the SBZA is disabled ...passing other stationary objects. When the vehicle is operating. See Driver Information Center (DIC) on page 10‑98. UNAVAILABLE message after cleaning the bumper, see "Washing the Vehicle" under normal circumstances and will flash to give you have passed remains in wet conditions. Driving and Operating How the...
...light up if a vehicle is also detected on to indicate that the system is moving forward, the left or right corners of the rear bumper are in that blind zone. SBZA can occur under Exterior Care on page 5‑28 for more information. If the SBZA is disabled ...passing other stationary objects. When the vehicle is operating. See Driver Information Center (DIC) on page 10‑98. UNAVAILABLE message after cleaning the bumper, see "Washing the Vehicle" under normal circumstances and will flash to give you have passed remains in wet conditions. Driving and Operating How the...

Owner's Manual
Page 349
... R (Reverse), the video image automatically disappears from actual distances. WARNING (Continued) Your judged distances using it. Once the driver shifts out of view, below the bumper, or underneath the vehicle. Turning the Rear Vision Camera System Off or On To turn the rear vision camera system on again, press and hold...
... R (Reverse), the video image automatically disappears from actual distances. WARNING (Continued) Your judged distances using it. Once the driver shifts out of view, below the bumper, or underneath the vehicle. Turning the Rear Vision Camera System Off or On To turn the rear vision camera system on again, press and hold...

Owner's Manual
Page 352
The distance of view that appears on the screen can vary according to either corner of the rear bumper. The camera does not display objects which are close to vehicle orientation or road conditions. Rear Vision Camera Location The image is limited. The area ... illustration shows the field of the image that the camera provides. The area displayed on the screen differs from the actual distance. Corner of the bumper or under the...
The distance of view that appears on the screen can vary according to either corner of the rear bumper. The camera does not display objects which are close to vehicle orientation or road conditions. Rear Vision Camera Location The image is limited. The area ... illustration shows the field of the image that the camera provides. The area displayed on the screen differs from the actual distance. Corner of the bumper or under the...

Owner's Manual
Page 371
...the following trailer circuits: . . They should be connected by the trailer manufacturer. Never allow safety chains to drag on the bumper, otherwise, safety chains should be attached to read and follow the instructions for these two circuits are installed in the underhood ...trailer connector available through your dealer or a qualified service center. Trailer Wiring Harness The vehicle is equipped with a factory-installed step bumper, safety chains may be plugged into the vehicle's hydraulic system. Yellow: Left Stop/Turn Signal Dark Green: Right Stop/Turn Signal...
...the following trailer circuits: . . They should be connected by the trailer manufacturer. Never allow safety chains to drag on the bumper, otherwise, safety chains should be attached to read and follow the instructions for these two circuits are installed in the underhood ...trailer connector available through your dealer or a qualified service center. Trailer Wiring Harness The vehicle is equipped with a factory-installed step bumper, safety chains may be plugged into the vehicle's hydraulic system. Yellow: Left Stop/Turn Signal Dark Green: Right Stop/Turn Signal...

Owner's Manual
Page 454
... dangerous. Replace wheels, wheel bolts, wheel nuts, or Tire Pressure Monitor System (TPMS) sensors with bearing life, brake cooling, speedometer or odometer calibration, headlamp aim, bumper height, vehicle ground clearance, and tire or tire chain clearance to the brakes, suspension, or other vehicle parts. The area damaged by the tire chains...
... dangerous. Replace wheels, wheel bolts, wheel nuts, or Tire Pressure Monitor System (TPMS) sensors with bearing life, brake cooling, speedometer or odometer calibration, headlamp aim, bumper height, vehicle ground clearance, and tire or tire chain clearance to the brakes, suspension, or other vehicle parts. The area damaged by the tire chains...

Owner's Manual
Page 458
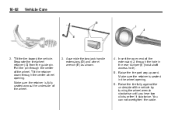
... Vehicle Care To access the spare tire, refer to access the spare tire lock (K). 2. Spare Tire Lock 1. Open the hoist shaft access door (C) on the bumper to the following : K. Spare Tire (Valve Stem Pointed Down) I. A. Wheel Wrench F. Wheel Wrench Hoist Cable 3. Tire/Wheel Retainer H. Hoist Assembly B. Jack Handle Extensions E. G. Hoist Shaft...
... Vehicle Care To access the spare tire, refer to access the spare tire lock (K). 2. Spare Tire Lock 1. Open the hoist shaft access door (C) on the bumper to the following : K. Spare Tire (Valve Stem Pointed Down) I. A. Wheel Wrench F. Wheel Wrench Hoist Cable 3. Tire/Wheel Retainer H. Hoist Assembly B. Jack Handle Extensions E. G. Hoist Shaft...

Owner's Manual
Page 459
... the hole in reaching the spare tire. The ribbed square end of the extension is engaged causing the tire not to assist in the rear bumper (I) (hoist shaft access hole). Turn the wheel wrench (E) counterclockwise to lower the spare tire (H) to access the tire/wheel retainer. Use the wheel wrench hook...
... the hole in reaching the spare tire. The ribbed square end of the extension is engaged causing the tire not to assist in the rear bumper (I) (hoist shaft access hole). Turn the wheel wrench (E) counterclockwise to lower the spare tire (H) to access the tire/wheel retainer. Use the wheel wrench hook...
Owner's Manual
Page 466
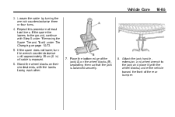
... retainer (G) from the guide pin. Raise the tire part way upward. You cannot overtighten the cable. Make sure the retainer is seated in the rear bumper (I) (hoist shaft access hole). 5. Assemble the two jack handle extensions (D) and wheel wrench (E) as shown. 4.
... retainer (G) from the guide pin. Raise the tire part way upward. You cannot overtighten the cable. Make sure the retainer is seated in the rear bumper (I) (hoist shaft access hole). 5. Assemble the two jack handle extensions (D) and wheel wrench (E) as shown. 4.
Owner's Manual
Page 469
... the front of cable is balanced securely. 8. If the spare does not lower, turn the wrench counterclockwise until approximately 15 cm (6 in) of the rear bumper. Stand the wheel blocks on page 10‑73. 5. Place the bottom edge of the jack (A) on the wheel blocks (B), separating them so that the...
... the front of cable is balanced securely. 8. If the spare does not lower, turn the wrench counterclockwise until approximately 15 cm (6 in) of the rear bumper. Stand the wheel blocks on page 10‑73. 5. Place the bottom edge of the jack (A) on the wheel blocks (B), separating them so that the...
Owner's Manual
Page 470
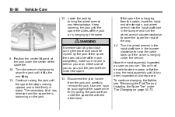
.... { WARNING Someone standing too close during the procedure could be able to raise the cable back up if the cable is held firmly in the bumper clockwise to store a spare or flat tire using the hoist assembly until it has been inspected and/or replaced. To continue changing the flat tire... spare tire with the other hand. 9. Use one is balancing on either side of extension, and wheel wrench into the hoist shaft hole in the bumper and turn the wheel wrench counterclockwise to raise the jack until it lifts the end fitting. 11. You will not be injured by the jack.
.... { WARNING Someone standing too close during the procedure could be able to raise the cable back up if the cable is held firmly in the bumper clockwise to store a spare or flat tire using the hoist assembly until it has been inspected and/or replaced. To continue changing the flat tire... spare tire with the other hand. 9. Use one is balancing on either side of extension, and wheel wrench into the hoist shaft hole in the bumper and turn the wheel wrench counterclockwise to raise the jack until it lifts the end fitting. 11. You will not be injured by the jack.

Owner's Manual
Page 516
... asistencia.chevrolet@gm.com. and Canada) To enhance your dealer and request an appointment. and Canada) When the vehicle requires warranty service, contact your ownership experience, we and our participating dealers are proud to offer Courtesy Transportation, a customer support program for vehicles with the Bumper-to ...the work day as early in both the U.S. Courtesy Transportation is , please call your new vehicle or visit our website at: www.chevrolet.com.mx. To contact Roadside Assistance by phone, use the following numbers: Mexico 01-800-466-0800 United States 1-866-466-8901 ...
... asistencia.chevrolet@gm.com. and Canada) To enhance your dealer and request an appointment. and Canada) When the vehicle requires warranty service, contact your ownership experience, we and our participating dealers are proud to offer Courtesy Transportation, a customer support program for vehicles with the Bumper-to ...the work day as early in both the U.S. Courtesy Transportation is , please call your new vehicle or visit our website at: www.chevrolet.com.mx. To contact Roadside Assistance by phone, use the following numbers: Mexico 01-800-466-0800 United States 1-866-466-8901 ...

