
Owner's Manual
Page 3
Keep this manual in the vehicle for Chevrolet Motor Division wherever it appears in Canada, substitute the name "General Motors of Canada Limited" for quick reference. iii Canadian Vehicle Owners Proprié...The names, logos, emblems, slogans, vehicle model names, and vehicle body designs appearing in U.S.A. Part No. 25965913 C Third Printing © 2011 General Motors LLC. All Rights Reserved. Introduction Please refer to the purchase documentation relating to your specific vehicle to , GM, the GM logo, CHEVROLET, the CHEVROLET Emblem, SILVERADO, and Z71 are options that you...
Keep this manual in the vehicle for Chevrolet Motor Division wherever it appears in Canada, substitute the name "General Motors of Canada Limited" for quick reference. iii Canadian Vehicle Owners Proprié...The names, logos, emblems, slogans, vehicle model names, and vehicle body designs appearing in U.S.A. Part No. 25965913 C Third Printing © 2011 General Motors LLC. All Rights Reserved. Introduction Please refer to the purchase documentation relating to your specific vehicle to , GM, the GM logo, CHEVROLET, the CHEVROLET Emblem, SILVERADO, and Z71 are options that you...
Owner's Manual
Page 100
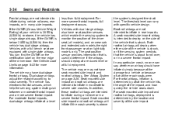
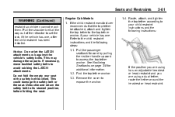
... a severe frontal impact. Seat‐mounted side impact and roof-rail airbags will deploy when either side of the driver seat (all models), and on crew cab and extended cab models the right front passenger seat on the rear edge of the side impact. See Vehicle Load Limits on page 3‑29. In addition... should deploy at a reduced level or at a level In any particular crash, no one can find the GVWR on the certification label on light duty models only. For more severe frontal impact.
... a severe frontal impact. Seat‐mounted side impact and roof-rail airbags will deploy when either side of the driver seat (all models), and on crew cab and extended cab models the right front passenger seat on the rear edge of the side impact. See Vehicle Load Limits on page 3‑29. In addition... should deploy at a reduced level or at a level In any particular crash, no one can find the GVWR on the certification label on light duty models only. For more severe frontal impact.
Owner's Manual
Page 117
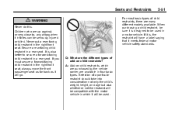
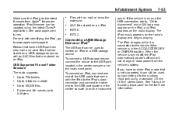
...'s weight, height, and age but also whether or not the restraint will be compatible with the motor vehicle in a rear seat. Q: What are many different models available. Seats and Restraints 3-51 { WARNING Never do this.
...'s weight, height, and age but also whether or not the restraint will be compatible with the motor vehicle in a rear seat. Q: What are many different models available. Seats and Restraints 3-51 { WARNING Never do this.
Owner's Manual
Page 124
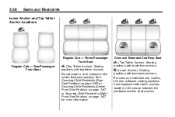
... anchors. 3-58 Seats and Restraints Lower Anchor and Top Tether Anchor Locations Regular Cab - Three-Passenger Front Seat Regular Cab - Two-Passenger Front Seat Crew and Extended Cab Rear Seat i (Top Tether Anchor): Seating positions with top tether anchors. For crew and extended cab models, the rear outboard seating positions have exposed metal lower anchors located in...
... anchors. 3-58 Seats and Restraints Lower Anchor and Top Tether Anchor Locations Regular Cab - Three-Passenger Front Seat Regular Cab - Two-Passenger Front Seat Crew and Extended Cab Rear Seat i (Top Tether Anchor): Seating positions with top tether anchors. For crew and extended cab models, the rear outboard seating positions have exposed metal lower anchors located in...
Owner's Manual
Page 125
... top tether in the vehicle. These loops will be used to route the top tether through, as well as, to access the anchor. For regular cab models, the top tether anchors are the loops located near the top of the seatback for more information. Be sure to use an anchor (loop)...located on the same side of the vehicle as the seating position where the child restraint will be placed. Regular Cab Do not install a child restraint in the center seat position. For regular cab models, there is an anchor symbol on page 3‑67 for each rear seating position. Seats and Restraints Child...
... top tether in the vehicle. These loops will be used to route the top tether through, as well as, to access the anchor. For regular cab models, the top tether anchors are the loops located near the top of the seatback for more information. Be sure to use an anchor (loop)...located on the same side of the vehicle as the seating position where the child restraint will be placed. Regular Cab Do not install a child restraint in the center seat position. For regular cab models, there is an anchor symbol on page 3‑67 for each rear seating position. Seats and Restraints Child...
Owner's Manual
Page 127
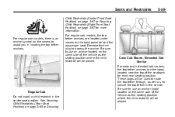
... to access the top tether anchor. Pull the passenger seatback forward by pulling the recliner handle upward to its stowed position, before folding the seat. Regular Cab Models 1. See Reclining Seatbacks on page 3‑8 for additional information. 1.2. Route, attach, and tighten the top tether according to the child restraint instructions and the following...
... to access the top tether anchor. Pull the passenger seatback forward by pulling the recliner handle upward to its stowed position, before folding the seat. Regular Cab Models 1. See Reclining Seatbacks on page 3‑8 for additional information. 1.2. Route, attach, and tighten the top tether according to the child restraint instructions and the following...

Owner's Manual
Page 128
... Securing Child Restraints (Center Front Seat Position) on page 3‑67 or Securing Child Restraints (Right Front Seat Position) on the seat. 1.3. Crew and Extended Cab Models 1.
... Securing Child Restraints (Center Front Seat Position) on page 3‑67 or Securing Child Restraints (Right Front Seat Position) on the seat. 1.3. Crew and Extended Cab Models 1.
Owner's Manual
Page 202
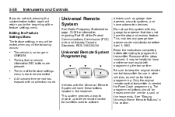
... be erased when the vehicle is no selection made. A 40-second time period has elapsed with programming the transmitter. This includes any garage door opener model manufactured before attempting to activate Be sure to keep the original remote control transmitter for future programming. The vehicle is sold or the lease ends...
... be erased when the vehicle is no selection made. A 40-second time period has elapsed with programming the transmitter. This includes any garage door opener model manufactured before attempting to activate Be sure to keep the original remote control transmitter for future programming. The vehicle is sold or the lease ends...
Owner's Manual
Page 251
... storage device, connect the device to 65,535 files. See "Using the Auxiliary Input Jack" earlier for proper operation. Radios that have an older iPod model that came with identifying the iPod, go to 64 bytes The iPod music appears on the instrument panel. If you have a USB port can still...
... storage device, connect the device to 65,535 files. See "Using the Auxiliary Input Jack" earlier for proper operation. Radios that have an older iPod model that came with identifying the iPod, go to 64 bytes The iPod music appears on the instrument panel. If you have a USB port can still...
Owner's Manual
Page 311
... the pickup box flareboard. When using this manual. The zone is also important loading information for Off-Road Driving" under Off-Road Driving on the model of each wheel well and the rear of your pick‐up, an upper load platform can strike and injure people in a sudden stop or...
... the pickup box flareboard. When using this manual. The zone is also important loading information for Off-Road Driving" under Off-Road Driving on the model of each wheel well and the rear of your pick‐up, an upper load platform can strike and injure people in a sudden stop or...
Owner's Manual
Page 367
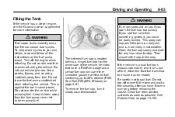
... page 10‑104. { WARNING Fuel vapor burns violently and a fuel fire can use cellular phones. The tethered fuel cap is a dual fuel tank chassis cab model, and it runs out of the vehicle. Vehicles that have finished pumping before removing the nozzle. Do not smoke near fuel or when refueling the...
... page 10‑104. { WARNING Fuel vapor burns violently and a fuel fire can use cellular phones. The tethered fuel cap is a dual fuel tank chassis cab model, and it runs out of the vehicle. Vehicles that have finished pumping before removing the nozzle. Do not smoke near fuel or when refueling the...
Owner's Manual
Page 374
..." later in this section carefully before pulling a trailer. Speed, altitude, road grades, outside temperature, and how much the vehicle can weigh, based upon the vehicle model and options. Trailering means changes in the tow vehicle must be ? Many of these are all required trailering equipment. So please read this section for...
..." later in this section carefully before pulling a trailer. Speed, altitude, road grades, outside temperature, and how much the vehicle can weigh, based upon the vehicle model and options. Trailering means changes in the tow vehicle must be ? Many of these are all required trailering equipment. So please read this section for...
Owner's Manual
Page 387
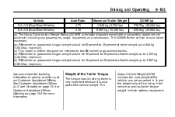
... be exceeded. (b) Fifth-wheel or gooseneck kingpin weight should be15 percent to 25 percent of trailer weight up to 680 kg (1,500 lbs) maximum. (c) This model is neither designed nor intended to tow fifth-wheel or gooseneck trailers. (d) Fifth-wheel or gooseneck kingpin weight should be 15 percent to 25 percent...
... be exceeded. (b) Fifth-wheel or gooseneck kingpin weight should be15 percent to 25 percent of trailer weight up to 680 kg (1,500 lbs) maximum. (c) This model is neither designed nor intended to tow fifth-wheel or gooseneck trailers. (d) Fifth-wheel or gooseneck kingpin weight should be 15 percent to 25 percent...
Owner's Manual
Page 390
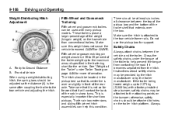
... the hitch. Weight‐Distributing Hitch Adjustment Safety Chains Always attach chains between the top of the pickup box and the bottom of the cab in front of Vehicle When using a weight-distributing hitch, the spring bars should be provided by the hitch manufacturer or by the trailer ... 25 percent of the weight (kingpin weight) on the bumper; The hitch should be attached to 2 271 kg (5,000 lbs) with many pickup models. Make sure the hitch is over the box. Cross the safety chains under Trailer Towing on the trailer hitch platform. This is especially important for...
... the hitch. Weight‐Distributing Hitch Adjustment Safety Chains Always attach chains between the top of the pickup box and the bottom of the cab in front of Vehicle When using a weight-distributing hitch, the spring bars should be provided by the hitch manufacturer or by the trailer ... 25 percent of the weight (kingpin weight) on the bumper; The hitch should be attached to 2 271 kg (5,000 lbs) with many pickup models. Make sure the hitch is over the box. Cross the safety chains under Trailer Towing on the trailer hitch platform. This is especially important for...
Owner's Manual
Page 407
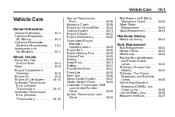
... Bulb Replacement Bulb Replacement ...10-43 Halogen Bulbs ...10-43 Headlamps ...10-43 Pick-Up Box Identification and Fender Marker Lamps ...10-44 Taillamps (Chassis Cab Models) ...10-44 Taillamps, Turn Signal, Stoplamps, and Back-Up Lamps ...10-45 Center High-Mounted Stoplamp (CHMSL) and Cargo Lamp ...10-46 License Plate Lamp...
... Bulb Replacement Bulb Replacement ...10-43 Halogen Bulbs ...10-43 Headlamps ...10-43 Pick-Up Box Identification and Fender Marker Lamps ...10-44 Taillamps (Chassis Cab Models) ...10-44 Taillamps, Turn Signal, Stoplamps, and Back-Up Lamps ...10-45 Center High-Mounted Stoplamp (CHMSL) and Cargo Lamp ...10-46 License Plate Lamp...
Owner's Manual
Page 426
... the scheduled maintenance intervals and replace it to release loose dust and dirt. Engine Air Cleaner/Filter If the vehicle has a diesel engine, see "Pickup Models" under "Engine Air Cleaner/Filter" in the Duramax® Diesel Supplement for more information. If driving on dusty/dirty conditions, inspect the filter at the...
... the scheduled maintenance intervals and replace it to release loose dust and dirt. Engine Air Cleaner/Filter If the vehicle has a diesel engine, see "Pickup Models" under "Engine Air Cleaner/Filter" in the Duramax® Diesel Supplement for more information. If driving on dusty/dirty conditions, inspect the filter at the...
Owner's Manual
Page 450
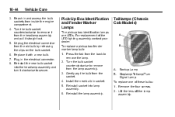
... socket. 4. Gently pry the bulb from the old bulb by releasing the clips on the bulb socket. 6. Install the new bulb in socket. 5. Taillamps (Chassis Cab Models) A. Turn the bulb socket counterclockwise to remove it from the lamp assembly. 3. Stoplamp/Taillamp/Turn Signal Lamp To replace one of the LED lighting assembly...
... socket. 4. Gently pry the bulb from the old bulb by releasing the clips on the bulb socket. 6. Install the new bulb in socket. 5. Taillamps (Chassis Cab Models) A. Turn the bulb socket counterclockwise to remove it from the lamp assembly. 3. Stoplamp/Taillamp/Turn Signal Lamp To replace one of the LED lighting assembly...

Owner's Manual
Page 453
... Bulb Number 921LL 1156 Exterior Lamp Low-Beam Headlamp License Plate Lamp Sidemarker Lamp/ Stoplamp/Taillamp/ Turn Signal Lamp Stoplamp/Turn Signal Lamp/ Taillamp* * Chassis Cab Models Bulb Number H11 168 3047K Electrical System Electrical System Overload The vehicle has fuses and circuit breakers to normal or the problem is too heavy...
... Bulb Number 921LL 1156 Exterior Lamp Low-Beam Headlamp License Plate Lamp Sidemarker Lamp/ Stoplamp/Taillamp/ Turn Signal Lamp Stoplamp/Turn Signal Lamp/ Taillamp* * Chassis Cab Models Bulb Number H11 168 3047K Electrical System Electrical System Overload The vehicle has fuses and circuit breakers to normal or the problem is too heavy...
Owner's Manual
Page 468
... It Is Time for New Tires on the other sidewall of the tire that contains a whitewall, bears white lettering, or bears manufacturer, brand, and/or model name molding that faces outward when mounted on the tire placard. Ratings are laid at which the tire beads are seated. The side of the...
... It Is Time for New Tires on the other sidewall of the tire that contains a whitewall, bears white lettering, or bears manufacturer, brand, and/or model name molding that faces outward when mounted on the tire placard. Ratings are laid at which the tire beads are seated. The side of the...
Owner's Manual
Page 488
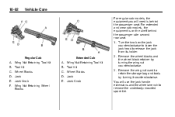
Regular Cab Extended Cab A. Wheel Blocks D. Tool Kit C. Turn the knob on the shelf behind the passenger seat. Jack E. Jack Knob 2. Wing Nut Retaining Wheel Blocks For extended and crew cab models, the equipment is behind the passenger side second row seat. 1. Remove the wheel blocks and the wheel .... 3. A. Wheel Blocks D. Jack E. Wing Nut Retaining Tool Kit B. Wing Nut Retaining Tool Kit B. 10-82 Vehicle Care For regular cab models, the equipment you will use the jack handle extensions and the wheel wrench to remove the underbody-mounted spare tire.
Regular Cab Extended Cab A. Wheel Blocks D. Tool Kit C. Turn the knob on the shelf behind the passenger seat. Jack E. Jack Knob 2. Wing Nut Retaining Wheel Blocks For extended and crew cab models, the equipment is behind the passenger side second row seat. 1. Remove the wheel blocks and the wheel .... 3. A. Wheel Blocks D. Jack E. Wing Nut Retaining Tool Kit B. Wing Nut Retaining Tool Kit B. 10-82 Vehicle Care For regular cab models, the equipment you will use the jack handle extensions and the wheel wrench to remove the underbody-mounted spare tire.
