
Owner's Manual
Page 1
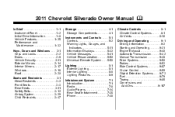
2011 Chevrolet Silverado Owner Manual M In Brief ...1-1 Instrument Panel ...1-2 Initial Drive Information ...1-8 Vehicle Features ...1-25 Performance and Maintenance ...1-32 Keys, Doors and Windows ...2-1 ...Airbag System ...3-29 Child Restraints ...3-47 Storage ...4-1 Storage Compartments ...4-1 Instruments and Controls ...5-1 Controls ...5-2 Warning Lights, Gauges, and Indicators ...5-11 Information Displays ...5-32 Vehicle Messages ...5-41 Vehicle Personalization ...5-50 Universal Remote System ...5-58 Lighting ...6-1 Exterior Lighting ...6-1 Interior Lighting ...6-8 Lighting Features ...6-9...
2011 Chevrolet Silverado Owner Manual M In Brief ...1-1 Instrument Panel ...1-2 Initial Drive Information ...1-8 Vehicle Features ...1-25 Performance and Maintenance ...1-32 Keys, Doors and Windows ...2-1 ...Airbag System ...3-29 Child Restraints ...3-47 Storage ...4-1 Storage Compartments ...4-1 Instruments and Controls ...5-1 Controls ...5-2 Warning Lights, Gauges, and Indicators ...5-11 Information Displays ...5-32 Vehicle Messages ...5-41 Vehicle Personalization ...5-50 Universal Remote System ...5-58 Lighting ...6-1 Exterior Lighting ...6-1 Interior Lighting ...6-8 Lighting Features ...6-9...
Owner's Manual
Page 2
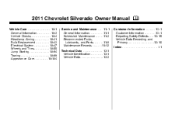
2011 Chevrolet Silverado Owner Manual M Vehicle Care ...10-1 General Information ...10-2 Vehicle Checks ...10-4 Headlamp Aiming ...10-41 Bulb Replacement ...10-43 Electrical System ...10-47 Wheels and Tires ...10-55 Jump Starting ...10-94 Towing ...10-99 Appearance Care ...10-104 Service and Maintenance ...11-1 General Information ...11-1 Scheduled Maintenance ...11-2 Recommended Fluids, Lubricants, and...
2011 Chevrolet Silverado Owner Manual M Vehicle Care ...10-1 General Information ...10-2 Vehicle Checks ...10-4 Headlamp Aiming ...10-41 Bulb Replacement ...10-43 Electrical System ...10-47 Wheels and Tires ...10-55 Jump Starting ...10-94 Towing ...10-99 Appearance Care ...10-104 Service and Maintenance ...11-1 General Information ...11-1 Scheduled Maintenance ...11-2 Recommended Fluids, Lubricants, and...
Owner's Manual
Page 3
... this owner manual. For vehicles first sold in Canada, substitute the name "General Motors of Canada Limited" for additional and specific information on your specific vehicle either because they are trademarks and/or service marks of General Motors LLC, its subsidiaries, affiliates, or licensors... CHEVROLET Emblem, SILVERADO, and Z71 are options that may or may not be obtained from : On peut obtenir un exemplaire de ce guide en français auprès du concessionnaire ou à l'adresse suivante: Helm, Incorporated P.O. Part No. 25965913 C Third Printing © 2011 General ...
... this owner manual. For vehicles first sold in Canada, substitute the name "General Motors of Canada Limited" for additional and specific information on your specific vehicle either because they are trademarks and/or service marks of General Motors LLC, its subsidiaries, affiliates, or licensors... CHEVROLET Emblem, SILVERADO, and Z71 are options that may or may not be obtained from : On peut obtenir un exemplaire de ce guide en français auprès du concessionnaire ou à l'adresse suivante: Helm, Incorporated P.O. Part No. 25965913 C Third Printing © 2011 General ...
Owner's Manual
Page 4
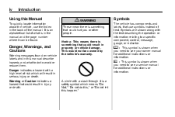
... Caution indicates a hazard that could hurt you need to see your owner manual for additional instructions or information. Symbols are shown along with the text describing the operation or information relating to do this," or "Do not let this happen." A circle with a high level of... could result in injury or death. M : This symbol is shown when you need to see a service manual for additional instructions or information. * : This symbol is an alphabetical list of what to a specific component, control, message, gauge, or indicator. iv Introduction Using this...
... Caution indicates a hazard that could hurt you need to see your owner manual for additional instructions or information. Symbols are shown along with the text describing the operation or information relating to do this," or "Do not let this happen." A circle with a high level of... could result in injury or death. M : This symbol is shown when you need to see a service manual for additional instructions or information. * : This symbol is an alphabetical list of what to a specific component, control, message, gauge, or indicator. iv Introduction Using this...
Owner's Manual
Page 5
For more information on the vehicle and what they mean. v or OnStar® 0 : Adjustable Pedals 9 : Airbag Readiness Light # : Air Conditioning ! : Antilock Brake System (ABS) % : Audio Steering Wheel Controls $: ...
For more information on the vehicle and what they mean. v or OnStar® 0 : Adjustable Pedals 9 : Airbag Readiness Light # : Air Conditioning ! : Antilock Brake System (ABS) % : Audio Steering Wheel Controls $: ...
Owner's Manual
Page 7
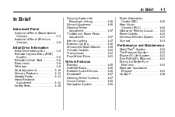
... 1-30 1-30 1-30 1-31 1-31 In Brief Instrument Panel Instrument Panel (Base/Uplevel Version) ...1-2 Instrument Panel (Premium Version) ...1-6 Initial Drive Information Initial Drive Information ...1-8 Remote Keyless Entry (RKE) System ...1-8 Remote Vehicle Start ...1-8 Door Locks ...1-9 Windows ...1-9 Seat Adjustment ...1-10 Memory Features ...1-13 Heated Seats ...1-... 1-16 1-17 1-17 1-17 1-18 1-19 1-20 1-22 1-23 1-25 1-26 1-26 1-27 1-27 1-28 1-28 Driver Information Center (DIC) ...Rear Vision Camera (RVC) ...Ultrasonic Parking Assist ...Power Outlets ...Universal Remote System ...Sunroof ...
... 1-30 1-30 1-30 1-31 1-31 In Brief Instrument Panel Instrument Panel (Base/Uplevel Version) ...1-2 Instrument Panel (Premium Version) ...1-6 Initial Drive Information Initial Drive Information ...1-8 Remote Keyless Entry (RKE) System ...1-8 Remote Vehicle Start ...1-8 Door Locks ...1-9 Windows ...1-9 Seat Adjustment ...1-10 Memory Features ...1-13 Heated Seats ...1-... 1-16 1-17 1-17 1-17 1-18 1-19 1-20 1-22 1-23 1-25 1-26 1-26 1-27 1-27 1-28 1-28 Driver Information Center (DIC) ...Rear Vision Camera (RVC) ...Ultrasonic Parking Assist ...Power Outlets ...Universal Remote System ...Sunroof ...
Owner's Manual
Page 9
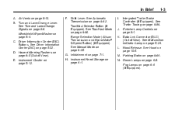
... Selection Mode (Allison Transmission and Hydra-Matic® 6‐Speed Button) (If Equipped). K. L. M. Fog Lamps on page 6‑6. See Driver Information Center (DIC) on page 6‑5 (Out of View). Hazard Warning Flashers on page 5‑32. See Trailer Towing on page 10‑5. See... Hood on page 9‑89. In Brief A. Turn and Lane‐Change Lever. Windshield Wiper/Washer on page 5‑12. Driver Information Center (DIC) Buttons. Instrument Cluster on page 5‑4. F. Tow/Haul Selector Button (If Equipped). See Manual Mode on page 7‑...
... Selection Mode (Allison Transmission and Hydra-Matic® 6‐Speed Button) (If Equipped). K. L. M. Fog Lamps on page 6‑6. See Driver Information Center (DIC) on page 6‑5 (Out of View). Hazard Warning Flashers on page 5‑32. See Trailer Towing on page 10‑5. See... Hood on page 9‑89. In Brief A. Turn and Lane‐Change Lever. Windshield Wiper/Washer on page 5‑12. Driver Information Center (DIC) Buttons. Instrument Cluster on page 5‑4. F. Tow/Haul Selector Button (If Equipped). See Manual Mode on page 7‑...
Owner's Manual
Page 13
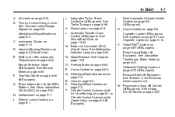
...8209;1. Windshield Wiper/Washer on page 10‑5. C. See Hood on page 5‑4. Ultrasonic Parking Assist on page 9‑45. Driver Information Center (DIC) Buttons. See Manual Mode on page 9‑72 (If Equipped). K. Hazard Warning Flashers on page 8‑5 (If ... 9‑69. In Brief A. Dome Lamps on page 9‑67 (If Equipped). StabiliTrak® System on page 6‑8. G. See Driver Information Center (DIC) on page 7‑1. Q. Infotainment on page 5‑32. J. T. Climate Control Systems (with Air Conditioning) on page 8‑...
...8209;1. Windshield Wiper/Washer on page 10‑5. C. See Hood on page 5‑4. Ultrasonic Parking Assist on page 9‑45. Driver Information Center (DIC) Buttons. See Manual Mode on page 9‑72 (If Equipped). K. Hazard Warning Flashers on page 8‑5 (If ... 9‑69. In Brief A. Dome Lamps on page 9‑67 (If Equipped). StabiliTrak® System on page 6‑8. G. See Driver Information Center (DIC) on page 7‑1. Q. Infotainment on page 5‑32. J. T. Climate Control Systems (with Air Conditioning) on page 8‑...
Owner's Manual
Page 14
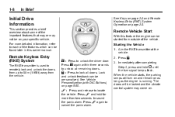
... flash. Press L and hold / until the turn on and remain on . Immediately after completing Step 2, press and hold for more detailed information, refer to sound the panic alarm. Aim the RKE transmitter at the vehicle. When the vehicle starts, the parking lamps will be personalized....be started from the vehicle. L : Press and release to cancel the panic alarm. Press L again to locate the vehicle. Initial Drive Information This section provides a brief overview about some of the vehicle. Press to unlock all doors. Press Q. Press K again within three seconds...
... flash. Press L and hold / until the turn on and remain on . Immediately after completing Step 2, press and hold for more detailed information, refer to sound the panic alarm. Aim the RKE transmitter at the vehicle. When the vehicle starts, the parking lamps will be personalized....be started from the vehicle. L : Press and release to cancel the panic alarm. Press L again to locate the vehicle. Initial Drive Information This section provides a brief overview about some of the vehicle. Press to unlock all doors. Press Q. Press K again within three seconds...
Owner's Manual
Page 16
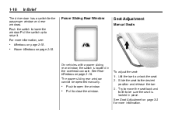
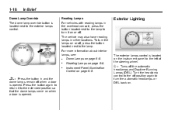
... rear window cannot be sure the seat is located in place. 1-10 In Brief Power Sliding Rear Window The driver door has a switch for more information, see: . . Lift the bar to the desired position and release the bar. 3. Slide the seat to unlock the seat. 2. Pull the switch ...To adjust the seat: 1. See Seat Adjustment on page 2‑18. Pull to raise it. Push the switch to open the window. For more information. Power Windows on page 2‑19. Seat Adjustment Manual Seats Windows on page 3‑3 for the passenger window and rear windows. Push to lower ...
... rear window cannot be sure the seat is located in place. 1-10 In Brief Power Sliding Rear Window The driver door has a switch for more information, see: . . Lift the bar to the desired position and release the bar. 3. Slide the seat to unlock the seat. 2. Pull the switch ...To adjust the seat: 1. See Seat Adjustment on page 2‑18. Pull to raise it. Push the switch to open the window. For more information. Power Windows on page 2‑19. Seat Adjustment Manual Seats Windows on page 3‑3 for the passenger window and rear windows. Push to lower ...
Owner's Manual
Page 17
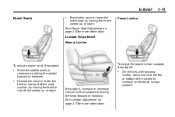
... by moving the front or rear of the control to increase or decrease lumbar support. See Lumbar Adjustment on page 3‑5 for more information. Lumbar Adjustment Manual Lumbar To adjust a power seat, if equipped: . Power Lumbar See Power Seat Adjustment on page 3‑7 for more... information. To adjust the power lumbar support, if equipped: . . In Brief Power Seats . 1-11 If available, raise or lower the entire seat by moving ...
... by moving the front or rear of the control to increase or decrease lumbar support. See Lumbar Adjustment on page 3‑5 for more information. Lumbar Adjustment Manual Lumbar To adjust a power seat, if equipped: . Power Lumbar See Power Seat Adjustment on page 3‑7 for more... information. To adjust the power lumbar support, if equipped: . . In Brief Power Seats . 1-11 If available, raise or lower the entire seat by moving ...
Owner's Manual
Page 18
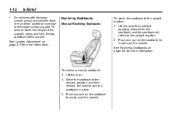
1-12 . See Reclining Seatbacks on page 3‑7 for more information. See Lumbar Adjustment on page 3‑8 for more information. To recline a manual seatback: 1. On vehicles with four-way lumbar, press and hold the top or bottom of the control to make sure it is ...
1-12 . See Reclining Seatbacks on page 3‑7 for more information. See Lumbar Adjustment on page 3‑8 for more information. To recline a manual seatback: 1. On vehicles with four-way lumbar, press and hold the top or bottom of the control to make sure it is ...
Owner's Manual
Page 19
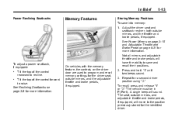
A single beep will have the ability to program and recall memory settings for more information. Repeat for more information. Adjust the driver seat and seatback recliner, both outside mirrors, and adjustable throttle and brake pedals, if equipped, will move to the position previously stored ...
A single beep will have the ability to program and recall memory settings for more information. Repeat for more information. Adjust the driver seat and seatback recliner, both outside mirrors, and adjustable throttle and brake pedals, if equipped, will move to the position previously stored ...
Owner's Manual
Page 20
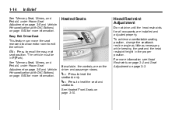
... Seat, Mirrors, and Pedals" under Power Seat Adjustment on page 3‑5 and Vehicle Personalization (with DIC Buttons) on page 5‑50 for more information see Head Restraints on page 3‑2 and Seat Adjustment on page 3‑3. I : Press to heat the seat and seatback. Easy Exit Driver Seat... This feature can move the seat rearward to allow extra room to recall the easy exit seat position. For more information. The vehicle must be in the proper position. To achieve a comfortable seating position, change the seatback recline angle as little as necessary...
... Seat, Mirrors, and Pedals" under Power Seat Adjustment on page 3‑5 and Vehicle Personalization (with DIC Buttons) on page 5‑50 for more information see Head Restraints on page 3‑2 and Seat Adjustment on page 3‑3. I : Press to heat the seat and seatback. Easy Exit Driver Seat... This feature can move the seat rearward to allow extra room to recall the easy exit seat position. For more information. The vehicle must be in the proper position. To achieve a comfortable seating position, change the seatback recline angle as little as necessary...
Owner's Manual
Page 21
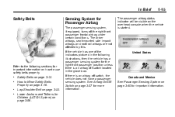
...properly... If there is started. See Airbag On-Off Switch on page 3‑22. Lap-Shoulder Belt on page 3‑37 for more information. Safety Belts on page 3‑16. How to the following illustrations, then the vehicle has a passenger sensing system for the right front.... Lower Anchors and Tethers for Children (LATCH System) on page 3‑40 for important information. . . If the vehicle has one of the indicators pictured in the following sections for important information on the overhead console when the vehicle is an airbag off switch, the vehicle does not...
...properly... If there is started. See Airbag On-Off Switch on page 3‑22. Lap-Shoulder Belt on page 3‑37 for more information. Safety Belts on page 3‑16. How to the following illustrations, then the vehicle has a passenger sensing system for the right front.... Lower Anchors and Tethers for Children (LATCH System) on page 3‑40 for important information. . . If the vehicle has one of the indicators pictured in the following sections for important information on the overhead console when the vehicle is an airbag off switch, the vehicle does not...
Owner's Manual
Page 22
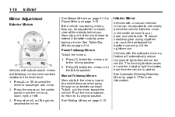
... outward, to return to the folded position. If the vehicle has towing mirrors, they can be adjusted for nighttime use and pull it for more information. Press (C) to fold the mirrors out to deselect the mirror. 2. Press either (A) or (B) again to the driving position. Mirror Adjustment Exterior Mirrors Interior Mirror Vehicles...
... outward, to return to the folded position. If the vehicle has towing mirrors, they can be adjusted for nighttime use and pull it for more information. Press (C) to fold the mirrors out to deselect the mirror. 2. Press either (A) or (B) again to the driving position. Mirror Adjustment Exterior Mirrors Interior Mirror Vehicles...
Owner's Manual
Page 24
... located next to the lamp to turn it to the extended position so that the dome lamps come on when a door is opened . For more information about interior lamps, see: ... O : Turns off , press the button located next to the lamp. Dome Lamp Override The dome lamp override button is located on...
... located next to the lamp to turn it to the extended position so that the dome lamps come on when a door is opened . For more information about interior lamps, see: ... O : Turns off , press the button located next to the lamp. Dome Lamp Override The dome lamp override button is located on...

Owner's Manual
Page 25
... . Turns on the parking lamps, taillamps, instrument panel lights, roof marker lamps (if equipped) and license plate lamps. 1-19 5 : Turns on page 6‑6. ;: . 8: . For more information, see: . Daytime Running Lamps (DRL) on page 6‑1. Windshield Wiper/Washer Exterior Lamp Controls on page 6‑3. Single wipe, turn to 8, then release. AUTO: Automatically...
... . Turns on the parking lamps, taillamps, instrument panel lights, roof marker lamps (if equipped) and license plate lamps. 1-19 5 : Turns on page 6‑6. ;: . 8: . For more information, see: . Daytime Running Lamps (DRL) on page 6‑1. Windshield Wiper/Washer Exterior Lamp Controls on page 6‑3. Single wipe, turn to 8, then release. AUTO: Automatically...
Owner's Manual
Page 31
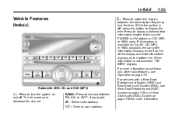
...(RSA), see Rear Seat Entertainment (RSE) System on page 7‑36 and Rear Seat Audio (RSA) System on page 7‑46 for more information about these and other radio features, see Operation on page 7‑2. f : Select radio stations. © ¨ : Seek or scan stations.... While the ignition is not available, "NO INFO" displays. When information is off . Press to display additional text information related to display the time. Turn to increase or decrease the volume. For vehicles with USB, CD, and DVD (MP3) O :...
...(RSA), see Rear Seat Entertainment (RSE) System on page 7‑36 and Rear Seat Audio (RSA) System on page 7‑46 for more information about these and other radio features, see Operation on page 7‑2. f : Select radio stations. © ¨ : Seek or scan stations.... While the ignition is not available, "NO INFO" displays. When information is off . Press to display additional text information related to display the time. Turn to increase or decrease the volume. For vehicles with USB, CD, and DVD (MP3) O :...
Owner's Manual
Page 32
For more information, see Clock on page 7‑10. Storing Radio Stations A maximum of 36 stations can be stored as an iPod®, laptop computer, MP3 player, CD ... music, coast to turn f clockwise or counter‐clockwise. Press FAV to go through up to be connected to receive the XM service. For more information, refer to display HR, MIN, MM, DD, and YYYY (hour, minute, month, day, and year). 3. www.xmradio.com or call 1-800-929-2100 (U.S.) www.xmradio...
For more information, see Clock on page 7‑10. Storing Radio Stations A maximum of 36 stations can be stored as an iPod®, laptop computer, MP3 player, CD ... music, coast to turn f clockwise or counter‐clockwise. Press FAV to go through up to be connected to receive the XM service. For more information, refer to display HR, MIN, MM, DD, and YYYY (hour, minute, month, day, and year). 3. www.xmradio.com or call 1-800-929-2100 (U.S.) www.xmradio...
