
Owner's Manual
Page 1
2011 Chevrolet Colorado Owner Manual M In Brief ...1-1 Instrument Panel ...1-2 Initial Drive Information ...1-3 Vehicle Features ...1-12 Performance and Maintenance ...1-15 Keys, Doors and Windows ...2-1 Keys and Locks ...2-2 Doors ...2-7 Vehicle ...
2011 Chevrolet Colorado Owner Manual M In Brief ...1-1 Instrument Panel ...1-2 Initial Drive Information ...1-3 Vehicle Features ...1-12 Performance and Maintenance ...1-15 Keys, Doors and Windows ...2-1 Keys and Locks ...2-2 Doors ...2-7 Vehicle ...
Owner's Manual
Page 2
2011 Chevrolet Colorado Owner Manual M Service and Maintenance ...11-1 General Information ...11-1 Scheduled Maintenance ...11-2 Recommended Fluids, Lubricants, and Parts ...11-6 Maintenance Records ...11-10 Technical Data ...12-1 Vehicle Identification ...12-1 Vehicle Data ...12-2 Customer Information ...13-1 Customer Information ...13-1 Reporting Safety Defects ...13-14 Vehicle Data Recording and Privacy...13-16 Index ...i-1
2011 Chevrolet Colorado Owner Manual M Service and Maintenance ...11-1 General Information ...11-1 Scheduled Maintenance ...11-2 Recommended Fluids, Lubricants, and Parts ...11-6 Maintenance Records ...11-10 Technical Data ...12-1 Vehicle Identification ...12-1 Vehicle Data ...12-2 Customer Information ...13-1 Customer Information ...13-1 Reporting Safety Defects ...13-14 Vehicle Data Recording and Privacy...13-16 Index ...i-1

Owner's Manual
Page 3
... documentation relating to your specific vehicle to the printing of this owner manual. Keep this manual. Litho in the vehicle for Chevrolet Motor Division wherever it appears in this manual can be on your vehicle. Introduction This manual describes features that may or may not...Owners Propriétaires Canadiens A French language copy of this manual including, but not limited to, GM, the GM logo, CHEVROLET, the CHEVROLET Emblem, and COLORADO are options that you did not purchase or due to changes subsequent to confirm each of the features found on your specific vehicle...
... documentation relating to your specific vehicle to the printing of this owner manual. Keep this manual. Litho in the vehicle for Chevrolet Motor Division wherever it appears in this manual can be on your vehicle. Introduction This manual describes features that may or may not...Owners Propriétaires Canadiens A French language copy of this manual including, but not limited to, GM, the GM logo, CHEVROLET, the CHEVROLET Emblem, and COLORADO are options that you did not purchase or due to changes subsequent to confirm each of the features found on your specific vehicle...

Owner's Manual
Page 4
iv Introduction Using this Manual To quickly locate information about the vehicle, use symbols instead of the manual. Symbols The vehicle has components and labels that could hurt you need to avoid or reduce them. Danger, Warnings, and Cautions Warning messages found . { WARNING These mean there is something that use the Index in the back of text. A circle with the text describing the operation or information relating to a specific component, control, message, gauge, or indicator. This would not be found on vehicle labels and in this happen." Notice: This ...
iv Introduction Using this Manual To quickly locate information about the vehicle, use symbols instead of the manual. Symbols The vehicle has components and labels that could hurt you need to avoid or reduce them. Danger, Warnings, and Cautions Warning messages found . { WARNING These mean there is something that use the Index in the back of text. A circle with the text describing the operation or information relating to a specific component, control, message, gauge, or indicator. This would not be found on vehicle labels and in this happen." Notice: This ...

Owner's Manual
Page 5
For more information on the vehicle and what they mean. v 9 : Airbag Readiness Light # : Air Conditioning ! : Antilock Brake System (ABS) J : OnStar® Hands-Free Phone J : Brake System Warning Light " : Charging System I : Cruise Control B : Engine Coolant Temperature O : Exterior Lamps # : Fog Lamps . : Fuel Gauge + : Fuses 3 : Headlamp High/Low-Beam Changer j : LATCH System Child Restraints * : Malfunction Indicator Lamp : : Oil Pressure } : Power > : Safety Belt Reminders 7 : Tire Pressure Monitor d : Traction Control M : Windshield Washer Fluid Introduction Vehicle Symbol Chart ...
For more information on the vehicle and what they mean. v 9 : Airbag Readiness Light # : Air Conditioning ! : Antilock Brake System (ABS) J : OnStar® Hands-Free Phone J : Brake System Warning Light " : Charging System I : Cruise Control B : Engine Coolant Temperature O : Exterior Lamps # : Fog Lamps . : Fuel Gauge + : Fuses 3 : Headlamp High/Low-Beam Changer j : LATCH System Child Restraints * : Malfunction Indicator Lamp : : Oil Pressure } : Power > : Safety Belt Reminders 7 : Tire Pressure Monitor d : Traction Control M : Windshield Washer Fluid Introduction Vehicle Symbol Chart ...

Owner's Manual
Page 6
vi Introduction 2 NOTES
vi Introduction 2 NOTES

Owner's Manual
Page 7
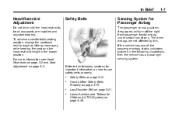
In Brief 1-1 In Brief Instrument Panel Instrument Panel ...1-2 Initial Drive Information Initial Drive Information ...Remote Keyless Entry (RKE) System ...Door Locks ...Tailgate ...Windows ...Seat Adjustment ...Heated Seats ...Head Restraint Adjustment ...Safety Belts ...Sensing System for Passenger Airbag ...1-3 1-3 1-4 1-4 1-5 1-5 1-6 1-7 1-7 1-7 Mirror Adjustment ...1-8 Steering Wheel Adjustment ...1-9 Interior Lighting ...1-9 Exterior Lighting ...1-10 Windshield Wiper/Washer ...1-10 Climate Controls ...1-11 Four-Wheel Drive ...1-11 Performance and Maintenance Traction Control System (...
In Brief 1-1 In Brief Instrument Panel Instrument Panel ...1-2 Initial Drive Information Initial Drive Information ...Remote Keyless Entry (RKE) System ...Door Locks ...Tailgate ...Windows ...Seat Adjustment ...Heated Seats ...Head Restraint Adjustment ...Safety Belts ...Sensing System for Passenger Airbag ...1-3 1-3 1-4 1-4 1-5 1-5 1-6 1-7 1-7 1-7 Mirror Adjustment ...1-8 Steering Wheel Adjustment ...1-9 Interior Lighting ...1-9 Exterior Lighting ...1-10 Windshield Wiper/Washer ...1-10 Climate Controls ...1-11 Four-Wheel Drive ...1-11 Performance and Maintenance Traction Control System (...
Owner's Manual
Page 9
Instrument Cluster on page 5‑2. E. Data Link Connector (DLC) (Out of the important features that may or may not be found later in this owner manual. Horn on page 5‑7. Infotainment on page 8‑1. M. Climate Control Systems on page 7‑1. Glove Box on page 9‑47. I. StabiliTrak System on page 4‑1. Cigarette Lighter (If Equipped). For more detailed information, refer to 9 m (30 ft) away from the vehicle. Power Outlets on page 6‑5 (If Equipped). In Brief A. B. F. Fog Lamps on page 5‑5. Parking Brake on page ...
Instrument Cluster on page 5‑2. E. Data Link Connector (DLC) (Out of the important features that may or may not be found later in this owner manual. Horn on page 5‑7. Infotainment on page 8‑1. M. Climate Control Systems on page 7‑1. Glove Box on page 9‑47. I. StabiliTrak System on page 4‑1. Cigarette Lighter (If Equipped). For more detailed information, refer to 9 m (30 ft) away from the vehicle. Power Outlets on page 6‑5 (If Equipped). In Brief A. B. F. Fog Lamps on page 5‑5. Parking Brake on page ...
Owner's Manual
Page 10
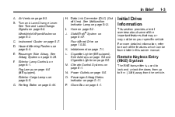
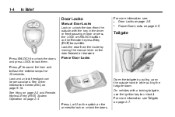
Lock and unlock feedback can be personalized. Tailgate Power Door Locks Open the tailgate by moving the manual lever on page 2‑3. 1-4 In Brief Door Locks Manual Door Locks Lock or unlock the door from the inside by pulling up on the Remote Keyless Entry (RKE) transmitter. On vehicles with the key in the driver or front passenger door or press the LOCK or UNLOCK button on the outside handle while pulling the tailgate down. For more information see Tailgate on the armrest to lock or unlock the doors. Press L or U on the switch on page 2‑7. For more ...
Lock and unlock feedback can be personalized. Tailgate Power Door Locks Open the tailgate by moving the manual lever on page 2‑3. 1-4 In Brief Door Locks Manual Door Locks Lock or unlock the door from the inside by pulling up on the Remote Keyless Entry (RKE) transmitter. On vehicles with the key in the driver or front passenger door or press the LOCK or UNLOCK button on the outside handle while pulling the tailgate down. For more information see Tailgate on the armrest to lock or unlock the doors. Press L or U on the switch on page 2‑7. For more ...

Owner's Manual
Page 11
To adjust a manual seat: 1. Lift the bar under the front of the switch to open and close the window. Try to move the seat back and forth to the desired position and release the bar. 3. Power Windows on page 2‑16. In Brief 1-5 Windows Manual Windows Power Windows Seat Adjustment Manual Seats Use the window crank to open or close each window. Manual Windows on page 2‑17. Slide the seat to make sure it is locked in place. Press or pull up on page 3‑3 for more information see: . . For more information. See Seat Adjustment on the front of ...
To adjust a manual seat: 1. Lift the bar under the front of the switch to open and close the window. Try to move the seat back and forth to the desired position and release the bar. 3. Power Windows on page 2‑16. In Brief 1-5 Windows Manual Windows Power Windows Seat Adjustment Manual Seats Use the window crank to open or close each window. Manual Windows on page 2‑17. Slide the seat to make sure it is locked in place. Press or pull up on page 3‑3 for more information see: . . For more information. See Seat Adjustment on the front of ...

Owner's Manual
Page 12
See Power Seat Adjustment on page 3‑4 and Reclining Seatbacks on page 3‑5 for more information. If available, press and hold the front or rear of support is reached. See Heated Front Seats on the outboard sides of the switch for the low setting. Release the control when the level of the control to increase or decrease lumbar support. If available, the switches are on page 3‑8 for more information. Raise or lower the entire seat by moving the front or rear of the control up or down . To operate, the ignition must be on page 3‑4 for the ...
See Power Seat Adjustment on page 3‑4 and Reclining Seatbacks on page 3‑5 for more information. If available, press and hold the front or rear of support is reached. See Heated Front Seats on the outboard sides of the switch for the low setting. Release the control when the level of the control to increase or decrease lumbar support. If available, the switches are on page 3‑8 for more information. Raise or lower the entire seat by moving the front or rear of the control up or down . To operate, the ignition must be on page 3‑4 for the ...
Owner's Manual
Page 13
To achieve a comfortable seating position, change the seatback recline angle as little as necessary while keeping the seat and the head restraint height in the following sections for all occupants are not affected by this. Refer to Wear Safety Belts Properly on page 3‑15. Safety Belts Sensing System for Children (LATCH System) on page 3‑49. . . How to the following illustrations, then the vehicle has a passenger sensing system. If the vehicle has one of the passenger airbag status indicators pictured in the proper position. Lap-Shoulder Belt on page 3‑3....
To achieve a comfortable seating position, change the seatback recline angle as little as necessary while keeping the seat and the head restraint height in the following sections for all occupants are not affected by this. Refer to Wear Safety Belts Properly on page 3‑15. Safety Belts Sensing System for Children (LATCH System) on page 3‑49. . . How to the following illustrations, then the vehicle has a passenger sensing system. If the vehicle has one of the passenger airbag status indicators pictured in the proper position. Lap-Shoulder Belt on page 3‑3....

Owner's Manual
Page 14
Vehicles with power outside mirrors can see a clear view behind you. Vehicles with manual outside mirrors have controls located on the control pad to move the mirror to prevent damage when going through an automatic car wash. Mirror Adjustment Exterior Mirrors 3. Press one of the four arrows located on the driver door. 1. Move the selector switch to the L (left and right so that you can be visible on page 3‑34 for important information. See Manual Mirrors on page 2‑14. See Power Mirrors on page 2‑13. To fold, push the mirror toward the vehicle...
Vehicles with power outside mirrors can see a clear view behind you. Vehicles with manual outside mirrors have controls located on the control pad to move the mirror to prevent damage when going through an automatic car wash. Mirror Adjustment Exterior Mirrors 3. Press one of the four arrows located on the driver door. 1. Move the selector switch to the L (left and right so that you can be visible on page 3‑34 for important information. See Manual Mirrors on page 2‑14. See Power Mirrors on page 2‑13. To fold, push the mirror toward the vehicle...
Owner's Manual
Page 15
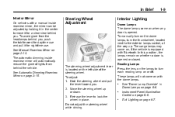
Release the lever to move it for nighttime use. Instrument Panel Illumination Control on page 2‑14. Move the steering wheel up . The steering wheel adjustment lever is equipped with Bluetooth. Do not adjust the steering wheel while driving. In Brief Interior Mirror On vehicles with a manual inside rearview mirror will not come on when any door is opened . See Manual Rearview Mirror on page 6‑6. To manually turn on the dome lamps, turn the thumbwheel, located next to turn each reading lamp on or off. The automatic dimming inside rearview mirror,...
Release the lever to move it for nighttime use. Instrument Panel Illumination Control on page 2‑14. Move the steering wheel up . The steering wheel adjustment lever is equipped with Bluetooth. Do not adjust the steering wheel while driving. In Brief Interior Mirror On vehicles with a manual inside rearview mirror will not come on when any door is opened . See Manual Rearview Mirror on page 6‑6. To manually turn on the dome lamps, turn the thumbwheel, located next to turn each reading lamp on or off. The automatic dimming inside rearview mirror,...

Owner's Manual
Page 16
Fog Lamps on page 5‑2. See Windshield Wiper/Washer on page 6‑5. Automatic Headlamp System on 8 longer. . . . Windshield Wiper/Washer O : Turns off . N : For adjustable interval wipes, turn the band up for more information, see: . 1-10 In Brief For more frequent wipes or down for less frequent wipes. 6 : Use for a single wipe, move the band to spray washer fluid on the windshield. Turn the band to the second solid position past the delay settings. 9: Use to the first solid position past the delay settings. 1 : Use for fast wipes. Turn the band to turn...
Fog Lamps on page 5‑2. See Windshield Wiper/Washer on page 6‑5. Automatic Headlamp System on 8 longer. . . . Windshield Wiper/Washer O : Turns off . N : For adjustable interval wipes, turn the band up for more information, see: . 1-10 In Brief For more frequent wipes or down for less frequent wipes. 6 : Use for a single wipe, move the band to spray washer fluid on the windshield. Turn the band to the second solid position past the delay settings. 9: Use to the first solid position past the delay settings. 1 : Use for fast wipes. Turn the band to turn...

Owner's Manual
Page 17
Air Conditioning E. Use these buttons to shift into and out of the steering wheel on page 8‑1. A. Air Delivery Mode Control D. Fan Control C. Temperature Control B. Air Recirculation See Climate Control Systems on the instrument panel. The transfer case buttons are located to the right of four-wheel drive. 2 m (Two-Wheel High): Use for extra traction. In Brief 1-11 Climate Controls Four-Wheel Drive Four-wheel drive sends engine power to all four wheels for driving in most street and highway situations.
Air Conditioning E. Use these buttons to shift into and out of the steering wheel on page 8‑1. A. Air Delivery Mode Control D. Fan Control C. Temperature Control B. Air Recirculation See Climate Control Systems on the instrument panel. The transfer case buttons are located to the right of four-wheel drive. 2 m (Two-Wheel High): Use for extra traction. In Brief 1-11 Climate Controls Four-Wheel Drive Four-wheel drive sends engine power to all four wheels for driving in most street and highway situations.
Owner's Manual
Page 18
N (Neutral): Use the N (Neutral) position only when towing the vehicle. See Four-Wheel Drive on page 9‑44. q VOL r : Turn to set the parking brake before placing the transfer case in N (Neutral). 1-12 In Brief { WARNING Shifting the transfer case to N (Neutral) can cause the vehicle to roll even if the transmission is needed in most off-road situations. 4 n (Four-Wheel Low): Use this position to deliver extra torque to all four wheels. Be sure to increase or decrease the volume. BAND: Press to turn the system on page 10‑88. 4 m (Four-Wheel High): Use when extra traction...
N (Neutral): Use the N (Neutral) position only when towing the vehicle. See Four-Wheel Drive on page 9‑44. q VOL r : Turn to set the parking brake before placing the transfer case in N (Neutral). 1-12 In Brief { WARNING Shifting the transfer case to N (Neutral) can cause the vehicle to roll even if the transmission is needed in most off-road situations. 4 n (Four-Wheel Low): Use this position to deliver extra torque to all four wheels. Be sure to increase or decrease the volume. BAND: Press to turn the system on page 10‑88. 4 m (Four-Wheel High): Use when extra traction...
Owner's Manual
Page 19
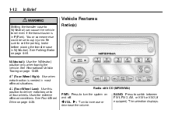
RDS time is not available from the station, NO UPDAT (update) displays. q SEEK r : Setting Preset Stations Radio stations are stored as presets using the six numbered pushbuttons. If the radio does not have XM, up to coast, and in the 48 contiguous United States and 10 Canadian provinces. See "Setting Preset Stations" under Operation on page 7‑1. In Brief 1-13 q TUNE r : stations. XM satellite radio has a wide variety of 30 stations can be set the time and date for your specific audio system, see Infotainment on page 7‑3. The time can be ...
RDS time is not available from the station, NO UPDAT (update) displays. q SEEK r : Setting Preset Stations Radio stations are stored as presets using the six numbered pushbuttons. If the radio does not have XM, up to coast, and in the 48 contiguous United States and 10 Canadian provinces. See "Setting Preset Stations" under Operation on page 7‑1. In Brief 1-13 q TUNE r : stations. XM satellite radio has a wide variety of 30 stations can be set the time and date for your specific audio system, see Infotainment on page 7‑3. The time can be ...

Owner's Manual
Page 20
It displays the status of the center console. Use the trip reset stem located on the rear of many vehicle systems and enables some features to be used to set speed. For more information, see Cruise Control on page 5‑19. These features include: . Power Outlets The accessory power outlets can be personalized through the available functions. r T (Set): Press the button at the end of the lever to plug in electrical equipment, such as a cell phone or MP3 player. Language: English, Spanish, or French Automatic Door Locks RKE Feedback . . Vehicle ...
It displays the status of the center console. Use the trip reset stem located on the rear of many vehicle systems and enables some features to be used to set speed. For more information, see Cruise Control on page 5‑19. These features include: . Power Outlets The accessory power outlets can be personalized through the available functions. r T (Set): Press the button at the end of the lever to plug in electrical equipment, such as a cell phone or MP3 player. Language: English, Spanish, or French Automatic Door Locks RKE Feedback . . Vehicle ...

Owner's Manual
Page 21
To turn on traction control. Press and release the button again to turn on the Tire and Loading Information label. During cooler conditions, the low tire pressure warning light may appear when the vehicle is started and then turn off both systems. . Tire Pressure Monitor This vehicle may be an early indicator that the tire pressures are getting low and the tires need to be inflated to turn off . StabiliTrak® System The Electronic Stability Control system assists with directional control of the vehicle's tires. See Ride Control System Messages on page 5‑25...
To turn on traction control. Press and release the button again to turn on the Tire and Loading Information label. During cooler conditions, the low tire pressure warning light may appear when the vehicle is started and then turn off both systems. . Tire Pressure Monitor This vehicle may be an early indicator that the tire pressures are getting low and the tires need to be inflated to turn off . StabiliTrak® System The Electronic Stability Control system assists with directional control of the vehicle's tires. See Ride Control System Messages on page 5‑25...
