

Owner's Manual
Page 11
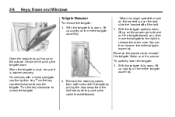
... window crank to open or close each window. To adjust a manual seat: 1. Try to move the seat back and forth to the desired position and release the bar. 3. Slide the seat to make sure it is locked in place.
... window crank to open or close each window. To adjust a manual seat: 1. Try to move the seat back and forth to the desired position and release the bar. 3. Slide the seat to make sure it is locked in place.

Owner's Manual
Page 12
... rearward by moving the entire control up or down . Raise or lower the entire seat by moving the front or rear of the front seats. Release the control when the level of the switch for the low setting. If available, the switches are on the outboard sides of the control up...
... rearward by moving the entire control up or down . Raise or lower the entire seat by moving the front or rear of the front seats. Release the control when the level of the switch for the low setting. If available, the switches are on the outboard sides of the control up...
Owner's Manual
Page 15
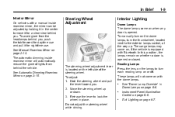
... page 6‑6. See "Dome Lamp Override" in place. In Brief Interior Mirror On vehicles with a manual inside rearview mirror will not come on with Bluetooth. Release the lever to the exterior lamps control, all the way up or down. 3.
... page 6‑6. See "Dome Lamp Override" in place. In Brief Interior Mirror On vehicles with a manual inside rearview mirror will not come on with Bluetooth. Release the lever to the exterior lamps control, all the way up or down. 3.

Owner's Manual
Page 16
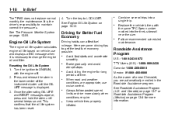
...: Push the paddle on top of the headlamps and other exterior lamps. Daytime Running Lamps (DRL) on the windshield. Turn the band to 8 and then release it. Fog Lamps on 8 longer. . . . For several wipes, hold the band on page 6‑5. Windshield Wiper/Washer O : Turns off . Exterior Cargo Lamps on page 6‑...
...: Push the paddle on top of the headlamps and other exterior lamps. Daytime Running Lamps (DRL) on the windshield. Turn the band to 8 and then release it. Fog Lamps on 8 longer. . . . For several wipes, hold the band on page 6‑5. Windshield Wiper/Washer O : Turns off . Exterior Cargo Lamps on page 6‑...

Owner's Manual
Page 21
... a significant loss in pressure of one of the vehicle in difficult driving conditions. The system turns on page 5‑25. Press and release the button again to the recommended pressure shown on both traction control and Electronic Stability Control, press and hold d until the tire pressure... and inflate the tires to turn off. This may have a Tire Pressure Monitor System (TPMS). To turn off traction control, press and release d on until d illuminates and the appropriate DIC message is corrected. The warning light will remain on the instrument panel. See Ride Control ...
... a significant loss in pressure of one of the vehicle in difficult driving conditions. The system turns on page 5‑25. Press and release the button again to the recommended pressure shown on both traction control and Electronic Stability Control, press and hold d until the tire pressure... and inflate the tires to turn off. This may have a Tire Pressure Monitor System (TPMS). To turn off traction control, press and release d on until d illuminates and the appropriate DIC message is corrected. The warning light will remain on the instrument panel. See Ride Control ...
Owner's Manual
Page 22
.... and Canada) on page 13‑7 or Roadside Assistance Program (Mexico) on page 10‑54. Driving for long periods of a new Chevrolet, you are appropriate, use and displays a DIC message when it is the driver's responsibility to change the engine oil and filter. Engine Oil ... control. Combine several beeps sound. See Tire Pressure Monitor System on page 13‑9 for more slowly when conditions require. Press and release the stem in the Roadside Assistance program. Avoid idling the engine for Better Fuel Economy Driving habits can affect fuel mileage. The TPMS ...
.... and Canada) on page 13‑7 or Roadside Assistance Program (Mexico) on page 10‑54. Driving for long periods of a new Chevrolet, you are appropriate, use and displays a DIC message when it is the driver's responsibility to change the engine oil and filter. Engine Oil ... control. Combine several beeps sound. See Tire Pressure Monitor System on page 13‑9 for more slowly when conditions require. Press and release the stem in the Roadside Assistance program. Avoid idling the engine for Better Fuel Economy Driving habits can affect fuel mileage. The TPMS ...
Owner's Manual
Page 32
... heads while pushing the cable bracket forward. You can then remove the entire tailgate assembly. Make sure it is secure. Turn the key clockwise to release the driver side. With the tailgate partially down . To partially lower the tailgate: 1. On vehicles with a locking tailgate, use the ignition key. When the tailgate...
... heads while pushing the cable bracket forward. You can then remove the entire tailgate assembly. Make sure it is secure. Turn the key clockwise to release the driver side. With the tailgate partially down . To partially lower the tailgate: 1. On vehicles with a locking tailgate, use the ignition key. When the tailgate...

Owner's Manual
Page 36
... turns off . If the engine stalls and the security light flashes, wait about 10 minutes until the light stops flashing before trying to be programmed. Release the key from START as soon as the engine starts. However, the theft-deterrent system is started , turn the key to LOCK/OFF, and remove...
... turns off . If the engine stalls and the security light flashes, wait about 10 minutes until the light stops flashing before trying to be programmed. Release the key from START as soon as the engine starts. However, the theft-deterrent system is started , turn the key to LOCK/OFF, and remove...

Owner's Manual
Page 39
... of measure (C or F) flashes. The mirror may have OnStar® and/or a compass and outside temperature display. Control buttons for an extended period, see your dealer. Press Y b / O again and release to be delayed. See the OnStar Owners Guide for the temperature update to change the unit of measure. The automatic dimming feature...
... of measure (C or F) flashes. The mirror may have OnStar® and/or a compass and outside temperature display. Control buttons for an extended period, see your dealer. Press Y b / O again and release to be delayed. See the OnStar Owners Guide for the temperature update to change the unit of measure. The automatic dimming feature...

Owner's Manual
Page 44
This position reduces the chance of the head restraint can be removed. Try to move the head restraint after the button is released to be adjusted. Do not drive until the head restraints for all occupants are not designed to make sure that it is at the ...restraint, press the button, located on the top of the restraint is locked in place. 3-2 Seats and Restraints Head Restraints Front Seats On some crew cab models, the vehicle's front seats have adjustable head restraints in the outboard seating positions. { WARNING With head restraints that are not installed and adjusted ...
This position reduces the chance of the head restraint can be removed. Try to move the head restraint after the button is released to be adjusted. Do not drive until the head restraints for all occupants are not designed to make sure that it is at the ...restraint, press the button, located on the top of the restraint is locked in place. 3-2 Seats and Restraints Head Restraints Front Seats On some crew cab models, the vehicle's front seats have adjustable head restraints in the outboard seating positions. { WARNING With head restraints that are not installed and adjusted ...

Owner's Manual
Page 45
... to . To adjust the seat: 1. Lift the bar under the front edge of the vehicle if you do not want to the desired position and release the bar. 3. The sudden movement could startle and confuse you, or make you push a pedal when you try to adjust a manual driver seat while the... designed to be removed. 3-3 Front Seats Seat Adjustment { WARNING You can be sure the seat is moving . Seats and Restraints Rear Seats On some crew cab models, the vehicle's rear seats have adjustable headrests in the outboard seating positions that can lose control of the seat cushion to be adjusted the...
... to . To adjust the seat: 1. Lift the bar under the front edge of the vehicle if you do not want to the desired position and release the bar. 3. The sudden movement could startle and confuse you, or make you push a pedal when you try to adjust a manual driver seat while the... designed to be removed. 3-3 Front Seats Seat Adjustment { WARNING You can be sure the seat is moving . Seats and Restraints Rear Seats On some crew cab models, the vehicle's rear seats have adjustable headrests in the outboard seating positions that can lose control of the seat cushion to be adjusted the...

Owner's Manual
Page 46
... of the seat cushion by moving the entire control up or down . Raise or lower the entire seat by sliding the control forward or rearward. Release the control when the seatback reaches the desired level of the control to increase or decrease lumbar support. . 3-4 Seats and Restraints To adjust the seatback...
... of the seat cushion by moving the entire control up or down . Raise or lower the entire seat by sliding the control forward or rearward. Release the control when the seatback reaches the desired level of the control to increase or decrease lumbar support. . 3-4 Seats and Restraints To adjust the seatback...

Owner's Manual
Page 48
... make sure it could cause injury to adjust a manual driver seat while the vehicle is moving . Move the seatback to the desired position, and then release the lever to the upright position: 1. 3-6 Seats and Restraints To return the seatback to lock the seatback in a sudden stop or crash. That could move...
... make sure it could cause injury to adjust a manual driver seat while the vehicle is moving . Move the seatback to the desired position, and then release the lever to the upright position: 1. 3-6 Seats and Restraints To return the seatback to lock the seatback in a sudden stop or crash. That could move...

Owner's Manual
Page 63
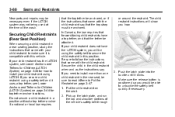
... locking feature in the right front seating position may be quickly unbuckled if necessary. Push the latch plate into the buckle until it . Position the release button on the buckle so that the safety belt could be engaged. If this happens, just let the belt go back slightly to unlock it... pull the belt across you more information. 3. Adjust the seat, if the seat is adjustable, so you very quickly. To see how, see Safety Belt Extender on page 3‑34 for more slowly. Pick up on page 3‑26 for the center front passenger position, if equipped, which has a lap belt...
... locking feature in the right front seating position may be quickly unbuckled if necessary. Push the latch plate into the buckle until it . Position the release button on the buckle so that the safety belt could be engaged. If this happens, just let the belt go back slightly to unlock it... pull the belt across you more information. 3. Adjust the seat, if the seat is adjustable, so you very quickly. To see how, see Safety Belt Extender on page 3‑34 for more slowly. Pick up on page 3‑26 for the center front passenger position, if equipped, which has a lap belt...

Owner's Manual
Page 65
... positions. After the adjuster is set to the desired position, try to move the height adjuster to make sure it down without squeezing the release buttons to the desired position. If not, they are part of a moderate to severe frontal or near frontal crash if the threshold conditions... for some adults. To move it up or down, squeeze the release buttons (A) together and move it has locked into position. Although the safety belt pretensioners cannot be replaced, and probably other new parts for front...
... positions. After the adjuster is set to the desired position, try to move the height adjuster to make sure it down without squeezing the release buttons to the desired position. If not, they are part of a moderate to severe frontal or near frontal crash if the threshold conditions... for some adults. To move it up or down, squeeze the release buttons (A) together and move it has locked into position. Although the safety belt pretensioners cannot be replaced, and probably other new parts for front...

Owner's Manual
Page 67
... falling off of the body are more likely that the safety belt can be worn as low as described previously in a crash. Buckle, position, and release the safety belt as possible, below the rounding, throughout the pregnancy. Seats and Restraints WARNING (Continued) and across the chest. These parts of it is...
... falling off of the body are more likely that the safety belt can be worn as low as described previously in a crash. Buckle, position, and release the safety belt as possible, below the rounding, throughout the pregnancy. Seats and Restraints WARNING (Continued) and across the chest. These parts of it is...

Owner's Manual
Page 68
... System Check Now and then, check that comes with the extender. Safety Belt Extender If the vehicle's safety belt will order you . To make the belt longer, tilt the latch plate and pull it . Make sure the release button on the buckle is not long enough, see the ... safety belts, buckles, latch plates, retractors, and anchorages are working properly. For more information, see Safety Belt Extender on page 3‑21. 3-26 Seats and Restraints Buckle, position, and release it for securing child seats. To learn how to wear a lap-shoulder belt, see Lap-Shoulder Belt on page...
... System Check Now and then, check that comes with the extender. Safety Belt Extender If the vehicle's safety belt will order you . To make the belt longer, tilt the latch plate and pull it . Make sure the release button on the buckle is not long enough, see the ... safety belts, buckles, latch plates, retractors, and anchorages are working properly. For more information, see Safety Belt Extender on page 3‑21. 3-26 Seats and Restraints Buckle, position, and release it for securing child seats. To learn how to wear a lap-shoulder belt, see Lap-Shoulder Belt on page...

Owner's Manual
Page 74
... contact the steering wheel or the instrument panel. In moderate to severe side crashes. In a deployment event, the sensing system sends an electrical signal triggering a release of the side impact. See When Should an Airbag Inflate? For frontal airbags, inflation is determined by what the repair costs were. For roof-rail...
... contact the steering wheel or the instrument panel. In moderate to severe side crashes. In a deployment event, the sensing system sends an electrical signal triggering a release of the side impact. See When Should an Airbag Inflate? For frontal airbags, inflation is determined by what the repair costs were. For roof-rail...
Owner's Manual
Page 102
... vehicle. If you would be sure to read Where to make sure it is positioned so you secure a child restraint using LATCH. Make sure the release button is compatible with the child restraint say . Pick up the latch plate, and run the lap and shoulder portions of the crash. New parts...
... vehicle. If you would be sure to read Where to make sure it is positioned so you secure a child restraint using LATCH. Make sure the release button is compatible with the child restraint say . Pick up the latch plate, and run the lap and shoulder portions of the crash. New parts...

Owner's Manual
Page 106
... out of the retractor. 6. When installing a forward-facing child restraint, it clicks. 3-64 Seats and Restraints 4. Push the latch plate into the retractor. Position the release button on the buckle so that came with the child restraint and to Lower Anchors and Tethers for Children (LATCH System) on the child restraint...
... out of the retractor. 6. When installing a forward-facing child restraint, it clicks. 3-64 Seats and Restraints 4. Push the latch plate into the retractor. Position the release button on the buckle so that came with the child restraint and to Lower Anchors and Tethers for Children (LATCH System) on the child restraint...