Owner's Manual
Page 1
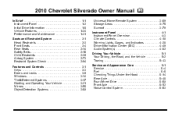
2010 Chevrolet Silverado Owner Manual M In Brief ...1-1 Instrument Panel ...1-2 Initial Drive Information ...1-6 Vehicle Features ...1-24 Performance and Maintenance ...1-31 Seats and Restraint System ...2-1 Head Restraints ...2-3 Front Seats ...2-4 Rear Seats ...2-14 ...
2010 Chevrolet Silverado Owner Manual M In Brief ...1-1 Instrument Panel ...1-2 Initial Drive Information ...1-6 Vehicle Features ...1-24 Performance and Maintenance ...1-31 Seats and Restraint System ...2-1 Head Restraints ...2-3 Front Seats ...2-4 Rear Seats ...2-14 ...

Owner's Manual
Page 2
2010 Chevrolet Silverado Owner Manual M Headlamp Aiming ...6-54 Bulb Replacement ...6-57 Windshield Wiper Blade Replacement ...6-63 Tires ...6-64 Appearance Care ...6-110 Vehicle Identification ...6-117 Electrical System ...6-117 Capacities and Specifications ...6-126 Maintenance Schedule ...7-1 Maintenance Schedule ...7-2 Customer Assistance Information ...8-1 Customer Assistance and Information ...8-2 Reporting Safety Defects ...8-15 Vehicle Data Recording and Privacy ...8-17 Index ...i-1
2010 Chevrolet Silverado Owner Manual M Headlamp Aiming ...6-54 Bulb Replacement ...6-57 Windshield Wiper Blade Replacement ...6-63 Tires ...6-64 Appearance Care ...6-110 Vehicle Identification ...6-117 Electrical System ...6-117 Capacities and Specifications ...6-126 Maintenance Schedule ...7-1 Maintenance Schedule ...7-2 Customer Assistance Information ...8-1 Customer Assistance and Information ...8-2 Reporting Safety Defects ...8-15 Vehicle Data Recording and Privacy ...8-17 Index ...i-1
Owner's Manual
Page 3
...en français auprès du concessionnaire ou à l'adresse suivante: GENERAL MOTORS, GM, the GM Emblem, CHEVROLET, the CHEVROLET Emblem, and the names SILVERADO and Z71 are options that you did not purchase or due to changes subsequent to the DURAMAX® Diesel supplement for ...additional and specific information on this manual can be on your specific vehicle either because they are registered trademarks of General...
...en français auprès du concessionnaire ou à l'adresse suivante: GENERAL MOTORS, GM, the GM Emblem, CHEVROLET, the CHEVROLET Emblem, and the names SILVERADO and Z71 are options that you did not purchase or due to changes subsequent to the DURAMAX® Diesel supplement for ...additional and specific information on this manual can be on your specific vehicle either because they are registered trademarks of General...
Owner's Manual
Page 4
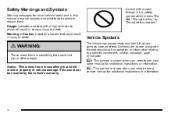
... injury or death. iv A circle with a high level of risk which means "Do Not," "Do not do this," or "Do not let this manual describe hazards and what to do to see your owner manual for additional instructions or information. * : This symbol is something that could hurt you need to see a service...
... injury or death. iv A circle with a high level of risk which means "Do Not," "Do not do this," or "Do not let this manual describe hazards and what to do to see your owner manual for additional instructions or information. * : This symbol is something that could hurt you need to see a service...
Owner's Manual
Page 12
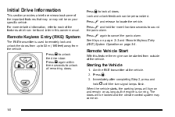
... of the features which can be found later in this feature the engine can be started from the vehicle. Remote Vehicle Start With this owner manual. Press K to locate the vehicle. Starting the Vehicle 1. Aim the RKE transmitter at the vehicle. 2. When the vehicle starts, the parking lamps will be on...
... of the features which can be found later in this feature the engine can be started from the vehicle. Remote Vehicle Start With this owner manual. Press K to locate the vehicle. Starting the Vehicle 1. Aim the RKE transmitter at the vehicle. 2. When the vehicle starts, the parking lamps will be on...
Owner's Manual
Page 13
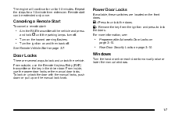
...hazard warning flashers. Turn on page 3‑10. Turn the ignition on the front doors. From outside, use the power door locks or the manual door locks. Q : Remove the key from the ignition and press to lock and unlock the vehicle. Door Locks There are located on and ... knob. Repeat the steps for 10 minutes. To lock or unlock the door with the manual locks, push down or pull up on page 3‑10. K : Press to manually raise or lower the manual windows. 1-7 Windows Turn the hand crank on page 3‑7. . Remote start : . For more information, see: . See...
...hazard warning flashers. Turn on page 3‑10. Turn the ignition on the front doors. From outside, use the power door locks or the manual door locks. Q : Remove the key from the ignition and press to lock and unlock the vehicle. Door Locks There are located on and ... knob. Repeat the steps for 10 minutes. To lock or unlock the door with the manual locks, push down or pull up on page 3‑10. K : Press to manually raise or lower the manual windows. 1-7 Windows Turn the hand crank on page 3‑7. . Remote start : . For more information, see: . See...
Owner's Manual
Page 14
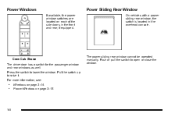
... up to open or close the window. Power Windows on page 3‑14. Crew Cab Shown The driver door has a switch for the passenger window and rear windows as well. The power sliding rear window cannot be operated manually. Push or pull the switch to raise it. Press the switch to lower the...
... up to open or close the window. Power Windows on page 3‑14. Crew Cab Shown The driver door has a switch for the passenger window and rear windows as well. The power sliding rear window cannot be operated manually. Push or pull the switch to raise it. Press the switch to lower the...
Owner's Manual
Page 15
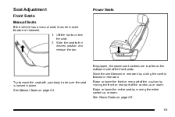
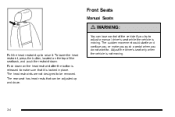
... 2‑5. 1-9 See Power Seats on the outboard side of the cushion by moving the front or rear part of the control up or down . See Manual Seats on page 2‑4. Raise or lower the front or rear part of the front seats. Lift the bar to the desired position and release... the bar. Move the seat forward or rearward by sliding the control forward or rearward. Seat Adjustment Front Seats Manual Seats If the vehicle has a manual seat, it can be sure the seat is locked in place.
... 2‑5. 1-9 See Power Seats on the outboard side of the cushion by moving the front or rear part of the control up or down . See Manual Seats on page 2‑4. Raise or lower the front or rear part of the front seats. Lift the bar to the desired position and release... the bar. Move the seat forward or rearward by sliding the control forward or rearward. Seat Adjustment Front Seats Manual Seats If the vehicle has a manual seat, it can be sure the seat is locked in place.
Owner's Manual
Page 16
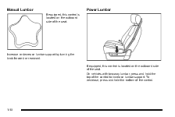
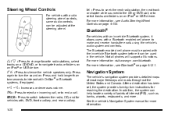
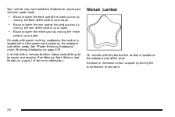
Manual Lumbar If equipped, this control is located on the outboard side of the seat. Power Lumbar Increase or decrease lumbar support by turning the knob forward or rearward. On vehicles with two-way lumbar, press and hold the bottom of the control to increase lumbar support. If equipped, this control is located on the outboard side of the seat. To decrease, press and hold the top of the control. 1-10
Manual Lumbar If equipped, this control is located on the outboard side of the seat. Power Lumbar Increase or decrease lumbar support by turning the knob forward or rearward. On vehicles with two-way lumbar, press and hold the bottom of the control to increase lumbar support. If equipped, this control is located on the outboard side of the seat. To decrease, press and hold the top of the control. 1-10
Owner's Manual
Page 17
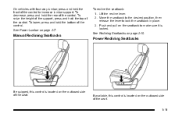
... is located on the outboard side of the control. To raise the height of the support, press and hold the top of the seat. 1-11 Manual Reclining Seatbacks Power Reclining Seatbacks If equipped, this control is locked. If available, this control is located on the seatback to lock the seatback in...
... is located on the outboard side of the control. To raise the height of the support, press and hold the top of the seat. 1-11 Manual Reclining Seatbacks Power Reclining Seatbacks If equipped, this control is locked. If available, this control is located on the seatback to lock the seatback in...
Owner's Manual
Page 21
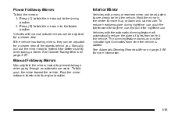
... time the vehicle is started. Hold the mirror in to side. Vehicles with a manual rearview mirror can be adjusted for a clearer view of lights from behind the vehicle. Vehicles with manual outside mirrors can be adjusted to see clearly behind the vehicle. To reduce headlamp glare...when towing a trailer. See Automatic Dimming Rearview Mirror on page 3‑56 for nighttime use and pull it for a clearer view. Manual Foldaway Mirrors Manually fold the mirrors inward to the driving position. 2. Push the mirror outward, to return to extend it for more information. To fold,...
... time the vehicle is started. Hold the mirror in to side. Vehicles with a manual rearview mirror can be adjusted for a clearer view of lights from behind the vehicle. Vehicles with manual outside mirrors can be adjusted to see clearly behind the vehicle. To reduce headlamp glare...when towing a trailer. See Automatic Dimming Rearview Mirror on page 3‑56 for nighttime use and pull it for a clearer view. Manual Foldaway Mirrors Manually fold the mirrors inward to the driving position. 2. Push the mirror outward, to return to extend it for more information. To fold,...
Owner's Manual
Page 27
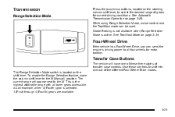
... the steering column shift lever, to the M. Transfer Case Buttons The vehicle will appear next to select the desired range of these controls to the M (Manual) position. The Range Selection Mode switch is the highest attainable range with all four wheels for current driving conditions. While using Range Selection Mode, cruise...
... the steering column shift lever, to the M. Transfer Case Buttons The vehicle will appear next to select the desired range of these controls to the M (Manual) position. The Range Selection Mode switch is the highest attainable range with all four wheels for current driving conditions. While using Range Selection Mode, cruise...
Owner's Manual
Page 28
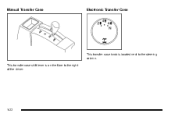
Manual Transfer Case Electronic Transfer Case This transfer case knob is on the floor to the steering column. This transfer case shift lever is located next to the right of the driver. 1-22
Manual Transfer Case Electronic Transfer Case This transfer case knob is on the floor to the steering column. This transfer case shift lever is located next to the right of the driver. 1-22
Owner's Manual
Page 32
... system, it can help locate a variety of points of most major freeways and roads throughout the United States and Canada. See the vehicle's Navigation System manual for reaching the destination. e − e : Increases or decreases volume. In addition, the system can be adjusted at the steering wheel. ¨: Press to seek the...
... system, it can help locate a variety of points of most major freeways and roads throughout the United States and Canada. See the vehicle's Navigation System manual for reaching the destination. e − e : Increases or decreases volume. In addition, the system can be adjusted at the steering wheel. ¨: Press to seek the...
Owner's Manual
Page 37
... on page 4‑63. 5 on page 4‑63. See Sunroof on automatically every time the vehicle is started. . To turn on page 3‑79. Manual-Open/Manual-Close : To open the sunroof, fully press and release the rear of the passenger side switch to vent the sunroof. The sunroof also has a sunshade... StabiliTrak® System on both traction control and Electronic Stability Control, press and hold 5 until the sunroof reaches the desired position. Vent : From the closed manually.
... on page 4‑63. 5 on page 4‑63. See Sunroof on automatically every time the vehicle is started. . To turn on page 3‑79. Manual-Open/Manual-Close : To open the sunroof, fully press and release the rear of the passenger side switch to vent the sunroof. The sunroof also has a sunshade... StabiliTrak® System on both traction control and Electronic Stability Control, press and hold 5 until the sunroof reaches the desired position. Vent : From the closed manually.
Owner's Manual
Page 40
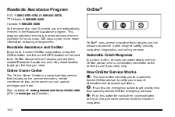
...need . This program provides technically trained advisors who is a complimentary service that includes online service reminders, vehicle maintenance tips, online owner manual, special privileges and more. Online Owner Center The Online Owner Center is immediately connected to the vehicle to get you the help ... answer questions. ] : Push this button for hands‐free, voice‐activated calling and to provide a wide range of a new Chevrolet, you are automatically enrolled in sensors can automatically alert an OnStar advisor who are available 24 hours a day, 365 days a year, minor...
...need . This program provides technically trained advisors who is a complimentary service that includes online service reminders, vehicle maintenance tips, online owner manual, special privileges and more. Online Owner Center The Online Owner Center is immediately connected to the vehicle to get you the help ... answer questions. ] : Push this button for hands‐free, voice‐activated calling and to provide a wide range of a new Chevrolet, you are automatically enrolled in sensors can automatically alert an OnStar advisor who are available 24 hours a day, 365 days a year, minor...
Owner's Manual
Page 43
... Airbag Off Switch) ...Securing a Child Restraint in the Right Front Seat Position (Heavy Duty Crew Cab Only) ...2-37 2-37 2-38 2-39 2-39 2-42 2-45 2-48 2-49 2-58 2-61 2-61 2-65 2-70 Head Restraints ...2-3 Front Seats ...2-4 Manual Seats ...2-4 Power Seats ...2-5 Manual Lumbar ...2-6 Power Lumbar ...2-7 Heated Seats ...2-8 Memory Seat, Mirrors, and Pedals ...2-8 Reclining Seatbacks ...2-10 Seatback...
... Airbag Off Switch) ...Securing a Child Restraint in the Right Front Seat Position (Heavy Duty Crew Cab Only) ...2-37 2-37 2-38 2-39 2-39 2-42 2-45 2-48 2-49 2-58 2-61 2-61 2-65 2-70 Head Restraints ...2-3 Front Seats ...2-4 Manual Seats ...2-4 Power Seats ...2-5 Manual Lumbar ...2-6 Power Lumbar ...2-7 Heated Seats ...2-8 Memory Seat, Mirrors, and Pedals ...2-8 Reclining Seatbacks ...2-10 Seatback...
Owner's Manual
Page 46
...'s seat only when the vehicle is moving . Pull the head restraint up and down on the top of the vehicle if you try to adjust a manual driver's seat while the vehicle is not moving . The head restraints are not designed to be adjusted up to raise it is released to . Push...
...'s seat only when the vehicle is moving . Pull the head restraint up and down on the top of the vehicle if you try to adjust a manual driver's seat while the vehicle is not moving . The head restraints are not designed to be adjusted up to raise it is released to . Push...

Owner's Manual
Page 47
Driver's Seat with Power Seat Control, Power Recline, and Power Lumbar shown On a vehicle with your body to the desired position and release the bar. Lift the bar to operate them are located on the outboard side of the seats. Slide the seat to be moved forward or rearward. 1. Move the seat forward or rearward by sliding the control forward or rearward. 2-5 Power Seats Try to move the seat with power seats, the controls used to unlock the seat. 2. If the vehicle has a manual seat, it can be sure the seat is locked in place.
Driver's Seat with Power Seat Control, Power Recline, and Power Lumbar shown On a vehicle with your body to the desired position and release the bar. Lift the bar to operate them are located on the outboard side of the seats. Slide the seat to be moved forward or rearward. 1. Move the seat forward or rearward by sliding the control forward or rearward. 2-5 Power Seats Try to move the seat with power seats, the controls used to unlock the seat. 2. If the vehicle has a manual seat, it can be sure the seat is locked in place.
Owner's Manual
Page 48
See "Power Reclining Seatbacks" under Reclining Seatbacks on page 2‑8 for more information. Manual Lumbar Raise or lower the front part of the seat cushion by moving the rear of the seat. Raise or lower the entire seat by ...
See "Power Reclining Seatbacks" under Reclining Seatbacks on page 2‑8 for more information. Manual Lumbar Raise or lower the front part of the seat cushion by moving the rear of the seat. Raise or lower the entire seat by ...


