Owner's Manual
Page 1
2010 Chevrolet Corvette Owner Manual In Brief ...1-1 Instrument Panel ...1-2 Initial Drive Information ...1-4 Vehicle Features ...1-15 Performance and Maintenance ...1-21 Seats and Restraint System ...2-1 Front Seats ...2-2 Safety Belts ...2-9 Child Restraints ... Check ...2-60 Features and Controls ...3-1 Keys ...3-3 Doors and Locks ...3-10 Windows ...3-16 Theft-Deterrent Systems ...3-18 M Starting and Operating Your Vehicle ...3-21 Mirrors ...3-38 Universal Home Remote System ...3-41 Storage Areas ...3-48 Roof Panel ...3-52 Convertible Top ...3-56 ...4-1 Instrument Panel Instrument Panel ...
2010 Chevrolet Corvette Owner Manual In Brief ...1-1 Instrument Panel ...1-2 Initial Drive Information ...1-4 Vehicle Features ...1-15 Performance and Maintenance ...1-21 Seats and Restraint System ...2-1 Front Seats ...2-2 Safety Belts ...2-9 Child Restraints ... Check ...2-60 Features and Controls ...3-1 Keys ...3-3 Doors and Locks ...3-10 Windows ...3-16 Theft-Deterrent Systems ...3-18 M Starting and Operating Your Vehicle ...3-21 Mirrors ...3-38 Universal Home Remote System ...3-41 Storage Areas ...3-48 Roof Panel ...3-52 Convertible Top ...3-56 ...4-1 Instrument Panel Instrument Panel ...
Owner's Manual
Page 2
... the Hood ...6-12 Rear Axle ...6-58 Headlamp Aiming ...6-58 Bulb Replacement ...6-59 Windshield Replacement ...6-62 Windshield Wiper Blade Replacement ...6-62 Tires ...6-64 Appearance Care ...6-92 Vehicle Identification ...6-101 Electrical System ...6-102 Capacities and Specifications ...6-112 Maintenance Schedule ...7-1 Maintenance Schedule ...7-2 Customer Assistance Information ...8-1 Customer Assistance and Information ...8-2 Reporting...
... the Hood ...6-12 Rear Axle ...6-58 Headlamp Aiming ...6-58 Bulb Replacement ...6-59 Windshield Replacement ...6-62 Windshield Wiper Blade Replacement ...6-62 Tires ...6-64 Appearance Care ...6-92 Vehicle Identification ...6-101 Electrical System ...6-102 Capacities and Specifications ...6-112 Maintenance Schedule ...7-1 Maintenance Schedule ...7-2 Customer Assistance Information ...8-1 Customer Assistance and Information ...8-2 Reporting...
Owner's Manual
Page 3
...çais auprès du concessionnaire ou à l'adresse suivante: GENERAL MOTORS, GM, the GM Emblem, CHEVROLET, the CHEVROLET Emblem, the names CORVETTE, Z06, ZR1, CORVETTE GRAND SPORT and the CORVETTE Emblem are options that you did not purchase or due to changes subsequent to confirm each of what...800-551-4123 Numéro de poste 6438 de langue française www.helminc.com Index To quickly locate information about the vehicle, use the index in Canada, substitute the name "General Motors of General Motors Corporation. Please refer to the purchase documentation relating to ...
...çais auprès du concessionnaire ou à l'adresse suivante: GENERAL MOTORS, GM, the GM Emblem, CHEVROLET, the CHEVROLET Emblem, the names CORVETTE, Z06, ZR1, CORVETTE GRAND SPORT and the CORVETTE Emblem are options that you did not purchase or due to changes subsequent to confirm each of what...800-551-4123 Numéro de poste 6438 de langue française www.helminc.com Index To quickly locate information about the vehicle, use the index in Canada, substitute the name "General Motors of General Motors Corporation. Please refer to the purchase documentation relating to ...
Owner's Manual
Page 4
... or Caution indicates a hazard that could result in serious injury or death. Notice: This means there is something that could result in property or vehicle damage. iv M : This symbol is shown when you or other people. A circle with a slash through it is something that could hurt ... is shown when you need to see a service manual for additional instructions or information. This would not be covered by the vehicle's warranty. Safety Warnings and Symbols Warning Messages found on vehicle labels and in this manual describe hazards and what to do this," or "Do not let this happen...
... or Caution indicates a hazard that could result in serious injury or death. Notice: This means there is something that could result in property or vehicle damage. iv M : This symbol is shown when you or other people. A circle with a slash through it is something that could hurt ... is shown when you need to see a service manual for additional instructions or information. This would not be covered by the vehicle's warranty. Safety Warnings and Symbols Warning Messages found on vehicle labels and in this manual describe hazards and what to do this," or "Do not let this happen...

Owner's Manual
Page 5
For more information on the vehicle and what they mean. Vehicle Symbol Chart Here are some additional symbols that may be found on the symbol, refer to the index. .: +: j 7: F: M: Fuel Gage Fuses Headlamp High/Low-Beam ... System Warning Light Charging System Cruise Control Engine Coolant Temperature Exterior Lamps Fog Lamps LATCH System Child Restraints Malfunction Indicator Lamp Oil Pressure Power Remote Vehicle Start Safety Belt Reminders Tire Pressure Monitor Traction Control Windshield Washer Fluid ": I: B: O: #: v
For more information on the vehicle and what they mean. Vehicle Symbol Chart Here are some additional symbols that may be found on the symbol, refer to the index. .: +: j 7: F: M: Fuel Gage Fuses Headlamp High/Low-Beam ... System Warning Light Charging System Cruise Control Engine Coolant Temperature Exterior Lamps Fog Lamps LATCH System Child Restraints Malfunction Indicator Lamp Oil Pressure Power Remote Vehicle Start Safety Belt Reminders Tire Pressure Monitor Traction Control Windshield Washer Fluid ": I: B: O: #: v
Owner's Manual
Page 7
... for Passenger Airbag ...1-9 Mirror Adjustment ...1-10 Steering Wheel Adjustment ...1-11 Interior Lighting ...1-12 Exterior Lighting ...1-12 Windshield Wiper/Washer ...1-13 Climate Controls ...1-14 Transmission ...1-14 Vehicle Features ...1-15 Radio(s) ...1-15 Satellite Radio ...1-16 In Brief Portable Audio Devices ...1-17 Steering Wheel Controls ...1-17 Bluetooth® ...1-17 Navigation System ...1-18 Driver Information...
... for Passenger Airbag ...1-9 Mirror Adjustment ...1-10 Steering Wheel Adjustment ...1-11 Interior Lighting ...1-12 Exterior Lighting ...1-12 Windshield Wiper/Washer ...1-13 Climate Controls ...1-14 Transmission ...1-14 Vehicle Features ...1-15 Radio(s) ...1-15 Satellite Radio ...1-16 In Brief Portable Audio Devices ...1-17 Steering Wheel Controls ...1-17 Bluetooth® ...1-17 Navigation System ...1-18 Driver Information...
Owner's Manual
Page 10
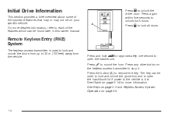
.... Initial Drive Information This section provides a brief overview about some of the features which can be used to lock and unlock the doors from the vehicle. Press again within five seconds to sound the horn. Press the button (A) to 30 m (100 feet) away from up to remove ...the key. For more information. Press any other button on your specific vehicle. See Hatch on page 3-5. 1-4 See Keys on page 3-3 and Keyless Access System Operation on page 3-14 for approximately one second to open the hatch/...
.... Initial Drive Information This section provides a brief overview about some of the features which can be used to lock and unlock the doors from the vehicle. Press again within five seconds to sound the horn. Press the button (A) to 30 m (100 feet) away from up to remove ...the key. For more information. Press any other button on your specific vehicle. See Hatch on page 3-5. 1-4 See Keys on page 3-3 and Keyless Access System Operation on page 3-14 for approximately one second to open the hatch/...

Owner's Manual
Page 13
See Power Seats on page 2-3. • Move (B) up or down to adjust the seat cushion height. See Power Lumbar and Side Bolsters on the outboard side of the control up or down to adjust the side bolsters. On vehicles with power seats, the control is located on page 2-3. 1-7 Power Seats Power Lumbar and Side Bolsters On vehicles with power lumbar and side bolsters: • Move the control forward or rearward to adjust the seat location. • Move (A) forward or rearward to adjust lumbar support. • Move the front or rear of the seat.
See Power Seats on page 2-3. • Move (B) up or down to adjust the seat cushion height. See Power Lumbar and Side Bolsters on the outboard side of the control up or down to adjust the side bolsters. On vehicles with power seats, the control is located on page 2-3. 1-7 Power Seats Power Lumbar and Side Bolsters On vehicles with power lumbar and side bolsters: • Move the control forward or rearward to adjust the seat location. • Move (A) forward or rearward to adjust lumbar support. • Move the front or rear of the seat.

Owner's Manual
Page 14
To recline the seatback: 1. Reclining Seatbacks Heated Seats On vehicles with heated seats, the buttons are located on page 2-6. 1-8 See Reclining Seatbacks on the center console. Lift the recline lever. 2. Lean back to position the seatback to where you want it to the low setting Press to turn the seat on for this feature to lock the seatback into place. Press again to turn the system off. L: 9: Press to turn it . 3. The ignition must be on at the high setting. Release the lever to work.
To recline the seatback: 1. Reclining Seatbacks Heated Seats On vehicles with heated seats, the buttons are located on page 2-6. 1-8 See Reclining Seatbacks on the center console. Lift the recline lever. 2. Lean back to position the seatback to where you want it to the low setting Press to turn the seat on for this feature to lock the seatback into place. Press again to turn the system off. L: 9: Press to turn it . 3. The ignition must be on at the high setting. Release the lever to work.

Owner's Manual
Page 15
... Passenger Sensing System on page 2-9. Safety Belt Sensing System for Passenger Airbag The passenger sensing system will be visible in the rearview mirror when the vehicle is started. Safety Belts: They Are for Everyone on page 2-52 for Children (LATCH) (Z06 and ZR1 Models Only) on page 2-23. Lower Anchors and...
... Passenger Sensing System on page 2-9. Safety Belt Sensing System for Passenger Airbag The passenger sensing system will be visible in the rearview mirror when the vehicle is started. Safety Belts: They Are for Everyone on page 2-52 for Children (LATCH) (Z06 and ZR1 Models Only) on page 2-23. Lower Anchors and...
Owner's Manual
Page 16
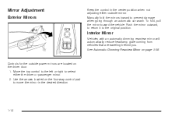
... mirrors are traveling behind you. Mirror Adjustment Exterior Mirrors Keep the control in the desired direction. 1-10 Interior Mirror Vehicles with an automatic dimming rearview mirror will automatically reduce headlamp glare coming from vehicles that are located on page 3-38. Controls for the outside mirror. To fold, pull the mirror toward the...
... mirrors are traveling behind you. Mirror Adjustment Exterior Mirrors Keep the control in the desired direction. 1-10 Interior Mirror Vehicles with an automatic dimming rearview mirror will automatically reduce headlamp glare coming from vehicles that are located on page 3-38. Controls for the outside mirror. To fold, pull the mirror toward the...

Owner's Manual
Page 17
... information. See Tilt Wheel on page 4-3. 1-11 Push the switch forward to lock the steering wheel in place. Steering Wheel Adjustment Telescopic Steering Column For vehicles with your memory settings. Move the steering wheel up or down into a comfortable position. 3.
... information. See Tilt Wheel on page 4-3. 1-11 Push the switch forward to lock the steering wheel in place. Steering Wheel Adjustment Telescopic Steering Column For vehicles with your memory settings. Move the steering wheel up or down into a comfortable position. 3.
Owner's Manual
Page 18
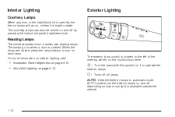
AUTO: Sets the exterior lamps to turn on each lamp. The exterior lamp control is bright outside the vehicle. 1-12 AUTO mode turns the exterior lamps on it is located to operate the exterior lamps. For more information on interior lighting, see: • Instrument ...
AUTO: Sets the exterior lamps to turn on each lamp. The exterior lamp control is bright outside the vehicle. 1-12 AUTO mode turns the exterior lamps on it is located to operate the exterior lamps. For more information on interior lighting, see: • Instrument ...
Owner's Manual
Page 20
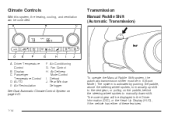
.... Climate Controls With this system, the heating, cooling, and ventilation can be in the Driver Information (DIC), or the Head-Up Display (HUD), if the vehicle has either of these features. 1-14 Transmission Manual Paddle Shift (Automatic Transmission) A.
.... Climate Controls With this system, the heating, cooling, and ventilation can be in the Driver Information (DIC), or the Head-Up Display (HUD), if the vehicle has either of these features. 1-14 Transmission Manual Paddle Shift (Automatic Transmission) A.
Owner's Manual
Page 21
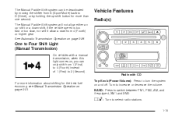
... Radio(s) One to Four Shift Light (Manual Transmission) On vehicles with CD For more than one second. Turn to turn the system on and off. The Manual Paddle Shift system can only shift from 4 (Fourth) ... , you can be deactivated by moving the shifter from S (Sport Mode) back to D (Drive), or by holding the up -shift or a down-shift, if the vehicle speed is too fast or too slow, nor will it allow a start from 1 (First) to 4 (Fourth) instead of 1 (First) to switch between FM1, FM2, AM...
... Radio(s) One to Four Shift Light (Manual Transmission) On vehicles with CD For more than one second. Turn to turn the system on and off. The Manual Paddle Shift system can only shift from 4 (Fourth) ... , you can be deactivated by moving the shifter from S (Sport Mode) back to D (Drive), or by holding the up -shift or a down-shift, if the vehicle speed is too fast or too slow, nor will it allow a start from 1 (First) to 4 (Fourth) instead of 1 (First) to switch between FM1, FM2, AM...

Owner's Manual
Page 23
... an incoming call, or to end a call. −: Increases or decreases volume. For more information, see Audio Steering Wheel Controls on and off the vehicle speakers. e+/e Steering Wheel Controls w / x: Press to change radio stations or select tracks on a CD. 1 to 6 (Preset Pushbuttons): Press to ...as iPod®, MP3 players, etc. For more information, see Bluetooth® on the radio preset pushbuttons. Bluetooth® For vehicles with an in-vehicle Bluetooth system, it can be connected to play stations that are programmed on page 4-93. 1-17 Press and hold longer than ...
... an incoming call, or to end a call. −: Increases or decreases volume. For more information, see Audio Steering Wheel Controls on and off the vehicle speakers. e+/e Steering Wheel Controls w / x: Press to change radio stations or select tracks on a CD. 1 to 6 (Preset Pushbuttons): Press to ...as iPod®, MP3 players, etc. For more information, see Bluetooth® on the radio preset pushbuttons. Bluetooth® For vehicles with an in-vehicle Bluetooth system, it can be connected to play stations that are programmed on page 4-93. 1-17 Press and hold longer than ...

Owner's Manual
Page 24
...manual for reaching the destination. After a destination has been set, the system provides turn-by-turn instructions for more . Navigation System The vehicle's navigation system provides detailed maps of the instrument panel cluster. In addition, the system can help locate a variety of points of the ...instrument panel cluster. 1-18 It shows the status of many vehicle systems and enables access to the right of interest (POI), such as banks, airports, restaurants, and more information. The DIC buttons are ...
...manual for reaching the destination. After a destination has been set, the system provides turn-by-turn instructions for more . Navigation System The vehicle's navigation system provides detailed maps of the instrument panel cluster. In addition, the system can help locate a variety of points of the ...instrument panel cluster. 1-18 It shows the status of many vehicle systems and enables access to the right of interest (POI), such as banks, airports, restaurants, and more information. The DIC buttons are ...
Owner's Manual
Page 25
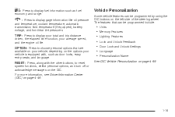
...see Driver Information Center (DIC) on page 4-46. Press to display your total and trip distance driven, the elapsed time function, your vehicle is equipped with the other buttons, to display fuel information such as door locks, easy entry seats, and language. TRIP: Press to...Units Memory Features Lighting Features Lock and Unlock Feedback Door Lock and Unlock Settings Language Personalization Name See DIC Vehicle Personalization on page 4-69. 1-19 Vehicle Personalization Some vehicle features can be programmed by using the DIC buttons on the left side of the steering wheel. The ...
...see Driver Information Center (DIC) on page 4-46. Press to display your total and trip distance driven, the elapsed time function, your vehicle is equipped with the other buttons, to display fuel information such as door locks, easy entry seats, and language. TRIP: Press to...Units Memory Features Lighting Features Lock and Unlock Feedback Door Lock and Unlock Settings Language Personalization Name See DIC Vehicle Personalization on page 4-69. 1-19 Vehicle Personalization Some vehicle features can be programmed by using the DIC buttons on the left side of the steering wheel. The ...

Owner's Manual
Page 26
... lever. R : Turns the system on the forward left side. Power Outlets The accessory power outlet can be used to make the vehicle accelerate or resume a previously set the speed. On vehicles with a removable roof panel, there are located at the end of the lever to set speed. Cruise Control The cruise controls...
... lever. R : Turns the system on the forward left side. Power Outlets The accessory power outlet can be used to make the vehicle accelerate or resume a previously set the speed. On vehicles with a removable roof panel, there are located at the end of the lever to set speed. Cruise Control The cruise controls...
Owner's Manual
Page 27
... the seats. See Competitive Driving Mode on page 4-51. See Active Handling System on page 5-6. The system turns on automatically every time the vehicle is started. • Storing the Roof Panel on page 3-54. • Installing the Roof Panel on page 3-55. • To turn... Press and release the button again to allow increased performance while accelerating and cornering. See Traction Control System (TCS) on page 5-8. The vehicle may have someone help you can be stored properly in difficult driving conditions. For more information, see Convertible Top (Manual) on page 3-56...
... the seats. See Competitive Driving Mode on page 4-51. See Active Handling System on page 5-6. The system turns on automatically every time the vehicle is started. • Storing the Roof Panel on page 3-54. • Installing the Roof Panel on page 3-55. • To turn... Press and release the button again to allow increased performance while accelerating and cornering. See Traction Control System (TCS) on page 5-8. The vehicle may have someone help you can be stored properly in difficult driving conditions. For more information, see Convertible Top (Manual) on page 3-56...
