
Owner's Manual
Page 1
2010 Chevrolet Corvette Owner Manual In Brief ...1-1 Instrument Panel ...1-2 Initial Drive Information ...1-4 Vehicle Features ...1-15 Performance and Maintenance ...1-21 Seats and Restraint System ...2-1 Front Seats ... Operating Your Vehicle ...3-21 Mirrors ...3-38 Universal Home Remote System ...3-41 Storage Areas ...3-48 Roof Panel ...3-52 Convertible Top ...3-56 ...4-1 Instrument Panel Instrument Panel Overview ...4-3 Climate Controls ...4-21 Warning Lights, Gages, and Indicators ...4-28 Driver Information Center (DIC) ...4-46 Audio System(s) ...4-78 Driving Your Vehicle ...5-1 Your Driving...
2010 Chevrolet Corvette Owner Manual In Brief ...1-1 Instrument Panel ...1-2 Initial Drive Information ...1-4 Vehicle Features ...1-15 Performance and Maintenance ...1-21 Seats and Restraint System ...2-1 Front Seats ... Operating Your Vehicle ...3-21 Mirrors ...3-38 Universal Home Remote System ...3-41 Storage Areas ...3-48 Roof Panel ...3-52 Convertible Top ...3-56 ...4-1 Instrument Panel Instrument Panel Overview ...4-3 Climate Controls ...4-21 Warning Lights, Gages, and Indicators ...4-28 Driver Information Center (DIC) ...4-46 Audio System(s) ...4-78 Driving Your Vehicle ...5-1 Your Driving...
Owner's Manual
Page 10
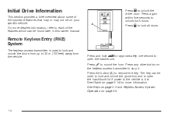
... lid if power to the vehicle is lost. See Hatch on the keyless access transmitter to stop it. Initial Drive Information This section provides a brief overview about some of the features which can be used to lock and unlock the doors from up to 30 m (100 feet) away from the vehicle...
... lid if power to the vehicle is lost. See Hatch on the keyless access transmitter to stop it. Initial Drive Information This section provides a brief overview about some of the features which can be used to lock and unlock the doors from up to 30 m (100 feet) away from the vehicle...
Owner's Manual
Page 163
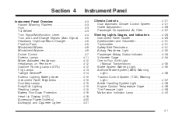
... System (TCS) Warning Light ...4-37 Active Handling System Light ...4-38 Engine Coolant Temperature Gage ...4-39 Tire Pressure Light ...4-39 Malfunction Indicator Lamp ...4-40 Instrument Panel Overview ...4-3 Hazard Warning Flashers ...4-3 Horn ...4-3 Tilt Wheel ...4-3 Turn Signal/Multifunction Lever ...4-4 Turn and Lane-Change Signals (Auto Signal) ...4-5 Headlamp High/Low-Beam Changer ...4-5 Flash-to-Pass...
... System (TCS) Warning Light ...4-37 Active Handling System Light ...4-38 Engine Coolant Temperature Gage ...4-39 Tire Pressure Light ...4-39 Malfunction Indicator Lamp ...4-40 Instrument Panel Overview ...4-3 Hazard Warning Flashers ...4-3 Horn ...4-3 Tilt Wheel ...4-3 Turn Signal/Multifunction Lever ...4-4 Turn and Lane-Change Signals (Auto Signal) ...4-5 Headlamp High/Low-Beam Changer ...4-5 Flash-to-Pass...

Owner's Manual
Page 165
.... Tilt Wheel | : Press to turn signals will not work no matter what mode the ignition is in place. 4-3 To adjust the steering wheel: 1. Instrument Panel Overview Hazard Warning Flashers The hazard warning flashers warns others that you . 2. The button is located on and off . Press again to make the front...
.... Tilt Wheel | : Press to turn signals will not work no matter what mode the ignition is in place. 4-3 To adjust the steering wheel: 1. Instrument Panel Overview Hazard Warning Flashers The hazard warning flashers warns others that you . 2. The button is located on and off . Press again to make the front...

Owner's Manual
Page 189
... cover retainer clips (A) from the air including pollen and dust particles. The passenger compartment air filter is located on page 6-14. See Engine Compartment Overview on the passenger side of the engine compartment near the battery. See Scheduled Maintenance on page 7-3 for information on how often to it. Reductions in...
... cover retainer clips (A) from the air including pollen and dust particles. The passenger compartment air filter is located on page 6-14. See Engine Compartment Overview on the passenger side of the engine compartment near the battery. See Scheduled Maintenance on page 7-3 for information on how often to it. Reductions in...

Owner's Manual
Page 303
... Fuel ...6-7 Additives ...6-7 Fuels in Foreign Countries ...6-8 Filling the Tank ...6-9 Filling a Portable Fuel Container ...6-12 Checking Things Under the Hood ...6-12 Hood Release ...6-13 Engine Compartment Overview ...6-14 Engine Oil ...6-20 Engine Oil Life System ...6-27 Engine Air Cleaner/Filter ...6-28 Automatic Transmission Fluid ...6-32 Manual Transmission Fluid ...6-33 Hydraulic Clutch ...6-33...
... Fuel ...6-7 Additives ...6-7 Fuels in Foreign Countries ...6-8 Filling the Tank ...6-9 Filling a Portable Fuel Container ...6-12 Checking Things Under the Hood ...6-12 Hood Release ...6-13 Engine Compartment Overview ...6-14 Engine Oil ...6-20 Engine Oil Life System ...6-27 Engine Air Cleaner/Filter ...6-28 Automatic Transmission Fluid ...6-32 Manual Transmission Fluid ...6-33 Hydraulic Clutch ...6-33...

Owner's Manual
Page 316
Engine Compartment Overview If the vehicle has the 6.2 L LS3 V8 engine (without the dry sump engine oil tank) and you are facing the front of the vehicle, when the hood is opened: 6-14
Engine Compartment Overview If the vehicle has the 6.2 L LS3 V8 engine (without the dry sump engine oil tank) and you are facing the front of the vehicle, when the hood is opened: 6-14

Owner's Manual
Page 322
... engine oil crankcase capacity, see Driver Information Center (DIC) on the Driver Information Center (DIC), check the engine oil level right away. See Engine Compartment Overview on page 6-112. Pull out the dipstick and clean it with a lint-free paper towel or a cloth, then push it back in the cross-hatched...
... engine oil crankcase capacity, see Driver Information Center (DIC) on the Driver Information Center (DIC), check the engine oil level right away. See Engine Compartment Overview on page 6-112. Pull out the dipstick and clean it with a lint-free paper towel or a cloth, then push it back in the cross-hatched...
Owner's Manual
Page 323
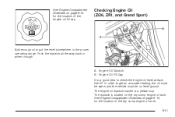
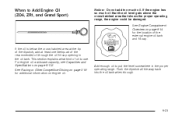
A. The dipstick is a yellow loop. See Engine Compartment Overview on page 6-14 for the location of the engine oil fill cap. Checking Engine Oil (ZO6, ZR1, and Grand Sport) Add enough oil to ... level somewhere in when through. Engine Oil Dipstick B. The engine oil dipstick handle is located on the dry sump engine oil tank. See Engine Compartment Overview on level ground. In order to get an accurate reading, the oil must be warm and the vehicle must be on page 6-14 for the...
A. The dipstick is a yellow loop. See Engine Compartment Overview on page 6-14 for the location of the engine oil fill cap. Checking Engine Oil (ZO6, ZR1, and Grand Sport) Add enough oil to ... level somewhere in when through. Engine Oil Dipstick B. The engine oil dipstick handle is located on the dry sump engine oil tank. See Engine Compartment Overview on level ground. In order to get an accurate reading, the oil must be warm and the vehicle must be on page 6-14 for the...
Owner's Manual
Page 325
... in the oil tank. See Racing or Other Competitive Driving on page 5-19 for the location of the recommended oil through . 6-23 See Engine Compartment Overview on page 6-14 for additional information on page 6-112. Push the dipstick all the way back into the oil tank when through the oil fi...
... in the oil tank. See Racing or Other Competitive Driving on page 5-19 for the location of the recommended oil through . 6-23 See Engine Compartment Overview on page 6-14 for additional information on page 6-112. Push the dipstick all the way back into the oil tank when through the oil fi...

Owner's Manual
Page 330
... shown in the trash, pouring it on the ground, into sewers, or into streams or bodies of water. Engine Air Cleaner/Filter See Engine Compartment Overview on page 6-14 for two seconds. Press the TRIP button so the OIL LIFE percentage is started, the engine oil life system has not reset...
... shown in the trash, pouring it on the ground, into sewers, or into streams or bodies of water. Engine Air Cleaner/Filter See Engine Compartment Overview on page 6-14 for two seconds. Press the TRIP button so the OIL LIFE percentage is started, the engine oil life system has not reset...

Owner's Manual
Page 335
... you suspect there is at the MIN (minimum) line on page 6-14 for reservoir location. 6-33 Have the system inspected and repaired. See Engine Compartment Overview on the side of the reservoir. Hydraulic Clutch It is not necessary to use .
... you suspect there is at the MIN (minimum) line on page 6-14 for reservoir location. 6-33 Have the system inspected and repaired. See Engine Compartment Overview on the side of the reservoir. Hydraulic Clutch It is not necessary to use .

Owner's Manual
Page 337
See Engine Compartment Overview on page 6-14 for service if the intercooler is difficult, see Service Publications Ordering Information on coolant. Because this procedure is low on page 8-17. 1. ...
See Engine Compartment Overview on page 6-14 for service if the intercooler is difficult, see Service Publications Ordering Information on coolant. Because this procedure is low on page 8-17. 1. ...

Owner's Manual
Page 339
.... When the engine is cold, the coolant level should be sure the cooling system is cool before this manual for more information. See Engine Compartment Overview on location. If the coolant is below the FULL COLD line when the engine is hot, there could be a leak in the vehicle's cooling system...
.... When the engine is cold, the coolant level should be sure the cooling system is cool before this manual for more information. See Engine Compartment Overview on location. If the coolant is below the FULL COLD line when the engine is hot, there could be a leak in the vehicle's cooling system...

Owner's Manual
Page 346
... cap and wipe the dipstick with a clean rag. 4. Turn the ignition off and let the engine compartment cool down. 2. Power Steering Fluid See Engine Compartment Overview on both sides of the reservoir clean. 3. The level should be at the FULL COLD mark. 6-44 When the engine compartment is a leak in this...
... cap and wipe the dipstick with a clean rag. 4. Turn the ignition off and let the engine compartment cool down. 2. Power Steering Fluid See Engine Compartment Overview on both sides of the reservoir clean. 3. The level should be at the FULL COLD mark. 6-44 When the engine compartment is a leak in this...

Owner's Manual
Page 347
... 7-9. This allows for fluid expansion if freezing occurs, which could damage the tank if it . Notice: Use of the washer system. See Engine Compartment Overview on page 6-14 for adding water. • Do not mix water with the washer symbol on page 7-9. Adding Washer Fluid Open the cap with ready...
... 7-9. This allows for fluid expansion if freezing occurs, which could damage the tank if it . Notice: Use of the washer system. See Engine Compartment Overview on page 6-14 for adding water. • Do not mix water with the washer symbol on page 7-9. Adding Washer Fluid Open the cap with ready...

Owner's Manual
Page 348
... with DOT 3 brake fluid. There are installed. Refer to the Maintenance Schedule to determine when to check the brake fluid. See Engine Compartment Overview on the brake hydraulic system. { WARNING: If too much fluid when new brake linings are only two reasons why the brake fluid level...
... with DOT 3 brake fluid. There are installed. Refer to the Maintenance Schedule to determine when to check the brake fluid. See Engine Compartment Overview on the brake hydraulic system. { WARNING: If too much fluid when new brake linings are only two reasons why the brake fluid level...

Owner's Manual
Page 349
... hydraulic system, make sure the level is done on page 6-95. • What to be above the MIN mark on the vehicle. See Engine Compartment Overview on page 6-14. Always clean the brake fluid reservoir cap and the area around the cap before removing it. Checking Brake Fluid Check brake...
... hydraulic system, make sure the level is done on page 6-95. • What to be above the MIN mark on the vehicle. See Engine Compartment Overview on page 6-14. Always clean the brake fluid reservoir cap and the area around the cap before removing it. Checking Brake Fluid Check brake...

Owner's Manual
Page 356
... the engine cover, below the engine oil fill cap. Keep hands, clothing and tools away from any underhood electric fan. 6-54 See Engine Compartment Overview on each vehicle. Open the hoods and locate the positive (+) and negative (−) terminal locations on page 6-14 for the location of the engine compartment...
... the engine cover, below the engine oil fill cap. Keep hands, clothing and tools away from any underhood electric fan. 6-54 See Engine Compartment Overview on each vehicle. Open the hoods and locate the positive (+) and negative (−) terminal locations on page 6-14 for the location of the engine compartment...

Owner's Manual
Page 409
... is one fuse block in the engine compartment located on any electrical components on location. Notice: Spilling liquid on any electrical component. See Engine Compartment Overview on page 6-14 for more information on the vehicle may damage it.
... is one fuse block in the engine compartment located on any electrical components on location. Notice: Spilling liquid on any electrical component. See Engine Compartment Overview on page 6-14 for more information on the vehicle may damage it.