

Owner's Manual
Page 1
2010 Chevrolet Colorado Owner Manual M In Brief ...1-1 Instrument Panel ...1-2 Initial Drive Information ...1-4 Vehicle Features ...1-15 Performance and Maintenance ...1-18 Seats and Restraint System ...2-1 Front ... ...3-7 Windows ...3-12 Theft-Deterrent Systems ...3-14 Starting and Operating Your Vehicle ...3-18 Mirrors ...3-39 Storage Areas ...3-43 Sunroof ...3-46 Instrument Panel ...4-1 Instrument Panel Overview ...4-3 Climate Controls ...4-16 Warning Lights, Gauges, and Indicators ...4-18 Driver Information Center (DIC) ...4-33 Audio System(s) ...4-41 Driving Your Vehicle ...5-1 Your Driving...
2010 Chevrolet Colorado Owner Manual M In Brief ...1-1 Instrument Panel ...1-2 Initial Drive Information ...1-4 Vehicle Features ...1-15 Performance and Maintenance ...1-18 Seats and Restraint System ...2-1 Front ... ...3-7 Windows ...3-12 Theft-Deterrent Systems ...3-14 Starting and Operating Your Vehicle ...3-18 Mirrors ...3-39 Storage Areas ...3-43 Sunroof ...3-46 Instrument Panel ...4-1 Instrument Panel Overview ...4-3 Climate Controls ...4-16 Warning Lights, Gauges, and Indicators ...4-18 Driver Information Center (DIC) ...4-33 Audio System(s) ...4-41 Driving Your Vehicle ...5-1 Your Driving...
Owner's Manual
Page 10
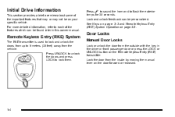
... rearward. 1-4 Press UNLOCK to unlock the doors and press LOCK to flash the exterior lamps for 30 seconds. Initial Drive Information This section provides a brief overview about some of the features which can be found later in the driver or front passenger door or press the LOCK or UNLOCK button on...
... rearward. 1-4 Press UNLOCK to unlock the doors and press LOCK to flash the exterior lamps for 30 seconds. Initial Drive Information This section provides a brief overview about some of the features which can be found later in the driver or front passenger door or press the LOCK or UNLOCK button on...

Owner's Manual
Page 161
... 4-16 4-18 4-18 4-18 4-20 4-20 4-20 4-21 4-22 4-23 4-24 4-24 4-24 4-25 4-26 4-27 4-27 4-28 4-30 4-31 4-31 4-31 4-32 Instrument Panel Overview ...4-3 Hazard Warning Flashers ...4-3 Horn ...4-3 Tilt Wheel ...4-3 Turn Signal/Multifunction Lever ...4-4 Turn and Lane-Change Signals ...4-4 Headlamp High/Low-Beam Changer ...4-5 Flash-to-Pass ...4-5 Windshield Wipers...
... 4-16 4-18 4-18 4-18 4-20 4-20 4-20 4-21 4-22 4-23 4-24 4-24 4-24 4-25 4-26 4-27 4-27 4-28 4-30 4-31 4-31 4-31 4-32 Instrument Panel Overview ...4-3 Hazard Warning Flashers ...4-3 Horn ...4-3 Tilt Wheel ...4-3 Turn Signal/Multifunction Lever ...4-4 Turn and Lane-Change Signals ...4-4 Headlamp High/Low-Beam Changer ...4-5 Flash-to-Pass ...4-5 Windshield Wipers...

Owner's Manual
Page 163
Instrument Panel Overview Hazard Warning Flashers | (Hazard Warning Flasher): Press this button located on the instrument panel, to make the front and rear turn signal lamps flash on ...
Instrument Panel Overview Hazard Warning Flashers | (Hazard Warning Flasher): Press this button located on the instrument panel, to make the front and rear turn signal lamps flash on ...

Owner's Manual
Page 281
... Fuel ...6-6 Additives ...6-6 Fuels in Foreign Countries ...6-7 Filling the Tank ...6-8 Filling a Portable Fuel Container ...6-10 Checking Things Under the Hood ...6-10 Hood Release ...6-11 Engine Compartment Overview ...6-12 Engine Oil ...6-15 Engine Oil Life System ...6-18 Engine Air Cleaner/Filter ...6-20 Automatic Transmission Fluid ...6-21 Manual Transmission Fluid ...6-24 Hydraulic Clutch ...6-25
... Fuel ...6-6 Additives ...6-6 Fuels in Foreign Countries ...6-7 Filling the Tank ...6-8 Filling a Portable Fuel Container ...6-10 Checking Things Under the Hood ...6-10 Hood Release ...6-11 Engine Compartment Overview ...6-12 Engine Oil ...6-15 Engine Oil Life System ...6-18 Engine Air Cleaner/Filter ...6-20 Automatic Transmission Fluid ...6-21 Manual Transmission Fluid ...6-24 Hydraulic Clutch ...6-25

Owner's Manual
Page 292
Engine Compartment Overview When you open the hood on the 3.7L engine (2.9L engine similar), you will see the following: 6-12
Engine Compartment Overview When you open the hood on the 3.7L engine (2.9L engine similar), you will see the following: 6-12

Owner's Manual
Page 295
..., then push it again, keeping the tip down, and check the level. 6-15 D. I. L. Engine Oil Checking Engine Oil It is a yellow loop. See Engine Compartment Overview on page 6‑113. A. E. See "When to drain back into the oil pan. C. G. The engine oil dipstick handle is a good idea to get an accurate...
..., then push it again, keeping the tip down, and check the level. 6-15 D. I. L. Engine Oil Checking Engine Oil It is a yellow loop. See Engine Compartment Overview on page 6‑113. A. E. See "When to drain back into the oil pan. C. G. The engine oil dipstick handle is a good idea to get an accurate...

Owner's Manual
Page 296
.... 6-16 This section explains what kind of the recommended oil. Add enough oil to use. If the engine has so much oil. See Engine Compartment Overview on page 6‑119. For engine oil crankcase capacity, see Capacities and Specifications on page 6‑12 for the location of the engine oil fill...
.... 6-16 This section explains what kind of the recommended oil. Add enough oil to use. If the engine has so much oil. See Engine Compartment Overview on page 6‑119. For engine oil crankcase capacity, see Capacities and Specifications on page 6‑12 for the location of the engine oil fill...
Owner's Manual
Page 300
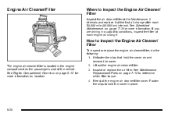
... the filter at the first oil change after each engine oil change. The engine air cleaner/filter is located in place. 6-20 See Engine Compartment Overview on page 6‑12 for more information on page 7‑12 to determine which filter to Inspect the Engine Air Cleaner/ Filter To inspect or...
... the filter at the first oil change after each engine oil change. The engine air cleaner/filter is located in place. 6-20 See Engine Compartment Overview on page 6‑12 for more information on page 7‑12 to determine which filter to Inspect the Engine Air Cleaner/ Filter To inspect or...

Owner's Manual
Page 302
... with this cold check, check the fluid hot before adding fluid. With your foot on the passenger side of the fluid level. 3. See Engine Compartment Overview on page 6‑12 for three minutes or more accurate reading of the vehicle. If it is located in each range. Should the fluid level...
... with this cold check, check the fluid hot before adding fluid. With your foot on the passenger side of the fluid level. 3. See Engine Compartment Overview on page 6‑12 for three minutes or more accurate reading of the vehicle. If it is located in each range. Should the fluid level...

Owner's Manual
Page 305
... Maintenance Schedule to determine what kind of the filler plug hole. 3. See Recommended Fluids and Lubricants on it. Remove the filler plug. 2. See Engine Compartment Overview on page 6‑12 for reservoir location. How to Add Fluid Here is fully seated. It is not necessary to regularly check clutch fluid unless...
... Maintenance Schedule to determine what kind of the filler plug hole. 3. See Recommended Fluids and Lubricants on it. Remove the filler plug. 2. See Engine Compartment Overview on page 6‑12 for reservoir location. How to Add Fluid Here is fully seated. It is not necessary to regularly check clutch fluid unless...

Owner's Manual
Page 309
When the engine is cold, the coolant level should be at FULL COLD, or a little higher. See Engine Compartment Overview on page 6‑12 for more information on it. When the engine is not, there could be above the FULL COLD mark, add a 50/50 ...
When the engine is cold, the coolant level should be at FULL COLD, or a little higher. See Engine Compartment Overview on page 6‑12 for more information on it. When the engine is not, there could be above the FULL COLD mark, add a 50/50 ...

Owner's Manual
Page 315
... damages may not be between the ADD and FULL marks. Always use the correct fluid listed in this system could indicate a problem. See Engine Compartment Overview on the dipstick. How to use the proper fluid. Then remove the cap again and look at the fluid level on page 6‑12 for...
... damages may not be between the ADD and FULL marks. Always use the correct fluid listed in this system could indicate a problem. See Engine Compartment Overview on the dipstick. How to use the proper fluid. Then remove the cap again and look at the fluid level on page 6‑12 for...

Owner's Manual
Page 316
... and damage the washer fluid tank and other parts of the washer system. Add washer fluid until the tank is very cold. See Engine Compartment Overview on it. Do not use washer fluid. When using concentrated washer fluid, follow the manufacturer's instructions for adding water. Fill the washer fluid tank only...
... and damage the washer fluid tank and other parts of the washer system. Add washer fluid until the tank is very cold. See Engine Compartment Overview on it. Do not use washer fluid. When using concentrated washer fluid, follow the manufacturer's instructions for adding water. Fill the washer fluid tank only...

Owner's Manual
Page 317
... in the brake hydraulic system can spill on the engine and burn, if the engine is added when the linings are installed. See Engine Compartment Overview on the brake hydraulic system. { WARNING: If too much fluid when new brake linings are worn, there will not work is filled with DOT 3 brake...
... in the brake hydraulic system can spill on the engine and burn, if the engine is added when the linings are installed. See Engine Compartment Overview on the brake hydraulic system. { WARNING: If too much fluid when new brake linings are worn, there will not work is filled with DOT 3 brake...

Owner's Manual
Page 318
See Engine Compartment Overview on the vehicle. This could cause a crash. Always use the proper brake fluid. After work well. Be careful not to see if there is above ...
See Engine Compartment Overview on the vehicle. This could cause a crash. Always use the proper brake fluid. After work well. Be careful not to see if there is above ...

Owner's Manual
Page 320
... brake parts are not careful. Infrequent Usage: Remove the black, negative (−) cable from the battery to cause cancer and reproductive harm. See Engine Compartment Overview on working around a battery without getting hurt. Vehicle Storage { WARNING: Batteries have to be sure to have really good braking. For example, if someone puts...
... brake parts are not careful. Infrequent Usage: Remove the black, negative (−) cable from the battery to cause cancer and reproductive harm. See Engine Compartment Overview on working around a battery without getting hurt. Vehicle Storage { WARNING: Batteries have to be sure to have really good braking. For example, if someone puts...

Owner's Manual
Page 322
... outlets. This will avoid sparks and help immediately. 6-42 Your vehicle has a remote positive (+) and a remote negative (−) jump starting the vehicle. 3. See Engine Compartment Overview on page 6‑12 for more light. If you accidentally get it is there. But if a battery has filler caps, be sure the right amount...
... outlets. This will avoid sparks and help immediately. 6-42 Your vehicle has a remote positive (+) and a remote negative (−) jump starting the vehicle. 3. See Engine Compartment Overview on page 6‑12 for more light. If you accidentally get it is there. But if a battery has filler caps, be sure the right amount...

Owner's Manual
Page 393
Notice: Spilling liquid on any electrical component. See Engine Compartment Overview on page 6‑12 for more information on the vehicle may damage it. Always keep the covers on the driver side of the cover and lift. The engine compartment fuse block is located on any electrical components on location. 6-113 Engine Compartment Fuse Block To remove the cover, push in on the tab on the cover until the tab clicks into place. To reinstall the cover, line up the tab and push down on the end of the engine compartment.
Notice: Spilling liquid on any electrical component. See Engine Compartment Overview on page 6‑12 for more information on the vehicle may damage it. Always keep the covers on the driver side of the cover and lift. The engine compartment fuse block is located on any electrical components on location. 6-113 Engine Compartment Fuse Block To remove the cover, push in on the tab on the cover until the tab clicks into place. To reinstall the cover, line up the tab and push down on the end of the engine compartment.

Owner's Manual
Page 441
Electronic Immobilizer Operation PASS-Key® III+ ...3-16 Engine Air Cleaner/Filter ...6-20 Check and Service Engine Soon Lamp ...4-28 Compartment Overview ...6-12 Coolant ...6-28 Coolant Heater ...3-22 Coolant Temperature Gauge ...4-27 Cooling System ...6-26 Drive Belt Routing ...7-13 Exhaust ...3-37 Fan Noise ...6-34 Oil ...6-15 Overheating ...6-...
Electronic Immobilizer Operation PASS-Key® III+ ...3-16 Engine Air Cleaner/Filter ...6-20 Check and Service Engine Soon Lamp ...4-28 Compartment Overview ...6-12 Coolant ...6-28 Coolant Heater ...3-22 Coolant Temperature Gauge ...4-27 Cooling System ...6-26 Drive Belt Routing ...7-13 Exhaust ...3-37 Fan Noise ...6-34 Oil ...6-15 Overheating ...6-...