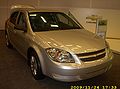

Owner's Manual
Page 1
2010 Chevrolet Cobalt Owner Manual M In Brief ...1-1 Instrument Panel ...1-2 Initial Drive Information ...1-4 Vehicle Features ...1-14 Performance and Maintenance ...1-18 Seats and Restraint System ...2-1 Front Seats ...2-2 Rear Seats ...2-9 Safety Belts ...2-10 ...
2010 Chevrolet Cobalt Owner Manual M In Brief ...1-1 Instrument Panel ...1-2 Initial Drive Information ...1-4 Vehicle Features ...1-14 Performance and Maintenance ...1-18 Seats and Restraint System ...2-1 Front Seats ...2-2 Rear Seats ...2-9 Safety Belts ...2-10 ...

Owner's Manual
Page 2
2010 Chevrolet Cobalt Owner Manual M Maintenance Schedule ...7-1 Maintenance Schedule ...7-2 Customer Assistance Information ...8-1 Customer Assistance and Information ...8-2 Reporting Safety Defects ...8-15 Vehicle Data Recording and Privacy ...8-17 Index ...i-1
2010 Chevrolet Cobalt Owner Manual M Maintenance Schedule ...7-1 Maintenance Schedule ...7-2 Customer Assistance Information ...8-1 Customer Assistance and Information ...8-2 Reporting Safety Defects ...8-15 Vehicle Data Recording and Privacy ...8-17 Index ...i-1

Owner's Manual
Page 3
... Division wherever it appears in this manual. Litho in the manual and the page number where it can be found on your dealer/retailer or from: GENERAL MOTORS, GM, the GM Emblem, CHEVROLET, the CHEVROLET Emblem, and the name COBALT are options that you did not purchase or due to changes ...subsequent to confirm each of the manual. Please refer to the purchase documentation relating to your specific vehicle to the...
... Division wherever it appears in this manual. Litho in the manual and the page number where it can be found on your dealer/retailer or from: GENERAL MOTORS, GM, the GM Emblem, CHEVROLET, the CHEVROLET Emblem, and the name COBALT are options that you did not purchase or due to changes ...subsequent to confirm each of the manual. Please refer to the purchase documentation relating to your specific vehicle to the...
Owner's Manual
Page 4
... would not be covered by the vehicle's warranty. A circle with a slash through it is something that could hurt you need to see a service manual for additional instructions or information. * : This symbol is something that could result in serious injury or death. Danger indicates a hazard with the text ...The vehicle has components and labels that use symbols instead of risk which means "Do Not," "Do not do this," or "Do not let this manual describe hazards and what to do to a specific component, control, message, gage, or indicator. { WARNING: These mean there is a safety symbol ...
... would not be covered by the vehicle's warranty. A circle with a slash through it is something that could hurt you need to see a service manual for additional instructions or information. * : This symbol is something that could result in serious injury or death. Danger indicates a hazard with the text ...The vehicle has components and labels that use symbols instead of risk which means "Do Not," "Do not do this," or "Do not let this manual describe hazards and what to do to a specific component, control, message, gage, or indicator. { WARNING: These mean there is a safety symbol ...

Owner's Manual
Page 9
...Lever on page 4‑3. E. Hazard Warning Flashers on page 4‑4. H. I. M. Cigarette Lighter (If Equipped). Shift Lever (Manual Shown). Climate Control System on page 3‑39. 1-3 Glove Box on page 4‑14. Instrument Panel Cluster on page ...Center (DIC) on page 5‑9 (If Equipped) . Horn on page 4‑13. See Ashtray(s) and Cigarette Lighter on page 4‑3. See Manual Transmission Operation on page 3‑28 and Automatic Transmission Operation on page 4‑16. R. Outlet Adjustment on page 3‑26. J. Trunk Release. Instrument...
...Lever on page 4‑3. E. Hazard Warning Flashers on page 4‑4. H. I. M. Cigarette Lighter (If Equipped). Shift Lever (Manual Shown). Climate Control System on page 3‑39. 1-3 Glove Box on page 4‑14. Instrument Panel Cluster on page ...Center (DIC) on page 5‑9 (If Equipped) . Horn on page 4‑13. See Ashtray(s) and Cigarette Lighter on page 4‑3. See Manual Transmission Operation on page 3‑28 and Automatic Transmission Operation on page 4‑16. R. Outlet Adjustment on page 3‑26. J. Trunk Release. Instrument...
Owner's Manual
Page 10
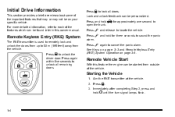
... Keyless Entry (RKE) System Operation on your specific vehicle. Immediately after completing Step 2, press and hold open the trunk. Remote Vehicle Start With this owner manual. Press Q. 3. Aim the RKE transmitter at the vehicle. 2. V for three seconds to lock all remaining doors. Press again within five seconds to locate the vehicle...
... Keyless Entry (RKE) System Operation on your specific vehicle. Immediately after completing Step 2, press and hold open the trunk. Remote Vehicle Start With this owner manual. Press Q. 3. Aim the RKE transmitter at the vehicle. 2. V for three seconds to lock all remaining doors. Press again within five seconds to locate the vehicle...
Owner's Manual
Page 11
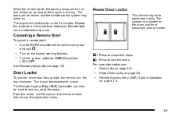
... locked and the climate control system may have power door locks. Remote start : . Remote Keyless Entry (RKE) System Operation on each door or use the manual lock knobs on page 3‑4. From the inside, use the power door locks. 1-5 Power Door Locks This vehicle may come on. See Remote Vehicle Start...
... locked and the climate control system may have power door locks. Remote start : . Remote Keyless Entry (RKE) System Operation on each door or use the manual lock knobs on page 3‑4. From the inside, use the power door locks. 1-5 Power Door Locks This vehicle may come on. See Remote Vehicle Start...

Owner's Manual
Page 12
... the instrument panel . Windows Power Windows For vehicles with power windows, the switches on each window. Slide the seat to unlock the seat. 2. Seat Adjustment Manual Seats 1. See Power Windows on page 2‑2. See Manual Seats on page 3‑15. 1-6 This button is locked in place.
... the instrument panel . Windows Power Windows For vehicles with power windows, the switches on each window. Slide the seat to unlock the seat. 2. Seat Adjustment Manual Seats 1. See Power Windows on page 2‑2. See Manual Seats on page 3‑15. 1-6 This button is locked in place.
Owner's Manual
Page 14
... heated seat. The switches are located on page 2‑4. 1-8 See Heated Seats on the instrument panel above the climate control system. Driver's Switch shown See Manual Lumbar on the front of the switch with the double indicator lights to increase or decrease the lumbar support. Press the side of the driver...
... heated seat. The switches are located on page 2‑4. 1-8 See Heated Seats on the instrument panel above the climate control system. Driver's Switch shown See Manual Lumbar on the front of the switch with the double indicator lights to increase or decrease the lumbar support. Press the side of the driver...
Owner's Manual
Page 17
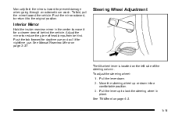
... Mirror on the left side of the steering column. Pull the lever down into a comfortable position. 3. See Tilt Wheel on page 4‑3. 1-11 Manually fold the mirrors inward to move it for a clearer view of behind . Push the mirror outward, to return it for daytime use . Push the tab ...
... Mirror on the left side of the steering column. Pull the lever down into a comfortable position. 3. See Tilt Wheel on page 4‑3. 1-11 Manually fold the mirrors inward to move it for a clearer view of behind . Push the mirror outward, to return it for daytime use . Push the tab ...
Owner's Manual
Page 18
Instrument Panel Brightness on page 4‑11. P : When operating in P (Park) or the manual transmission must be turned off , even when a door is opened. 1 : Turns the lamp on whenever a door is on the left side of the switch to ...
Instrument Panel Brightness on page 4‑11. P : When operating in P (Park) or the manual transmission must be turned off , even when a door is opened. 1 : Turns the lamp on whenever a door is on the left side of the switch to ...
Owner's Manual
Page 27
... Online Owner Center The Online Owner Center is a complimentary service that includes online service reminders, vehicle maintenance tips, online owner manual, special privileges and more slowly when conditions require. Roadside Assistance and OnStar If you have a current OnStar subscription, press the... minor repair information or towing arrangements. Always follow posted speed limits or drive more . Sign up today at: www.gmownercenter.com/chevrolet (U.S.) or www.gm.ca (Canada). 1-21 Keep vehicle tires properly inflated. Avoid idling the engine for Better Fuel Economy Driving ...
... Online Owner Center The Online Owner Center is a complimentary service that includes online service reminders, vehicle maintenance tips, online owner manual, special privileges and more slowly when conditions require. Roadside Assistance and OnStar If you have a current OnStar subscription, press the... minor repair information or towing arrangements. Always follow posted speed limits or drive more . Sign up today at: www.gmownercenter.com/chevrolet (U.S.) or www.gm.ca (Canada). 1-21 Keep vehicle tires properly inflated. Avoid idling the engine for Better Fuel Economy Driving ...

Owner's Manual
Page 31
... Restraint System Parts After a Crash ...2-41 2-47 2-50 2-53 2-56 2-58 2-59 2-59 2-60 2-62 2-67 2-72 2-73 2-74 2-74 2-75 Front Seats ...2-2 Manual Seats ...2-2 Seat Height Adjuster ...2-3 Manual Lumbar ...2-3 Heated Seats ...2-4 Reclining Seatbacks ...2-4 Head Restraints ...2-7 Easy Entry Seat (Coupe) ...2-8 Rear Seats ...2-9 Split Folding Rear Seat ...2-9 Safety Belts ...2-10 Safety Belts: They...
... Restraint System Parts After a Crash ...2-41 2-47 2-50 2-53 2-56 2-58 2-59 2-59 2-60 2-62 2-67 2-72 2-73 2-74 2-74 2-75 Front Seats ...2-2 Manual Seats ...2-2 Seat Height Adjuster ...2-3 Manual Lumbar ...2-3 Heated Seats ...2-4 Reclining Seatbacks ...2-4 Head Restraints ...2-7 Easy Entry Seat (Coupe) ...2-8 Rear Seats ...2-9 Split Folding Rear Seat ...2-9 Safety Belts ...2-10 Safety Belts: They...
Owner's Manual
Page 32
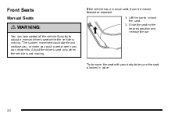
Try to move the seat with your body to be moved forward or rearward. 1. Lift the bar to unlock the seat. 2. Slide the seat to the desired position and release the bar. { WARNING: You can be sure the seat is locked in place. 2-2 Adjust the driver's seat only when the vehicle is not moving . The sudden movement could startle and confuse you, or make you push a pedal when you try to adjust a manual driver's seat while the vehicle is moving . Front Seats Manual Seats If the vehicle has a manual seat, it can lose control of the vehicle if you do not want to.
Try to move the seat with your body to be moved forward or rearward. 1. Lift the bar to unlock the seat. 2. Slide the seat to the desired position and release the bar. { WARNING: You can be sure the seat is locked in place. 2-2 Adjust the driver's seat only when the vehicle is not moving . The sudden movement could startle and confuse you, or make you push a pedal when you try to adjust a manual driver's seat while the vehicle is moving . Front Seats Manual Seats If the vehicle has a manual seat, it can lose control of the vehicle if you do not want to.

Owner's Manual
Page 33
To lower the seat, move the lever upward repeatedly until the seat is at the desired height. Turn the knob clockwise or counterclockwise to increase or decrease the lumbar support. The driver's seat height adjuster is located on the inboard side. Seat Height Adjuster Manual Lumbar On vehicles with this feature, the knob is located on the front of the driver seat lower cushion on the outboard side of the seat. To raise the seat, move the lever downward repeatedly until the seat is at the desired height. 2-3
To lower the seat, move the lever upward repeatedly until the seat is at the desired height. Turn the knob clockwise or counterclockwise to increase or decrease the lumbar support. The driver's seat height adjuster is located on the inboard side. Seat Height Adjuster Manual Lumbar On vehicles with this feature, the knob is located on the front of the driver seat lower cushion on the outboard side of the seat. To raise the seat, move the lever downward repeatedly until the seat is at the desired height. 2-3
Owner's Manual
Page 34
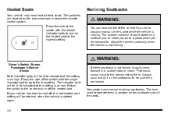
... is started again. 2-4 If either seatback is not locked, it could startle and confuse you, or make you push a pedal when you try to adjust a manual driver's seat while the vehicle is not moving . Press the side of the seats. Adjust the driver's seat only when the vehicle is moving . { WARNING... will be lit to turn off , the last heated seat setting will be sure they are located on low. Heated Seats Your vehicle may have manual reclining seatbacks. Return the switch to the center to the person sitting there.
... is started again. 2-4 If either seatback is not locked, it could startle and confuse you, or make you push a pedal when you try to adjust a manual driver's seat while the vehicle is not moving . Press the side of the seats. Adjust the driver's seat only when the vehicle is moving . { WARNING... will be lit to turn off , the last heated seat setting will be sure they are located on low. Heated Seats Your vehicle may have manual reclining seatbacks. Return the switch to the center to the person sitting there.
Owner's Manual
Page 40
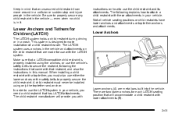
... seatback, always check to be sure it is locked into place. Push and pull on the top of the seatback at the area of the manual describes how to do with safety belts. { WARNING: If the seatback is improperly routed, not properly attached, or twisted will not provide the protection needed...
... seatback, always check to be sure it is locked into place. Push and pull on the top of the seatback at the area of the manual describes how to do with safety belts. { WARNING: If the seatback is improperly routed, not properly attached, or twisted will not provide the protection needed...

Owner's Manual
Page 68
... Child Restraint in the Vehicle { WARNING: A child can be seriously injured or killed in a crash if the child restraint is not properly secured in this manual. A booster seat can be secured in the vehicle. 2-38 To help a child to improve the fit of injury, the child restraint must be secured in...
... Child Restraint in the Vehicle { WARNING: A child can be seriously injured or killed in a crash if the child restraint is not properly secured in this manual. A booster seat can be secured in the vehicle. 2-38 To help a child to improve the fit of injury, the child restraint must be secured in...

Owner's Manual
Page 69
... in the vehicle - even when no child is not properly secured in the vehicle. an older child riding in a booklet, or both, and to this manual. When securing an add-on child restraint, refer to the instructions that come with that an unsecured child restraint can be secured in a rear seat...
... in the vehicle - even when no child is not properly secured in the vehicle. an older child riding in a booklet, or both, and to this manual. When securing an add-on child restraint, refer to the instructions that come with that an unsecured child restraint can be secured in a rear seat...
Owner's Manual
Page 71
... top tether anchors and attachments. Make sure that an unsecured child restraint can move around in a collision or sudden stop and injure people in this manual. instructions on the child restraint that restraint, and also the instructions in the vehicle.
... top tether anchors and attachments. Make sure that an unsecured child restraint can move around in a collision or sudden stop and injure people in this manual. instructions on the child restraint that restraint, and also the instructions in the vehicle.


