
Owner's Manual
Page 1
2010 Chevrolet Cobalt Owner Manual M In Brief ...1-1 Instrument Panel ...1-2 Initial Drive Information ...1-4 Vehicle Features ...1-14 Performance and Maintenance ...1-18 Seats and Restraint System ...2-1 Front Seats... Your Vehicle ...5-1 Your Driving, the Road, and the Vehicle ...5-2 Towing ...5-30 Service and Appearance Care ...6-1 Service ...6-4 Fuel ...6-6 Checking Things Under the Hood ...6-12 Headlamp Aiming ...6-44 Bulb Replacement ...6-47 Windshield Wiper Blade Replacement ...6-53 Tires ...6-54 Appearance Care ...6-112 Vehicle Identification ...6-120 Electrical System ...6-120 Capacities...
2010 Chevrolet Cobalt Owner Manual M In Brief ...1-1 Instrument Panel ...1-2 Initial Drive Information ...1-4 Vehicle Features ...1-14 Performance and Maintenance ...1-18 Seats and Restraint System ...2-1 Front Seats... Your Vehicle ...5-1 Your Driving, the Road, and the Vehicle ...5-2 Towing ...5-30 Service and Appearance Care ...6-1 Service ...6-4 Fuel ...6-6 Checking Things Under the Hood ...6-12 Headlamp Aiming ...6-44 Bulb Replacement ...6-47 Windshield Wiper Blade Replacement ...6-53 Tires ...6-54 Appearance Care ...6-112 Vehicle Identification ...6-120 Electrical System ...6-120 Capacities...
Owner's Manual
Page 114
... on page 4‑46 for that have already been provided for additional information. The remote vehicle start system is disabled through the DIC. The vehicle's hood is open it. See "REMOTE START" under DIC Vehicle Personalization on . The hazard warning flashers are not locked. See Malfunction Indicator Lamp on . The engine...
... on page 4‑46 for that have already been provided for additional information. The remote vehicle start system is disabled through the DIC. The vehicle's hood is open it. See "REMOTE START" under DIC Vehicle Personalization on . The hazard warning flashers are not locked. See Malfunction Indicator Lamp on . The engine...
Owner's Manual
Page 131
... should remain plugged in depends on the passenger side of extension cord could cause an electrical shock. To Use the Engine Coolant Heater 1. Open the hood and unwrap the electrical cord. Plug it away from moving engine parts, and prevent damaged. Engine Coolant Heater The engine coolant heater can provide easier...
... should remain plugged in depends on the passenger side of extension cord could cause an electrical shock. To Use the Engine Coolant Heater 1. Open the hood and unwrap the electrical cord. Plug it away from moving engine parts, and prevent damaged. Engine Coolant Heater The engine coolant heater can provide easier...
Owner's Manual
Page 162
... active if recirculate is experienced, select the defrost mode. Recirculation is selected in this mode during periods of the system. Use of non-GM approved hood deflectors may adversely affect the performance of high humidity and cool outside temperatures may block the flow of these modes, the recirculate indicator light flashes...
... active if recirculate is experienced, select the defrost mode. Recirculation is selected in this mode during periods of the system. Use of non-GM approved hood deflectors may adversely affect the performance of high humidity and cool outside temperatures may block the flow of these modes, the recirculate indicator light flashes...
Owner's Manual
Page 273
... ...6-6 Fuel ...6-6 Gasoline Octane ...6-7 Gasoline Specifications ...6-8 California Fuel ...6-8 Additives ...6-8 Fuels in Foreign Countries ...6-9 Filling the Tank ...6-10 Filling a Portable Fuel Container ...6-12 Checking Things Under the Hood ...6-12 Hood Release ...6-13 Engine Compartment Overview ...6-14 Engine Oil ...6-17 Engine Oil Life System ...6-21 Engine Air Cleaner/Filter (2.0L Turbo Engine) ...6-23 6-1
... ...6-6 Fuel ...6-6 Gasoline Octane ...6-7 Gasoline Specifications ...6-8 California Fuel ...6-8 Additives ...6-8 Fuels in Foreign Countries ...6-9 Filling the Tank ...6-10 Filling a Portable Fuel Container ...6-12 Checking Things Under the Hood ...6-12 Hood Release ...6-13 Engine Compartment Overview ...6-14 Engine Oil ...6-17 Engine Oil Life System ...6-21 Engine Air Cleaner/Filter (2.0L Turbo Engine) ...6-23 6-1
Owner's Manual
Page 284
... fill opening before operating the nozzle. Static electricity discharge from any surface other fluids, and plastic or rubber. Checking Things Under the Hood { WARNING: An electric fan under the hood can get on any underhood electric fan. Do not use a cellular phone while pumping fuel. { WARNING: Things that will burn onto a hot...
... fill opening before operating the nozzle. Static electricity discharge from any surface other fluids, and plastic or rubber. Checking Things Under the Hood { WARNING: An electric fan under the hood can get on any underhood electric fan. Do not use a cellular phone while pumping fuel. { WARNING: Things that will burn onto a hot...

Owner's Manual
Page 285
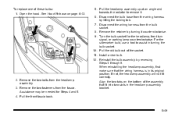
... vehicle. 3. Then go to latch fully. It is located under the front center of the hood toward the driver's side of the vehicle. 2. Check to make sure the hood is reduced, then release the hood to the front of the strut is closed and repeat the process if necessary. 6-13 Pull ...the interior hood release lever with this symbol on properly. Lower the hood until the lifting force of the vehicle and push the secondary hood release lever to lift and hold the hood in the fully open the hood, do the following. 1. After you have partially ...
... vehicle. 3. Then go to latch fully. It is located under the front center of the hood toward the driver's side of the vehicle. 2. Check to make sure the hood is reduced, then release the hood to the front of the strut is closed and repeat the process if necessary. 6-13 Pull ...the interior hood release lever with this symbol on properly. Lower the hood until the lifting force of the vehicle and push the secondary hood release lever to lift and hold the hood in the fully open the hood, do the following. 1. After you have partially ...

Owner's Manual
Page 286
Engine Compartment Overview When you open the hood on the 2.2L L4 engine, here is what you will see: 6-14
Engine Compartment Overview When you open the hood on the 2.2L L4 engine, here is what you will see: 6-14

Owner's Manual
Page 288
When you open the hood on the 2.0L L4 engine, this is what you will see: 6-16
When you open the hood on the 2.0L L4 engine, this is what you will see: 6-16

Owner's Manual
Page 300
... can be burned. Cooling System The Cooling System allows the engine to maintain the correct working temperature. { WARNING: An electric engine cooling fan under the hood can start up even when the engine is a leak. Electric Engine Cooling Fan B. Do not touch them.
... can be burned. Cooling System The Cooling System allows the engine to maintain the correct working temperature. { WARNING: An electric engine cooling fan under the hood can start up even when the engine is a leak. Electric Engine Cooling Fan B. Do not touch them.

Owner's Manual
Page 303
... enough. If the coolant inside the coolant surge tank is not running and can be severely damaged. { WARNING: An electric engine cooling fan under the hood can start up even when the engine is boiling, do not do anything else until it cools down. If coolant is visible but be sure...
... enough. If the coolant inside the coolant surge tank is not running and can be severely damaged. { WARNING: An electric engine cooling fan under the hood can start up even when the engine is boiling, do not do anything else until it cools down. If coolant is visible but be sure...

Owner's Manual
Page 306
... overheats, and get out of the vehicle until the engine is no coolant, your vehicle can burn you badly, even if you just open the hood. If Steam Is Coming From The Engine Compartment { WARNING: Steam from the vehicle until there is cool. 6-34 Just turn it off and get service... warning light on page 8‑8. Stay away from the engine if you see if the engine cooling fans are not, do decide to lift the hood , make sure the vehicle is not covered by the vehicle warranty. See Roadside Assistance Program on your vehicle's instrument panel. Then check to see or...
... overheats, and get out of the vehicle until the engine is no coolant, your vehicle can burn you badly, even if you just open the hood. If Steam Is Coming From The Engine Compartment { WARNING: Steam from the vehicle until there is cool. 6-34 Just turn it off and get service... warning light on page 8‑8. Stay away from the engine if you see if the engine cooling fans are not, do decide to lift the hood , make sure the vehicle is not covered by the vehicle warranty. See Roadside Assistance Program on your vehicle's instrument panel. Then check to see or...

Owner's Manual
Page 314
You will not see the battery of the positive (+) and negative (−) terminals on that vehicle. It is located under the hood. The vehicle has a remote positive (+) and a remote negative (−) jump starting . Locate the remote positive (+) terminal which is not running and can start ... for jump starting terminal. Lift the cap to access your vehicle under a red tethered cap on the engine compartment fuse block. Open the hood on the other vehicle and locate the positive (+) and negative (−) terminal locations on the vehicle. { WARNING: An electric fan can injure you...
You will not see the battery of the positive (+) and negative (−) terminals on that vehicle. It is located under the hood. The vehicle has a remote positive (+) and a remote negative (−) jump starting . Locate the remote positive (+) terminal which is not running and can start ... for jump starting terminal. Lift the cap to access your vehicle under a red tethered cap on the engine compartment fuse block. Open the hood on the other vehicle and locate the positive (+) and negative (−) terminal locations on the vehicle. { WARNING: An electric fan can injure you...

Owner's Manual
Page 318
... aim dot on the headlamp. Covering a headlamp may cause excessive heat build-up which may cause damage to improve beam cut-off when aiming. See Hood Release on the headlamps: 1. Record the distance from Step 2 and mark it directly on the low-beam headlamp. At the wall, measure from the ground... on the low-beam headlamps and place a piece of cardboard in front of the mark in Step 3. 2. Turn on the flat surface. 6-46 Open the hood.
... aim dot on the headlamp. Covering a headlamp may cause excessive heat build-up which may cause damage to improve beam cut-off when aiming. See Hood Release on the headlamps: 1. Record the distance from Step 2 and mark it directly on the low-beam headlamp. At the wall, measure from the ground... on the low-beam headlamps and place a piece of cardboard in front of the mark in Step 3. 2. Turn on the flat surface. 6-46 Open the hood.

Owner's Manual
Page 319
... the angle of the horizontal tape line. Repeat Steps 6 through 8 for the opposite headlamp. 6-47 Locate the vertical headlamp aiming screws, which are under the hood near each headlamp assembly. Turn it clockwise or counterclockwise to the horizontal tape line. Turn the vertical aiming screw until the headlamp beam is positioned...
... the angle of the horizontal tape line. Repeat Steps 6 through 8 for the opposite headlamp. 6-47 Locate the vertical headlamp aiming screws, which are under the hood near each headlamp assembly. Turn it clockwise or counterclockwise to the horizontal tape line. Turn the vertical aiming screw until the headlamp beam is positioned...
Owner's Manual
Page 321
...front turn signal, or parking lamp counterclockwise. Disconnect the bulb base from the bulb socket. 8. To replace one of the socket. 11. Open the hood. Remove the retainer by reversing Steps 1 through 9. Remove the two bolts from the fascia. Remove the two fasteners from the headlamp assembly. 3. Pull... the headlamp assembly up at an angle and towards the radiator to assist in its original position. Install a new bulb. 12. See Hood Release on the bottom of the assembly that the wiring harness is in turning the bulb socket. 10. Turn the bulb socket for Steps 4...
...front turn signal, or parking lamp counterclockwise. Disconnect the bulb base from the bulb socket. 8. To replace one of the socket. 11. Open the hood. Remove the retainer by reversing Steps 1 through 9. Remove the two bolts from the fascia. Remove the two fasteners from the headlamp assembly. 3. Pull... the headlamp assembly up at an angle and towards the radiator to assist in its original position. Install a new bulb. 12. See Hood Release on the bottom of the assembly that the wiring harness is in turning the bulb socket. 10. Turn the bulb socket for Steps 4...
Owner's Manual
Page 400
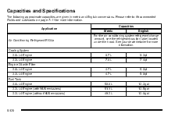
Application Capacities Metric English For the air conditioning system refrigerant charge amount, see the refrigerant caution label located under the hood. See your dealer/retailer for more information. 8.7 L 7.0 L 4.7 L 4.7 L 50.0 L 51.1 L 49.2 L 9.2 qt 7.4 qt 5.0 qt 5.0 qt 13.2 gal 13.5 gal 13.0 gal Air Conditioning Refrigerant R134a Cooling ...
Application Capacities Metric English For the air conditioning system refrigerant charge amount, see the refrigerant caution label located under the hood. See your dealer/retailer for more information. 8.7 L 7.0 L 4.7 L 4.7 L 50.0 L 51.1 L 49.2 L 9.2 qt 7.4 qt 5.0 qt 5.0 qt 13.2 gal 13.5 gal 13.0 gal Air Conditioning Refrigerant R134a Cooling ...
Owner's Manual
Page 414
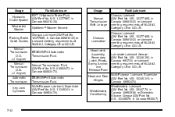
..., in Canada 88901242) or lubricant meeting requirements of NLGI #2, Category LB or GC-LB. Optikleen® Washer Solvent. U.S. 12377985, in Canada 992887). 7-12 Chassis Lubrication Hood Latch Assembly, Secondary Latch, Pivots, Spring Anchor, and Release Pawl Multi-Purpose Lubricant, Superlube...
..., in Canada 88901242) or lubricant meeting requirements of NLGI #2, Category LB or GC-LB. Optikleen® Washer Solvent. U.S. 12377985, in Canada 992887). 7-12 Chassis Lubrication Hood Latch Assembly, Secondary Latch, Pivots, Spring Anchor, and Release Pawl Multi-Purpose Lubricant, Superlube...

Owner's Manual
Page 443
... Center Console Storage ...3-39 Center High-Mounted Stoplamp (CHMSL) ...6-50 Chains, Tire ...6-79 Charging System Light ...4-23 Check Engine Lamp ...4-27 Checking Things Under the Hood ...6-12 Chemical Paint Spotting ...6-120 Child Restraints Infants and Young Children ...2-34 Lower Anchors and Tethers for Children ...2-41 Older Children ...2-31 Securing a Child Restraint...
... Center Console Storage ...3-39 Center High-Mounted Stoplamp (CHMSL) ...6-50 Chains, Tire ...6-79 Charging System Light ...4-23 Check Engine Lamp ...4-27 Checking Things Under the Hood ...6-12 Chemical Paint Spotting ...6-120 Child Restraints Infants and Young Children ...2-34 Lower Anchors and Tethers for Children ...2-41 Older Children ...2-31 Securing a Child Restraint...

Owner's Manual
Page 447
... Panel Brightness ...4-11 Cluster ...4-19 Introduction ...7-2 J Jump Starting ...6-41 Height Adjuster, Driver Seat ...2-3 Highbeam On Light ...4-31 Highway Hypnosis ...5-20 Hill and Mountain Roads ...5-20 Hood Checking Things Under ...6-12 Release ...6-13 Horn ...4-3 How to Wear Safety Belts Properly ...2-15 Hydraulic Clutch ...6-27 K Keyless Entry Remote (RKE) System ...3-4 Keyless Entry System...
... Panel Brightness ...4-11 Cluster ...4-19 Introduction ...7-2 J Jump Starting ...6-41 Height Adjuster, Driver Seat ...2-3 Highbeam On Light ...4-31 Highway Hypnosis ...5-20 Hill and Mountain Roads ...5-20 Hood Checking Things Under ...6-12 Release ...6-13 Horn ...4-3 How to Wear Safety Belts Properly ...2-15 Hydraulic Clutch ...6-27 K Keyless Entry Remote (RKE) System ...3-4 Keyless Entry System...
