
Owner's Manual
Page 1
2009 Chevrolet Tahoe, Suburban Owner Manual Seats and Restraint System ...1-1 Head Restraints ...1-2 Front Seats ...1-4 Rear Seats ...1-14 Safety Belts ...1-32 Child Restraints ...1-54 Airbag System ...1-81 Restraint System Check ...1-98 ...2-1 Features and Controls Keys ...2-3..., the Road, and the Vehicle ...4-2 Towing ...4-43 Service and Appearance Care ...5-1 Service ...5-3 Fuel ...5-5 Checking Things Under the Hood ...5-12 Rear Axle ...5-49 Four-Wheel Drive ...5-51 Front Axle ...5-52 Headlamp Aiming ...5-53 Bulb Replacement ...5-56 Windshield Wiper Blade Replacement ...5-59 Tires ...5-61
2009 Chevrolet Tahoe, Suburban Owner Manual Seats and Restraint System ...1-1 Head Restraints ...1-2 Front Seats ...1-4 Rear Seats ...1-14 Safety Belts ...1-32 Child Restraints ...1-54 Airbag System ...1-81 Restraint System Check ...1-98 ...2-1 Features and Controls Keys ...2-3..., the Road, and the Vehicle ...4-2 Towing ...4-43 Service and Appearance Care ...5-1 Service ...5-3 Fuel ...5-5 Checking Things Under the Hood ...5-12 Rear Axle ...5-49 Four-Wheel Drive ...5-51 Front Axle ...5-52 Headlamp Aiming ...5-53 Bulb Replacement ...5-56 Windshield Wiper Blade Replacement ...5-59 Tires ...5-61

Owner's Manual
Page 329
... Vehicle ...4-2 Driving for Better Fuel Economy ...4-2 Defensive Driving ...4-2 Drunk Driving ...4-3 Control of a Vehicle ...4-3 Braking ...4-4 Antilock Brake System (ABS) ...4-5 Braking in Emergencies ...4-6 StabiliTrak® System ...4-6 Locking Rear Axle ...4-9 Steering ...4-9 Off-Road Recovery ...4-11 Passing ...4-11 Loss of Control ...4-11 Off-Road Driving ...4-13 Driving at Night ...4-25 Driving in Rain and on Wet...
... Vehicle ...4-2 Driving for Better Fuel Economy ...4-2 Defensive Driving ...4-2 Drunk Driving ...4-3 Control of a Vehicle ...4-3 Braking ...4-4 Antilock Brake System (ABS) ...4-5 Braking in Emergencies ...4-6 StabiliTrak® System ...4-6 Locking Rear Axle ...4-9 Steering ...4-9 Off-Road Recovery ...4-11 Passing ...4-11 Loss of Control ...4-11 Off-Road Driving ...4-13 Driving at Night ...4-25 Driving in Rain and on Wet...

Owner's Manual
Page 337
...manual for more information. Traction in a curve, speed is important to take more effort. 4-9 Try to reduce speed, do it will allow the rear wheel with a locking rear axle can give more traction on the condition of the curve, and then accelerate gently into the straightaway. Wait to move the vehicle. It works...low, this feature will take curves at a reasonable speed. If there is a need to adjust the speed so you can drive through the curve. Locking Rear Axle Vehicles with the most of the time, but it before entering the curve, while the front wheels are straight.
...manual for more information. Traction in a curve, speed is important to take more effort. 4-9 Try to reduce speed, do it will allow the rear wheel with a locking rear axle can give more traction on the condition of the curve, and then accelerate gently into the straightaway. Wait to move the vehicle. It works...low, this feature will take curves at a reasonable speed. If there is a need to adjust the speed so you can drive through the curve. Locking Rear Axle Vehicles with the most of the time, but it before entering the curve, while the front wheels are straight.

Owner's Manual
Page 343
... to read the winch instructions. For vehicles with a winch, be on page 5-61. • Never park your trip, especially when going to one of the rear axle. However, it properly. Traveling to Remote Areas It makes sense to plan your vehicle over soft ground. 4-15 Know the terrain and plan your vehicle...
... to read the winch instructions. For vehicles with a winch, be on page 5-61. • Never park your trip, especially when going to one of the rear axle. However, it properly. Traveling to Remote Areas It makes sense to plan your vehicle over soft ground. 4-15 Know the terrain and plan your vehicle...
Owner's Manual
Page 362
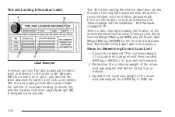
...label shows the number of the original equipment tires (C) and the recommended cold tire in your vehicle's placard. 2. Steps for the front and rear axles. Determine the combined weight of occupants and cargo should never exceed XXX kg or XXX lbs" on page 5-61 and Inflation -... will be riding in flation pressures (D). With the driver's door open, you the Gross Vehicle Weight Rating (GVWR) and the Gross Axle Weight Rating (GAWR) for Determining Correct Load Limit 1. Tire Pressure on the vehicle Certification/Tire label. Subtract the combined weight of ...
...label shows the number of the original equipment tires (C) and the recommended cold tire in your vehicle's placard. 2. Steps for the front and rear axles. Determine the combined weight of occupants and cargo should never exceed XXX kg or XXX lbs" on page 5-61 and Inflation -... will be riding in flation pressures (D). With the driver's door open, you the Gross Vehicle Weight Rating (GVWR) and the Gross Axle Weight Rating (GAWR) for Determining Correct Load Limit 1. Tire Pressure on the vehicle Certification/Tire label. Subtract the combined weight of ...
Owner's Manual
Page 365
... obtain the gross weight capacity of the driver's door. To find out the actual loads on the rear edge of your vehicle. The GVWR includes the weight of the driver, passengers, and cargo should never exceed your... GAWR for your vehicle's capacity weight. Never exceed the GVWR for either the front or rear axle. This is found on your front and rear axles, you need to go to a weigh station and weigh your vehicle. The Certification...cargo. Refer to your vehicle's tire and loading information label for the front and rear axles, called Gross Vehicle Weight Rating (GVWR).
... obtain the gross weight capacity of the driver's door. To find out the actual loads on the rear edge of your vehicle. The GVWR includes the weight of the driver, passengers, and cargo should never exceed your... GAWR for your vehicle's capacity weight. Never exceed the GVWR for either the front or rear axle. This is found on your front and rear axles, you need to go to a weigh station and weigh your vehicle. The Certification...cargo. Refer to your vehicle's tire and loading information label for the front and rear axles, called Gross Vehicle Weight Rating (GVWR).
Owner's Manual
Page 367
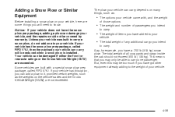
...package, called RPO VYU. Say, for example, you have the snow plow prep package, adding a plow can be damaged if either the front or rear axle ratings or the Gross Vehicle Weight (GVW) are built with a special snow plow prep package, called RPO VYU, then the payload your vehicle can ... you have added to the weight of your vehicle. 4-39 Adding a Snow Plow or Similar Equipment Before installing a snow plow on the vehicle's axles and the Gross Vehicle Weight (GVW), are not exceeded. Some vehicles are exceeded. Your vehicle can damage your vehicle, and the repairs would not ...
...package, called RPO VYU. Say, for example, you have the snow plow prep package, adding a plow can be damaged if either the front or rear axle ratings or the Gross Vehicle Weight (GVW) are built with a special snow plow prep package, called RPO VYU, then the payload your vehicle can ... you have added to the weight of your vehicle. 4-39 Adding a Snow Plow or Similar Equipment Before installing a snow plow on the vehicle's axles and the Gross Vehicle Weight (GVW), are not exceeded. Some vehicles are exceeded. Your vehicle can damage your vehicle, and the repairs would not ...
Owner's Manual
Page 368
... the difference between your front Gross Axle Weight Rating (GAWR) and the front axle weight of the rear axle. Rear ballast may be required to ensure a proper front and rear weight distribution ratio, even though the actual weight at the front axle may be less than the front axle rating. • The snow plow... are some guidelines for safely carrying a snow plow on your vehicle: • Make sure the weight on the front and rear axles does not exceed the axle rating for your vehicle can add to help make sure your snowplow/vehicle combination does not exceed the GVW rating, the front and...
... the difference between your front Gross Axle Weight Rating (GAWR) and the front axle weight of the rear axle. Rear ballast may be required to ensure a proper front and rear weight distribution ratio, even though the actual weight at the front axle may be less than the front axle rating. • The snow plow... are some guidelines for safely carrying a snow plow on your vehicle: • Make sure the weight on the front and rear axles does not exceed the axle rating for your vehicle can add to help make sure your snowplow/vehicle combination does not exceed the GVW rating, the front and...

Owner's Manual
Page 370
...4-42 Keep in mind that have a crash. The total vehicle reserve capacity for it may be possible to load the front axle to ensure a proper front and rear weight distribution ratio, even though the actual front weight may be less than the gross vehicle weight rating (GVWR). Your dealer... numbers are unsure of your vehicle's front, rear, or total weight, go to a weigh station and weigh your dealer/retailer for additional advice and information about using a snow plow on the front of reducing the load on the rear axle to provide proper braking performance. If you compensate...
...4-42 Keep in mind that have a crash. The total vehicle reserve capacity for it may be possible to load the front axle to ensure a proper front and rear weight distribution ratio, even though the actual front weight may be less than the gross vehicle weight rating (GVWR). Your dealer... numbers are unsure of your vehicle's front, rear, or total weight, go to a weigh station and weigh your dealer/retailer for additional advice and information about using a snow plow on the front of reducing the load on the rear axle to provide proper braking performance. If you compensate...

Owner's Manual
Page 383
... has a GVWR of 7,200 lbs (3 266 kg), a RGAWR of 4,000 lbs (1 814 kg) and a GCWR (Gross Combination Weight Rating) of trailer tongue weight on the rear axle is very close to 3,975 lbs (1 803 kg). The trailer rating should be limited by moving some items around in the trailer. The weight at... vehicle. This is greater than the total of trailer weight (850 lbs (386 kg)) and because the weight is applied well behind the rear axle, the effect on the rear axle. Choose the shortest hitch extension that will help reduce the effect of 14,000 lbs (6 350 kg). Do not exceed the maximum allowable...
... has a GVWR of 7,200 lbs (3 266 kg), a RGAWR of 4,000 lbs (1 814 kg) and a GCWR (Gross Combination Weight Rating) of trailer tongue weight on the rear axle is very close to 3,975 lbs (1 803 kg). The trailer rating should be limited by moving some items around in the trailer. The weight at... vehicle. This is greater than the total of trailer weight (850 lbs (386 kg)) and because the weight is applied well behind the rear axle, the effect on the rear axle. Choose the shortest hitch extension that will help reduce the effect of 14,000 lbs (6 350 kg). Do not exceed the maximum allowable...
Owner's Manual
Page 384
...label at least 10 percent of total loaded trailer weight, expect that the vehicle does not exceed any of tongue weight is important to the rear axle weight. Make sure not to go further and think 700 additional pounds (318 kg) should be subtracted from the trailering capacity to stay ...than 1,000 lbs (454 kg) to weigh the vehicle and trailer. Hitches It is about 1.5 times the actual weight. You may go over the rear axle limit before applying the weight distribution spring bars. The effect of these ratings is to avoid exceeding GVWR. Weight is 6,000 lbs (2 721 kg). ...
...label at least 10 percent of total loaded trailer weight, expect that the vehicle does not exceed any of tongue weight is important to the rear axle weight. Make sure not to go further and think 700 additional pounds (318 kg) should be subtracted from the trailering capacity to stay ...than 1,000 lbs (454 kg) to weigh the vehicle and trailer. Hitches It is about 1.5 times the actual weight. You may go over the rear axle limit before applying the weight distribution spring bars. The effect of these ratings is to avoid exceeding GVWR. Weight is 6,000 lbs (2 721 kg). ...
Owner's Manual
Page 401
... Operating Mode ...5-37 Engine Fan Noise ...5-37 Power Steering Fluid ...5-38 Windshield Washer Fluid ...5-39 Brakes ...5-40 Battery ...5-43 Jump Starting ...5-44 Rear Axle ...5-49 Four-Wheel Drive ...5-51 Front Axle ...5-52 Headlamp Aiming ...5-53 Bulb Replacement ...5-56 Halogen Bulbs ...5-56 Taillamps, Turn Signal, Stoplamps and Back-up Lamps ...5-57 License Plate Lamp...
... Operating Mode ...5-37 Engine Fan Noise ...5-37 Power Steering Fluid ...5-38 Windshield Washer Fluid ...5-39 Brakes ...5-40 Battery ...5-43 Jump Starting ...5-44 Rear Axle ...5-49 Four-Wheel Drive ...5-51 Front Axle ...5-52 Headlamp Aiming ...5-53 Bulb Replacement ...5-56 Halogen Bulbs ...5-56 Taillamps, Turn Signal, Stoplamps and Back-up Lamps ...5-57 License Plate Lamp...
Owner's Manual
Page 449
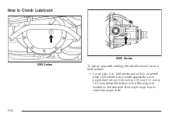
... the fluid level, it inspected and repaired. Return the remote positive (+) terminal cover, if the vehicle has one, to regularly check rear axle fluid unless you suspect there is a leak or you hear an unusual noise. Disconnect the black negative (−) cable from the vehicle...to Check Lubricant It is not necessary to its original position. Disconnect the black negative (−) cable from the vehicle that the rear axle assembly must be caused by volume of fluid during production. Therefore, a reading taken five minutes after the vehicle has...
... the fluid level, it inspected and repaired. Return the remote positive (+) terminal cover, if the vehicle has one, to regularly check rear axle fluid unless you suspect there is a leak or you hear an unusual noise. Disconnect the black negative (−) cable from the vehicle...to Check Lubricant It is not necessary to its original position. Disconnect the black negative (−) cable from the vehicle that the rear axle assembly must be caused by volume of fluid during production. Therefore, a reading taken five minutes after the vehicle has...
Owner's Manual
Page 450
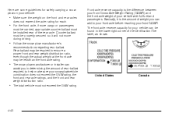
How to Check Lubricant 2500 Series 1500 Series To get an accurate reading, the vehicle should be on the rear axle. Add only enough fluid to 19.0 mm) below the bottom of the filler plug hole, located on a level surface. • For all 4.8L, 5.3L 1500 series and all 6.2L all wheel drive 1500 series luxury model applications, the proper level is from 0.04 inch to 0.75 inch (1.0 mm to reach the proper level. 5-50
How to Check Lubricant 2500 Series 1500 Series To get an accurate reading, the vehicle should be on the rear axle. Add only enough fluid to 19.0 mm) below the bottom of the filler plug hole, located on a level surface. • For all 4.8L, 5.3L 1500 series and all 6.2L all wheel drive 1500 series luxury model applications, the proper level is from 0.04 inch to 0.75 inch (1.0 mm to reach the proper level. 5-50
Owner's Manual
Page 451
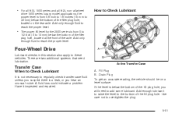
... Plug B. A fluid loss could indicate a problem. Active Transfer Case A. Drain Plug To get an accurate reading, the vehicle should be on the rear axle. Use care not to overtighten the plug. • For all 6.0L 1500 series and all 6.2L non-all wheel drive 1500 series luxury model applications, ...
... Plug B. A fluid loss could indicate a problem. Active Transfer Case A. Drain Plug To get an accurate reading, the vehicle should be on the rear axle. Use care not to overtighten the plug. • For all 6.0L 1500 series and all 6.2L non-all wheel drive 1500 series luxury model applications, ...
Owner's Manual
Page 468
...;ation pressure for air pressure. Normal Occupant Weight: The number of curb weight, accessory weight, vehicle capacity weight, and production options weight. GAWR RR: Gross Axle Weight Rating for the rear axle.
...;ation pressure for air pressure. Normal Occupant Weight: The number of curb weight, accessory weight, vehicle capacity weight, and production options weight. GAWR RR: Gross Axle Weight Rating for the rear axle.

Owner's Manual
Page 495
...room for the spare tire to fit the jack lift head into the proper location before raising the vehicle. Use the jacking pad provided on a rear tire of the vehicle, you could be sure to clear the ground. 5-95 Attach the jack handle (B) to use the jack handle (B) and ... will need to the jack (A). Attach the wheel wrench (D) to raise the vehicle. If the vehicle slips off the ground so there is on the rear axle. Turn the wheel wrench (D) clockwise to the jack handle extensions (C). { CAUTION: Getting under a vehicle when it is jacked up is supported only by a jack....
...room for the spare tire to fit the jack lift head into the proper location before raising the vehicle. Use the jacking pad provided on a rear tire of the vehicle, you could be sure to clear the ground. 5-95 Attach the jack handle (B) to use the jack handle (B) and ... will need to the jack (A). Attach the wheel wrench (D) to raise the vehicle. If the vehicle slips off the ground so there is on the rear axle. Turn the wheel wrench (D) clockwise to the jack handle extensions (C). { CAUTION: Getting under a vehicle when it is jacked up is supported only by a jack....

Owner's Manual
Page 538
... No. U.S. 12346241, in Canada 10953511) or lubricant meeting GM Specification 9986115. Usage Fluid/Lubricant SAE 75W-90 Synthetic Axle Lubricant (GM Part No. Rear Axle Transfer Case (Four-Wheel Drive) Front Axle Propshaft Spline or One-Piece Propshaft Spline (Two-Wheel Drive with Teflon, Superlube (GM Part No. U.S. 3634770, in...
... No. U.S. 12346241, in Canada 10953511) or lubricant meeting GM Specification 9986115. Usage Fluid/Lubricant SAE 75W-90 Synthetic Axle Lubricant (GM Part No. Rear Axle Transfer Case (Four-Wheel Drive) Front Axle Propshaft Spline or One-Piece Propshaft Spline (Two-Wheel Drive with Teflon, Superlube (GM Part No. U.S. 3634770, in...
Owner's Manual
Page 570
... StabiliTrak® Indicator ...3-42 Tire Pressure ...3-43 Tow/Haul Mode ...3-49 Loading Your Vehicle ...4-33 Locking Rear Axle ...4-9 Locks Delayed Locking ...2-11 Door ...2-10 Lockout Protection ...2-12 Power Door ...2-10 Programmable Automatic Door Locks ...2-11 Rear Door Security Locks ...2-11 Loss of Control ...4-11 Low Fuel Warning Light ...3-51 Lower Anchors and Tethers...
... StabiliTrak® Indicator ...3-42 Tire Pressure ...3-43 Tow/Haul Mode ...3-49 Loading Your Vehicle ...4-33 Locking Rear Axle ...4-9 Locks Delayed Locking ...2-11 Door ...2-10 Lockout Protection ...2-12 Power Door ...2-10 Programmable Automatic Door Locks ...2-11 Rear Door Security Locks ...2-11 Loss of Control ...4-11 Low Fuel Warning Light ...3-51 Lower Anchors and Tethers...
Owner's Manual
Page 573
... Reception ...3-139 Setting the Clock ...3-84 Theft-Deterrent ...3-138 Rainsense™ II Wipers ...3-9 Reading Lamps ...3-19 Rear Air Conditioning and Heating System ...3-31 Rear Air Conditioning and Heating System and Electronic Climate Controls ...3-32 Rear Axle ...5-49 Locking ...4-9 Rear Door Security Locks ...2-11 Rear Heated Seats ...1-14 Rear Seat Armrest ...2-80 Rear Seat Audio (RSA) System ...3-136 11
... Reception ...3-139 Setting the Clock ...3-84 Theft-Deterrent ...3-138 Rainsense™ II Wipers ...3-9 Reading Lamps ...3-19 Rear Air Conditioning and Heating System ...3-31 Rear Air Conditioning and Heating System and Electronic Climate Controls ...3-32 Rear Axle ...5-49 Locking ...4-9 Rear Door Security Locks ...2-11 Rear Heated Seats ...1-14 Rear Seat Armrest ...2-80 Rear Seat Audio (RSA) System ...3-136 11


