
Owner's Manual
Page 11
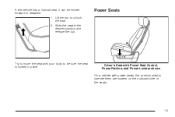
Lift the bar to the desired position and release the bar. Driver's Seat with Power Seat Control, Power Recline, and Power Lumbar shown On a vehicle with your body to operate them are located on the outboard side of the seats. 1-5 Power Seats Try to move the seat with power seats, the controls used to be moved forward or rearward. 1. If the vehicle has a manual seat, it can be sure the seat is locked in place. Slide the seat to unlock the seat. 2.
Lift the bar to the desired position and release the bar. Driver's Seat with Power Seat Control, Power Recline, and Power Lumbar shown On a vehicle with your body to operate them are located on the outboard side of the seats. 1-5 Power Seats Try to move the seat with power seats, the controls used to be moved forward or rearward. 1. If the vehicle has a manual seat, it can be sure the seat is locked in place. Slide the seat to unlock the seat. 2.
Owner's Manual
Page 18
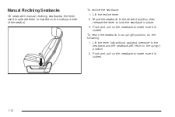
...: 1. To return the seatback to lock the seatback in place. 3. Push and pull on the seatback to make sure it is locked. 1-12 Lift the recline lever. 2. Lift the lever fully without applying pressure to the seatback and the seatback will return to operate them is located on the seatback to make...
...: 1. To return the seatback to lock the seatback in place. 3. Push and pull on the seatback to make sure it is locked. 1-12 Lift the recline lever. 2. Lift the lever fully without applying pressure to the seatback and the seatback will return to operate them is located on the seatback to make...
Owner's Manual
Page 19
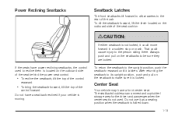
... seatback to its upright position, push and pull on the outboard side of the seat behind the power seat control. To tilt the seatback forward, lift the lever located on the seatback to be sure they are locked. Center Seat Your vehicle may have a seatback reclined if your vehicle is folded... is locked. • To recline the seatback, tilt the top of the control rearward. • To bring the seatback forward, tilt the top of the cab. To return the seatback to the person sitting there. Do not use it latches.
... seatback to its upright position, push and pull on the outboard side of the seat behind the power seat control. To tilt the seatback forward, lift the lever located on the seatback to be sure they are locked. Center Seat Your vehicle may have a seatback reclined if your vehicle is folded... is locked. • To recline the seatback, tilt the top of the control rearward. • To bring the seatback forward, tilt the top of the cab. To return the seatback to the person sitting there. Do not use it latches.
Owner's Manual
Page 111
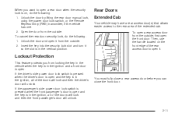
... ignition and a front door is open the front door. Unlock the door by lifting the rear door manual lock, using the power door lock switch, or the Remote Keyless Entry (RKE) transmitter, if the vehicle has one. 2. Rear Doors Extended Cab Your vehicle may have a rear access door(s) that allows easier access to...the following : 1. You must fully close the front door. 2-11 Unlock the door and open and the key is in the ignition, all of the extended cab. If the driver's side power door lock switch is pressed when the driver's door is open it so the slot is in the vertical position...
... ignition and a front door is open the front door. Unlock the door by lifting the rear door manual lock, using the power door lock switch, or the Remote Keyless Entry (RKE) transmitter, if the vehicle has one. 2. Rear Doors Extended Cab Your vehicle may have a rear access door(s) that allows easier access to...the following : 1. You must fully close the front door. 2-11 Unlock the door and open and the key is in the ignition, all of the extended cab. If the driver's side power door lock switch is pressed when the driver's door is open it so the slot is in the vertical position...
Owner's Manual
Page 112
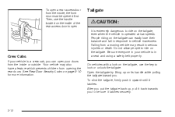
... may also have a feature which prevents children from opening the rear doors. Open the tailgate by lifting up , pull it back towards you can easily lose their balance and fall in serious injuries or death. Crew Cabs If your vehicle is operated at low speeds. To shut the tailgate, firmly push... inside, the front door must be sure it latches securely. Then, use the key to ride on the tailgate, even when the vehicle is a crew cab, you to ride on the tailgate. Do not allow people to lock or unlock the tailgate.
... may also have a feature which prevents children from opening the rear doors. Open the tailgate by lifting up , pull it back towards you can easily lose their balance and fall in serious injuries or death. Crew Cabs If your vehicle is operated at low speeds. To shut the tailgate, firmly push... inside, the front door must be sure it latches securely. Then, use the key to ride on the tailgate, even when the vehicle is a crew cab, you to ride on the tailgate. Do not allow people to lock or unlock the tailgate.

Owner's Manual
Page 113
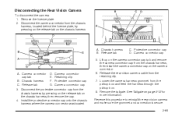
... 2-13 To remove the tailgate, do the following: 1. Reverse this procedure to release the left edge. 3. With the tailgate about halfway open, lift the right edge of the tailgate from the lower pivot. On vehicles with a rear vision camera, it points straight out. To release the retaining ...cable clips, lift the cable so it must be removed to removing the left edge. Although the tailgate can be disconnected before removing the tailgate. Raise the...
... 2-13 To remove the tailgate, do the following: 1. Reverse this procedure to release the left edge. 3. With the tailgate about halfway open, lift the right edge of the tailgate from the lower pivot. On vehicles with a rear vision camera, it points straight out. To release the retaining ...cable clips, lift the cable so it must be removed to removing the left edge. Although the tailgate can be disconnected before removing the tailgate. Raise the...
Owner's Manual
Page 169
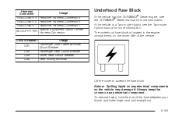
... install the camera connector cap on the chassis harness, then remove the cap. 4. Remove the license plate. 2. Release tab C. G. Camera connector cap tab B. Release tab D. Lift up on the camera connector cap tab and remove the camera connector cap from the chassis harness by pressing on the release tab on page...
... install the camera connector cap on the chassis harness, then remove the cap. 4. Remove the license plate. 2. Release tab C. G. Camera connector cap tab B. Release tab D. Lift up on the camera connector cap tab and remove the camera connector cap from the chassis harness by pressing on the release tab on page...

Owner's Manual
Page 181
.... 2-81 Instrument Panel Storage Vehicles that have an instrument panel storage area, have them located on and behind the center console. Storage Areas Glove Box Lift up on the glove box lever to open it located above the glove box. Pull the loop down on the lid to access the cupholders...
.... 2-81 Instrument Panel Storage Vehicles that have an instrument panel storage area, have them located on and behind the center console. Storage Areas Glove Box Lift up on the glove box lever to open it located above the glove box. Pull the loop down on the lid to access the cupholders...
Owner's Manual
Page 183
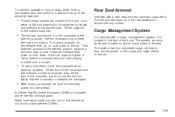
... the bed of 3/8 inch plywood to fit inside the crossrails and siderails to make sure cargo is tight. • To carry long items, move a crossrail, lift the release lever up, on the roof of the rail, down from sliding. Tie the plywood to the bumpers, but do not block or damage...
... the bed of 3/8 inch plywood to fit inside the crossrails and siderails to make sure cargo is tight. • To carry long items, move a crossrail, lift the release lever up, on the roof of the rail, down from sliding. Tie the plywood to the bumpers, but do not block or damage...
Owner's Manual
Page 423
... To open to within 6 inches (152 mm) from the closed position, pause, then push the front center of the hood with this symbol on properly. Lift the hood.
... To open to within 6 inches (152 mm) from the closed position, pause, then push the front center of the hood with this symbol on properly. Lift the hood.
Owner's Manual
Page 430
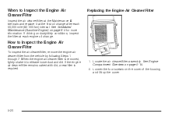
... to release loose dust and dirt. Locate the air cleaner/filter assembly. See Scheduled Maintenance (Gasoline Engine) on the cover of the housing and lift up the cover. 5-20 Loosen the four screws on page 6-4 for more information. When to Inspect the Engine Air Cleaner/Filter Inspect the air cleaner...
... to release loose dust and dirt. Locate the air cleaner/filter assembly. See Scheduled Maintenance (Gasoline Engine) on the cover of the housing and lift up the cover. 5-20 Loosen the four screws on page 6-4 for more information. When to Inspect the Engine Air Cleaner/Filter Inspect the air cleaner...
Owner's Manual
Page 445
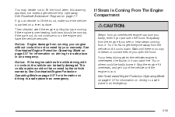
...vehicle until the engine is overheated, the liquids in an emergency. If you see if the engine cooling fans are not, do decide to lift the hood, make sure the vehicle is parked on driving to see or hear steam coming from the engine if you keep driving when the...coolant is overheating, both fans should be covered by your warranty. See Overheated Engine Protection Operating Mode on page 5-37 for information on driving to lift the hood when this warning appears, but instead get service help right away. Turn it overheats, and get everyone away from an overheated engine ...
...vehicle until the engine is overheated, the liquids in an emergency. If you see if the engine cooling fans are not, do decide to lift the hood, make sure the vehicle is parked on driving to see or hear steam coming from the engine if you keep driving when the...coolant is overheating, both fans should be covered by your warranty. See Overheated Engine Protection Operating Mode on page 5-37 for information on driving to lift the hood when this warning appears, but instead get service help right away. Turn it overheats, and get everyone away from an overheated engine ...
Owner's Manual
Page 469
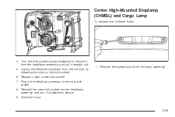
Turn the bulb socket counterclockwise to remove it from the old bulb by releasing the clips on the bulb socket. 6. Unplug the electrical connector from the headlamp assembly and pull it clockwise to the new bulb socket. 8. Center High-Mounted Stoplamp (CHMSL) and Cargo Lamp To replace one of these bulbs: 4. Reinstall the new bulb socket into the headlamp assembly and turn it straight out. 5. Close the hood. 1. Remove the screws and lift off the lamp assembly. 5-59 Replace it with a new bulb socket. 7. Plug in the electrical connector to secure. 9.
Turn the bulb socket counterclockwise to remove it from the old bulb by releasing the clips on the bulb socket. 6. Unplug the electrical connector from the headlamp assembly and pull it clockwise to the new bulb socket. 8. Center High-Mounted Stoplamp (CHMSL) and Cargo Lamp To replace one of these bulbs: 4. Reinstall the new bulb socket into the headlamp assembly and turn it straight out. 5. Close the hood. 1. Remove the screws and lift off the lamp assembly. 5-59 Replace it with a new bulb socket. 7. Plug in the electrical connector to secure. 9.
Owner's Manual
Page 472
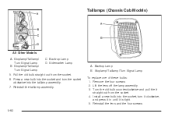
... D. Sidemarker Lamp A. Remove the four screws. 2. Pull the old bulb straight out from the socket. 4. Stoplamp/Taillamp/ Turn Signal Lamp C. Reinstall the taillamp assembly. 5-62 Lift the lens off the lamp assembly. 3. Stoplamp/Taillamp/Turn Signal Lamp To replace one of these bulbs: 1. Taillamps (Chassis...
... D. Sidemarker Lamp A. Remove the four screws. 2. Pull the old bulb straight out from the socket. 4. Stoplamp/Taillamp/ Turn Signal Lamp C. Reinstall the taillamp assembly. 5-62 Lift the lens off the lamp assembly. 3. Stoplamp/Taillamp/Turn Signal Lamp To replace one of these bulbs: 1. Taillamps (Chassis...
Owner's Manual
Page 501
Get the vehicle under control by steering the way you want the vehicle to a stop , well off the road if possible. { CAUTION: Lifting a vehicle and getting under it for a tire to blowout while you are a few tips about what to expect and what to do maintenance or repairs ...
Get the vehicle under control by steering the way you want the vehicle to a stop , well off the road if possible. { CAUTION: Lifting a vehicle and getting under it for a tire to blowout while you are a few tips about what to expect and what to do maintenance or repairs ...
Owner's Manual
Page 511
Turn the wheel wrench clockwise to fit the jack lift head into the proper location before raising the vehicle. 5-101 Never get under the wheel well. 6. To help avoid personal injury and vehicle damage, be ...
Turn the wheel wrench clockwise to fit the jack lift head into the proper location before raising the vehicle. 5-101 Never get under the wheel well. 6. To help avoid personal injury and vehicle damage, be ...

Owner's Manual
Page 517
.... 12. Have the hoist assembly inspected as soon as you can. You will not be injured by turning the wheel wrench counterclockwise. Position the center lift point of you as you pull the jack out from the cable, insert the hoist end of extension, and wheel wrench into the hoist shaft... flat tire using the hoist assembly until it has been inspected and/or replaced. Turn the wrench clockwise to raise the jack until it lifts the end fitting. 11. Continue raising the jack until the spare tire slides off the jack completely, make sure no one hand to push...
.... 12. Have the hoist assembly inspected as soon as you can. You will not be injured by turning the wheel wrench counterclockwise. Position the center lift point of you as you pull the jack out from the cable, insert the hoist end of extension, and wheel wrench into the hoist shaft... flat tire using the hoist assembly until it has been inspected and/or replaced. Turn the wrench clockwise to raise the jack until it lifts the end fitting. 11. Continue raising the jack until the spare tire slides off the jack completely, make sure no one hand to push...
Owner's Manual
Page 535
The underhood fuse block is a Two-mode Hybrid, see the DURAMAX® Diesel manual for more information. Lift the cover to access the fuse block. Always keep the covers on the driver side of the fuse between your thumb and index finger ...
The underhood fuse block is a Two-mode Hybrid, see the DURAMAX® Diesel manual for more information. Lift the cover to access the fuse block. Always keep the covers on the driver side of the fuse between your thumb and index finger ...
Owner's Manual
Page 571
... Reimbursement Program This program, available to qualified applicants, can reimburse you up to determine your vehicle, such as hand controls or a wheelchair/scooter lift. 7-7 de R.L. Mexico, Central America and Caribbean Islands/Countries (Except Puerto Rico and U.S. Virgin Islands) - Customer Assistance General Motors de Mexico, S. For more details, or to...
... Reimbursement Program This program, available to qualified applicants, can reimburse you up to determine your vehicle, such as hand controls or a wheelchair/scooter lift. 7-7 de R.L. Mexico, Central America and Caribbean Islands/Countries (Except Puerto Rico and U.S. Virgin Islands) - Customer Assistance General Motors de Mexico, S. For more details, or to...
