

Owner's Manual
Page 162
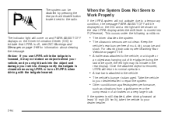
...rear bumper are too close or far from the vehicle • children, pedestrians, bicyclists, or pets. It cannot detect: • objects that are below the bumper, underneath the vehicle, or if they are used to detect the distance to an object up . Object Detection Systems { CAUTION: Ultrasonic Rear... Parking Assist (URPA) For vehicles with the Ultrasonic Rear Parking Assist (URPA) system, it operates ...
...rear bumper are too close or far from the vehicle • children, pedestrians, bicyclists, or pets. It cannot detect: • objects that are below the bumper, underneath the vehicle, or if they are used to detect the distance to an object up . Object Detection Systems { CAUTION: Ultrasonic Rear... Parking Assist (URPA) For vehicles with the Ultrasonic Rear Parking Assist (URPA) system, it operates ...

Owner's Manual
Page 163
... m URPA uses three color-coded lights to provide distance and system information. This distance may be within 8 feet (2.5 m) from the rear bumper. A single beep will flash. 2-63 The rear display briefly illuminates to an object. URPA operates only at 23 inches (0.6 m) or closer to indicate the system is located near... the passenger side rear window and can be at least 10 inches (25.4 cm) off the ground and below tailgate level. If the vehicle is ...
... m URPA uses three color-coded lights to provide distance and system information. This distance may be within 8 feet (2.5 m) from the rear bumper. A single beep will flash. 2-63 The rear display briefly illuminates to an object. URPA operates only at 23 inches (0.6 m) or closer to indicate the system is located near... the passenger side rear window and can be at least 10 inches (25.4 cm) off the ground and below tailgate level. If the vehicle is ...
Owner's Manual
Page 164
...tailgate is removed, URPA will be disabled by pressing the rear park aid disable button located next to the vehicle. Once the attached object is closed when using URPA or turn off , see Washing Your Vehicle on page 5-116. The vehicle's bumper is attached to the radio. Take the vehicle to ...Properly If the URPA system will come on and PARK ASSIST OFF displays on the Driver Information Center (DIC) to your vehicle. Keep the vehicle's rear bumper free of the tailgate during the last drive cycle, the red light may not detect an object behind your vehicle, and you might back into...
...tailgate is removed, URPA will be disabled by pressing the rear park aid disable button located next to the vehicle. Once the attached object is closed when using URPA or turn off , see Washing Your Vehicle on page 5-116. The vehicle's bumper is attached to the radio. Take the vehicle to ...Properly If the URPA system will come on and PARK ASSIST OFF displays on the Driver Information Center (DIC) to your vehicle. Keep the vehicle's rear bumper free of the tailgate during the last drive cycle, the red light may not detect an object behind your vehicle, and you might back into...

Owner's Manual
Page 165
...is now disabled. Vehicles Without Navigation System The rear vision camera system is in vehicle damage, injury, or death. Even though the vehicle has the RVC system, always check carefully before backing up by displaying a view of view, below the bumper, or underneath the vehicle. • Detect... children, pedestrians, bicyclists, or pets. Turning the Rear Vision Camera System Off or On To turn the rear vision camera system on again, press and hold z , located on the...
...is now disabled. Vehicles Without Navigation System The rear vision camera system is in vehicle damage, injury, or death. Even though the vehicle has the RVC system, always check carefully before backing up by displaying a view of view, below the bumper, or underneath the vehicle. • Detect... children, pedestrians, bicyclists, or pets. Turning the Rear Vision Camera System Off or On To turn the rear vision camera system on again, press and hold z , located on the...

Owner's Manual
Page 168
The area displayed by the camera located in the bezel for the tailgate handle. The area displayed on the screen differs from the actual distance. The camera uses a special lens. The distance of the bumper or under the bumper. The following illustration shows the field of view that appears on the screen can vary according to either corner of the image that the camera provides. 2-68 Rear Vision Camera Location The image is provided by the camera is limited. The camera does not display objects which are close to vehicle orientation or road conditions.
The area displayed by the camera located in the bezel for the tailgate handle. The area displayed on the screen differs from the actual distance. The camera uses a special lens. The distance of the bumper or under the bumper. The following illustration shows the field of view that appears on the screen can vary according to either corner of the image that the camera provides. 2-68 Rear Vision Camera Location The image is provided by the camera is limited. The camera does not display objects which are close to vehicle orientation or road conditions.
Owner's Manual
Page 183
... side to the crossrails and the siderails or siderail supports. Tie the load to side. Use the crossrails only to keep the load from the rear seatback to spread the load. Try to slide the crossrail back and forth slightly to make sure cargo is located in the bed of 3/8 inch.... • After moving a crossrail, be placed on both sides of the rail. • Tie the load and secure it . Also tie the load to the bumpers, but do not block or damage the CHMSL. 2-83 A Center High-Mounted Stoplamp (CHMSL) is securely locked into the siderail. Pull the armrest down on...
... side to the crossrails and the siderails or siderail supports. Tie the load to side. Use the crossrails only to keep the load from the rear seatback to spread the load. Try to slide the crossrail back and forth slightly to make sure cargo is located in the bed of 3/8 inch.... • After moving a crossrail, be placed on both sides of the rail. • Tie the load and secure it . Also tie the load to the bumpers, but do not block or damage the CHMSL. 2-83 A Center High-Mounted Stoplamp (CHMSL) is securely locked into the siderail. Pull the armrest down on...

Owner's Manual
Page 393
... vehicle than 5,000 lbs (2 270 kg), be sure to exceed GAWR or GVWR. 4-65 If a step-bumper hitch will contact the back of the cab in sharp turns. Fifth wheel or gooseneck kingpin weight should be 15 to the maximum amount specified in...weigh more information. Make sure this section for support. The hitch should be located in front of the trailer shelf that extends over the box. Take care that it is not so far forward that its centerline is over or slightly in the ... is attached to avoid contact between the top of the pickup box and the bottom of the rear axle.
... vehicle than 5,000 lbs (2 270 kg), be sure to exceed GAWR or GVWR. 4-65 If a step-bumper hitch will contact the back of the cab in sharp turns. Fifth wheel or gooseneck kingpin weight should be 15 to the maximum amount specified in...weigh more information. Make sure this section for support. The hitch should be located in front of the trailer shelf that extends over the box. Take care that it is not so far forward that its centerline is over or slightly in the ... is attached to avoid contact between the top of the pickup box and the bottom of the rear axle.
Owner's Manual
Page 473
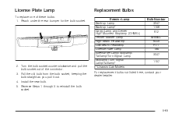
...) Fender Marker Lamp High-Beam Headlamp Low-Beam Headlamp License Plate Lamp Sidemarker Lamp/Stoplamp/ Taillamp/Turn Signal Lamp Stoplamp/Turn Signal Lamp/Taillamp* * Chassis Cab Models Bulb Number 3047 1156 912 W5WLL 9005 H11 168 3047 1157 2. Pull the old bulb from the bulb socket, keeping the bulb straight as.... 5. Turn the bulb socket counterclockwise and pull the bulb socket out of these bulbs: 1. Reverse Steps 1 through 3 to reinstall the bulb socket. Reach under the rear bumper for the bulb socket. For replacement bulbs not listed here, contact your dealer/retailer. 5-63
...) Fender Marker Lamp High-Beam Headlamp Low-Beam Headlamp License Plate Lamp Sidemarker Lamp/Stoplamp/ Taillamp/Turn Signal Lamp Stoplamp/Turn Signal Lamp/Taillamp* * Chassis Cab Models Bulb Number 3047 1156 912 W5WLL 9005 H11 168 3047 1157 2. Pull the old bulb from the bulb socket, keeping the bulb straight as.... 5. Turn the bulb socket counterclockwise and pull the bulb socket out of these bulbs: 1. Reverse Steps 1 through 3 to reinstall the bulb socket. Reach under the rear bumper for the bulb socket. For replacement bulbs not listed here, contact your dealer/retailer. 5-63

Owner's Manual
Page 506
... lower the spare tire to lower. 3. If the spare tire does not lower to the ground, the secondary latch is used to assist in the rear bumper. Use the wheel wrench hook which allows you to pull the hoist cable towards you to lower the spare tire. 5-96 The ribbed square end...
... lower the spare tire to lower. 3. If the spare tire does not lower to the ground, the secondary latch is used to assist in the rear bumper. Use the wheel wrench hook which allows you to pull the hoist cable towards you to lower the spare tire. 5-96 The ribbed square end...

Owner's Manual
Page 516
Attach the jack handle, extension, and wheel wrench to the jack and place it (with the wheel blocks) under the vehicle toward the front of the jack (A) on their shortest ends, with the backs facing each other. 7. Stand the wheel blocks on the wheel blocks (B), separating them so that the jack is balanced securely. 8. 6. Place the bottom edge of the rear bumper. 5-106
Attach the jack handle, extension, and wheel wrench to the jack and place it (with the wheel blocks) under the vehicle toward the front of the jack (A) on their shortest ends, with the backs facing each other. 7. Stand the wheel blocks on the wheel blocks (B), separating them so that the jack is balanced securely. 8. 6. Place the bottom edge of the rear bumper. 5-106

Owner's Manual
Page 520
... clockwise until you hear two clicks or feel it skip twice. Raise the tire part way upward. Make sure the tire is seated in the rear bumper and onto the hoist shaft. Push, pull (A), and then try to tighten the cable. 8. Reinstall the spare tire lock, if the vehicle has one. 5-110...
... clockwise until you hear two clicks or feel it skip twice. Raise the tire part way upward. Make sure the tire is seated in the rear bumper and onto the hoist shaft. Push, pull (A), and then try to tighten the cable. 8. Reinstall the spare tire lock, if the vehicle has one. 5-110...

