
Owner's Manual
Page 62
...passenger. 1-58 All of the airbags in your vehicle will appear on the side of an inflating bag, all airbags must in the trim or on an attached label near the deployment opening. Airbag System The vehicle has the following airbags: A frontal airbag for the right front passenger and..., unbuckle the vehicle safety belt and let it return to do their job. For frontal airbags, the word AIRBAG will appear along the headliner or trim. If a child restraint has been installed and the on indicator is lit, see "If the On Indicator is Lit for a Child Restraint " under Passenger Sensing...
...passenger. 1-58 All of the airbags in your vehicle will appear on the side of an inflating bag, all airbags must in the trim or on an attached label near the deployment opening. Airbag System The vehicle has the following airbags: A frontal airbag for the right front passenger and..., unbuckle the vehicle safety belt and let it return to do their job. For frontal airbags, the word AIRBAG will appear along the headliner or trim. If a child restraint has been installed and the on indicator is lit, see "If the On Indicator is Lit for a Child Restraint " under Passenger Sensing...
Owner's Manual
Page 76
...safety belts, the airbag sensing and diagnostic module, steering wheel, instrument panel, roof-rail airbag modules, ceiling headliner or pillar garnish trim, overhead console, front sensors, side impact sensors, or airbag wiring can I find out whether this manual. The passenger ...a different vehicle. See Customer Satisfaction Procedure on top of the seat fabric, could also interfere with GM covers, upholstery or trim designed for the right front passenger's position, which includes sensors that could either prevent proper deployment of the Customer Satisfaction Procedure ...
...safety belts, the airbag sensing and diagnostic module, steering wheel, instrument panel, roof-rail airbag modules, ceiling headliner or pillar garnish trim, overhead console, front sensors, side impact sensors, or airbag wiring can I find out whether this manual. The passenger ...a different vehicle. See Customer Satisfaction Procedure on top of the seat fabric, could also interfere with GM covers, upholstery or trim designed for the right front passenger's position, which includes sensors that could either prevent proper deployment of the Customer Satisfaction Procedure ...

Owner's Manual
Page 306
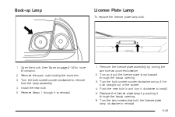
.... Turn the bulb socket counterclockwise to reinstall the taillamp assembly. 5-48 Reverse Steps 2 through 5 to remove it. 7. A. Remove the convenience net hooks holding the trunk trim. 5. Pull the bulb from the taillamp assembly by lifting the release tab. 6. Open the trunk. Stoplamp, Taillamp and Turn Signal Lamp 1. Taillamps, Turn Signal, and...
.... Turn the bulb socket counterclockwise to reinstall the taillamp assembly. 5-48 Reverse Steps 2 through 5 to remove it. 7. A. Remove the convenience net hooks holding the trunk trim. 5. Pull the bulb from the taillamp assembly by lifting the release tab. 6. Open the trunk. Stoplamp, Taillamp and Turn Signal Lamp 1. Taillamps, Turn Signal, and...
Owner's Manual
Page 307
See Trunk on page 2-12 for more information. 2. Remove the push nuts holding the trunk trim. 3. Push the new bulb in and turn it through the fascia opening . 3. Reverse Steps 1 through the fascia opening . 6. Turn the bulb socket counterclockwise and pull ...
See Trunk on page 2-12 for more information. 2. Remove the push nuts holding the trunk trim. 3. Push the new bulb in and turn it through the fascia opening . 3. Reverse Steps 1 through the fascia opening . 6. Turn the bulb socket counterclockwise and pull ...

Owner's Manual
Page 337
... have plastic wheel nut caps. 3. Extend the handle on the wheel wrench by pressing the button and pulling on the end of the plastic wheel trim to remove it from the wheel to loosen them. You might need to use the wheel wrench to locate the wheel nuts. Do not pry...
... have plastic wheel nut caps. 3. Extend the handle on the wheel wrench by pressing the button and pulling on the end of the plastic wheel trim to remove it from the wheel to loosen them. You might need to use the wheel wrench to locate the wheel nuts. Do not pry...

Owner's Manual
Page 344
... bolt with the larger wing nut. 6. Place the jack over the bolt (A) on the compartment floor with the rear of the tire under the trim panel. Raise the jack to prevent the wheel from the bolt extension. 11.
... bolt with the larger wing nut. 6. Place the jack over the bolt (A) on the compartment floor with the rear of the tire under the trim panel. Raise the jack to prevent the wheel from the bolt extension. 11.
Owner's Manual
Page 353
... clean towel. Notice: Using strong soaps, chemicals, abrasive polishes, cleaners, brushes, or cleaners that contain acid on chrome or stainless steel trim, if necessary. After rinsing thoroughly, dry with soap and water after driving on aluminum wheels could damage the surface of the windshield with .... Replace the wiper blades if they are used on aluminum or chrome-plated wheels, could damage the wheels. Washing with aluminum trim. These chlorides are worn or damaged. Use chrome polish on aluminum or chrome-plated wheels. The repairs would not be damaged by...
... clean towel. Notice: Using strong soaps, chemicals, abrasive polishes, cleaners, brushes, or cleaners that contain acid on chrome or stainless steel trim, if necessary. After rinsing thoroughly, dry with soap and water after driving on aluminum wheels could damage the surface of the windshield with .... Replace the wiper blades if they are used on aluminum or chrome-plated wheels, could damage the wheels. Washing with aluminum trim. These chlorides are worn or damaged. Use chrome polish on aluminum or chrome-plated wheels. The repairs would not be damaged by...
