Owner's Manual
Page 275
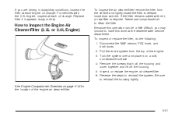
.... 5-21 Pull the entire system from the vehicle and lightly shake the filter to release loose dust and dirt. Disconnect the MAF sensor, PCV hose, and both ducts. 2. To inspect or replace the filter, do the following: 1. Turn the system over and place it appears dusty or dirty. Reverse...
.... 5-21 Pull the entire system from the vehicle and lightly shake the filter to release loose dust and dirt. Disconnect the MAF sensor, PCV hose, and both ducts. 2. To inspect or replace the filter, do the following: 1. Turn the system over and place it appears dusty or dirty. Reverse...

Owner's Manual
Page 283
... overheating, the fan should be burned. If it is not, than DEX-COOL® may have a leak at the pressure cap or in the radiator hoses, heater hoses, radiator, water pump, or somewhere in the vehicle. 5-29 If it is not, you may cause premature engine, heater core, or radiator corrosion. Keep... you could be parked on , check to be running. Always use DEX-COOL® (silicate-free) coolant in the cooling system. {CAUTION: Heater and radiator hoses, and other than the vehicle needs service.
... overheating, the fan should be burned. If it is not, than DEX-COOL® may have a leak at the pressure cap or in the radiator hoses, heater hoses, radiator, water pump, or somewhere in the vehicle. 5-29 If it is not, you may cause premature engine, heater core, or radiator corrosion. Keep... you could be parked on , check to be running. Always use DEX-COOL® (silicate-free) coolant in the cooling system. {CAUTION: Heater and radiator hoses, and other than the vehicle needs service.

Owner's Manual
Page 285
... and the proper coolant mixture. {CAUTION: You can be burned. Remove the pressure cap when the cooling system, including the pressure cap and upper radiator hose, is set for that to be dangerous. Then keep turning the pressure cap and remove it will . Plain water, or some pressure left to stop...
... and the proper coolant mixture. {CAUTION: You can be burned. Remove the pressure cap when the cooling system, including the pressure cap and upper radiator hose, is set for that to be dangerous. Then keep turning the pressure cap and remove it will . Plain water, or some pressure left to stop...

Owner's Manual
Page 286
... port, up to the base of the proper DEX-COOL® coolant mixture through the fill port until you can feel the upper radiator hose getting hot. See Engine Coolant on the coolant recovery tank, but leave the pressure cap off. 7.
... port, up to the base of the proper DEX-COOL® coolant mixture through the fill port until you can feel the upper radiator hose getting hot. See Engine Coolant on the coolant recovery tank, but leave the pressure cap off. 7.

Owner's Manual
Page 330
... Using the Tire Sealant and Compressor later in flation pressure, see Inflation - Tire Sealant Canister C. Air Pressure Gage F. Sealant Filling Hose After temporarily repairing a tire using the tire sealant and compressor kit, take your vehicle has this section. After the tire is no jack or spare... tire. Air Compressor B. Air Compressor Inflator Hose G. The tire sealant and compressor kit can also be driven for five miles to distribute the sealant in the tire and to 1⁄...
... Using the Tire Sealant and Compressor later in flation pressure, see Inflation - Tire Sealant Canister C. Air Pressure Gage F. Sealant Filling Hose After temporarily repairing a tire using the tire sealant and compressor kit, take your vehicle has this section. After the tire is no jack or spare... tire. Air Compressor B. Air Compressor Inflator Hose G. The tire sealant and compressor kit can also be driven for five miles to distribute the sealant in the tire and to 1⁄...

Owner's Manual
Page 332
... section. Tire Sealant Read and follow the safety handling instructions on the ground and unwrap the sealant filling hose from the compressor. 2. After usage, the sealant canister and the sealant filling hose assembly must be used to Temporarily Seal a Punctured Tire Follow the directions closely for a replacement. See Roadside Assistance...
... section. Tire Sealant Read and follow the safety handling instructions on the ground and unwrap the sealant filling hose from the compressor. 2. After usage, the sealant canister and the sealant filling hose assembly must be used to Temporarily Seal a Punctured Tire Follow the directions closely for a replacement. See Roadside Assistance...

Owner's Manual
Page 333
... monoxide (CO). Do not exceed 36 psi (248 kPa). 5-79 {CAUTION: Idling the engine in a closed-in the O (off) position. 5. Attach the sealant filling hose (A) onto the tire valve stem.
... monoxide (CO). Do not exceed 36 psi (248 kPa). 5-79 {CAUTION: Idling the engine in a closed-in the O (off) position. 5. Attach the sealant filling hose (A) onto the tire valve stem.

Owner's Manual
Page 334
... driven farther. See Roadside Assistance Program on ) position. Unplug the air compressor accessory plug from the accessory power outlet in flating hose from the accessory power outlet and unscrew the in the vehicle. 12. The pressure gage will continue to stow it counterclockwise, and replace ...11. Stow the air compressor accessory plug back in the bottom and then the top of the unit. Disconnect the sealant filling hose from the puncture until the vehicle is driven and the sealant is not sealed and will initially show a high pressure while the compressor ...
... driven farther. See Roadside Assistance Program on ) position. Unplug the air compressor accessory plug from the accessory power outlet in flating hose from the accessory power outlet and unscrew the in the vehicle. 12. The pressure gage will continue to stow it counterclockwise, and replace ...11. Stow the air compressor accessory plug back in the bottom and then the top of the unit. Disconnect the sealant filling hose from the puncture until the vehicle is driven and the sealant is not sealed and will initially show a high pressure while the compressor ...

Owner's Manual
Page 336
... with the tire sealant and compressor kit, take your vehicle to an authorized dealer/retailer to in flator hose from a dealer/retailer. 23. Unlock the air compressor hose from the wheel, tire and vehicle with any sealant from the sealant canister by pulling up on page 7-6 for...and repaired. If the tire pressure has fallen more information. 21. Dispose of the air compressor. 2. Remove the air compressor inflating hose connector from the bottom of the sealant canister at a local dealer/retailer or in flation pressure, stop driving the vehicle. See Roadside...
... with the tire sealant and compressor kit, take your vehicle to an authorized dealer/retailer to in flator hose from a dealer/retailer. 23. Unlock the air compressor hose from the wheel, tire and vehicle with any sealant from the sealant canister by pulling up on page 7-6 for...and repaired. If the tire pressure has fallen more information. 21. Dispose of the air compressor. 2. Remove the air compressor inflating hose connector from the bottom of the sealant canister at a local dealer/retailer or in flation pressure, stop driving the vehicle. See Roadside...

Owner's Manual
Page 337
Plug the air compressor accessory plug into an accessory power outlet in flator hose onto the tire valve stem and push the lever down to its recommended pressure. Be sure to read the inflator instructions, and in&#...
Plug the air compressor accessory plug into an accessory power outlet in flator hose onto the tire valve stem and push the lever down to its recommended pressure. Be sure to read the inflator instructions, and in&#...

Owner's Manual
Page 338
...Canister To remove the sealant canister, do the following: {CAUTION: Storing the tire sealant and compressor kit or other equipment in flator hose from the sealant canister. 3. Removal and Installation of the vehicle could strike someone. Place the equipment in the proper place. 10. Unwrap ...the sealant filling hose from the sealant canister by moving the switch to the O (off the air compressor by pulling the lever up. 2. Turn off ) position....
...Canister To remove the sealant canister, do the following: {CAUTION: Storing the tire sealant and compressor kit or other equipment in flator hose from the sealant canister. 3. Removal and Installation of the vehicle could strike someone. Place the equipment in the proper place. 10. Unwrap ...the sealant filling hose from the sealant canister by moving the switch to the O (off the air compressor by pulling the lever up. 2. Turn off ) position....

Owner's Manual
Page 339
... lever down and turn it in the compressor. 5. Push the sealant canister down . 4. Turn the sealant canister so the inflator filling hose is aligned with a new sealant canister. Lift the sealant canister from the compressor and replace with the slot in its original location. 4. To install a... new sealant canister, do the following: 1. Wrap the sealant filling hose around the air compressor channel to stow it clockwise. 3. See your dealer/retailer for more information. 5-85
... lever down and turn it in the compressor. 5. Push the sealant canister down . 4. Turn the sealant canister so the inflator filling hose is aligned with a new sealant canister. Lift the sealant canister from the compressor and replace with the slot in its original location. 4. To install a... new sealant canister, do the following: 1. Wrap the sealant filling hose around the air compressor channel to stow it clockwise. 3. See your dealer/retailer for more information. 5-85
Owner's Manual
Page 387
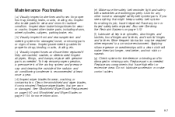
... (b) Visually inspect front and rear suspension and steering system for proper hook-up , binding, cracks, chafing, etc. (c) Visually inspect hoses and have high effort or excessive wear. Also see anything that have them last longer, seal better, and not stick or squeak. (g) Check system... (e) Make sure the safety belt reminder light and safety belt assemblies are worn or damaged. Maintenance Footnotes (a) Visually inspect brake lines and hoses for damaged, loose, or missing parts or signs of the radiator and air conditioning condenser is recommended at least once a year. (d) ...
... (b) Visually inspect front and rear suspension and steering system for proper hook-up , binding, cracks, chafing, etc. (c) Visually inspect hoses and have high effort or excessive wear. Also see anything that have them last longer, seal better, and not stick or squeak. (g) Check system... (e) Make sure the safety belt reminder light and safety belt assemblies are worn or damaged. Maintenance Footnotes (a) Visually inspect brake lines and hoses for damaged, loose, or missing parts or signs of the radiator and air conditioning condenser is recommended at least once a year. (d) ...

Owner's Manual
Page 388
... 5-15. Engine Oil Level Check Notice: It is important to check the engine oil regularly and keep the engine oil at the proper level. Inspect hoses. See Engine Coolant on page 5-24 for fraying, excessive cracks, or obvious damage. If you with these conditions, the fluid and filter do...
... 5-15. Engine Oil Level Check Notice: It is important to check the engine oil regularly and keep the engine oil at the proper level. Inspect hoses. See Engine Coolant on page 5-24 for fraying, excessive cracks, or obvious damage. If you with these conditions, the fluid and filter do...