
Owner's Manual
Page 90
... questions about servicing your vehicle. Adding Equipment to Your Airbag-Equipped Vehicle Q: Is there anything I might add to in several places around your vehicle's frame, bumper system, front end or side sheet metal or height, they may not work for Customer Assistance are probably part of the airbag sensors. You do...
... questions about servicing your vehicle. Adding Equipment to Your Airbag-Equipped Vehicle Q: Is there anything I might add to in several places around your vehicle's frame, bumper system, front end or side sheet metal or height, they may not work for Customer Assistance are probably part of the airbag sensors. You do...
Owner's Manual
Page 149
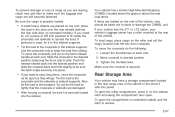
... a crossrail, be taken not to spread the load. Make sure the crossrail is properly loaded. If you are leaving, check now and then to the bumpers. Slide the crossrail to the desired position balancing the force side to desired position. 3. Also tie the load to make sure the luggage and cargo...
... a crossrail, be taken not to spread the load. Make sure the crossrail is properly loaded. If you are leaving, check now and then to the bumpers. Slide the crossrail to the desired position balancing the force side to desired position. 3. Also tie the load to make sure the luggage and cargo...

Owner's Manual
Page 305
... air dam. These will help make your vehicle, you have left the great North American road system behind. The front bumper lower air dam is the terrain itself. The push-pins are not marked. If your vehicle does not have some new skills. You will need ...some more ground clearance at the front of the front bumper. If you think you will find many driving tips and suggestions. The greatest of these is held in place by a series of push-pins...
... air dam. These will help make your vehicle, you have left the great North American road system behind. The front bumper lower air dam is the terrain itself. The push-pins are not marked. If your vehicle does not have some new skills. You will need ...some more ground clearance at the front of the front bumper. If you think you will find many driving tips and suggestions. The greatest of these is held in place by a series of push-pins...

Owner's Manual
Page 306
Always be sure to replace the front bumper air dam when you are finished off-road driving. 4-18 Pull the push-pins and lower air dam assembly away from the retainer. Notice: ..., be sure to replace the air dam. 2. The following steps must be performed on the front of your vehicle for extended periods without the front bumper lower air dam installed can cause improper air flow to the engine and may allow things like fog lamps or tow hooks on each...
Always be sure to replace the front bumper air dam when you are finished off-road driving. 4-18 Pull the push-pins and lower air dam assembly away from the retainer. Notice: ..., be sure to replace the air dam. 2. The following steps must be performed on the front of your vehicle for extended periods without the front bumper lower air dam installed can cause improper air flow to the engine and may allow things like fog lamps or tow hooks on each...

Owner's Manual
Page 358
... use a sway control if the trailer will weigh more than 5,000 lbs (2 270 kg) be sure to use a step-bumper hitch, the bumper could be adjusted so the distance (A) remains the same both before and after coupling the trailer to Ground Distance (B) Front of the proper size. If ...
... use a sway control if the trailer will weigh more than 5,000 lbs (2 270 kg) be sure to use a step-bumper hitch, the bumper could be adjusted so the distance (A) remains the same both before and after coupling the trailer to Ground Distance (B) Front of the proper size. If ...

Owner's Manual
Page 359
If you are towing a trailer up to your trailer. Always leave just enough slack so you can turn with a factory-installed step bumper, you may attach the safety chains to the attaching point on the master cylinder that sends the fluid to the rear brakes. Be sure ... and maintain them properly. If you do, it needs its own brakes - Use steel brake tubing. 4-71 Never allow safety chains to drag on the bumper. If everything checks out this . If you are towing a trailer up to 5,000 lbs (2 270 kg) with your brakes. Otherwise, both braking systems won't work...
If you are towing a trailer up to your trailer. Always leave just enough slack so you can turn with a factory-installed step bumper, you may attach the safety chains to the attaching point on the master cylinder that sends the fluid to the rear brakes. Be sure ... and maintain them properly. If you do, it needs its own brakes - Use steel brake tubing. 4-71 Never allow safety chains to drag on the bumper. If everything checks out this . If you are towing a trailer up to 5,000 lbs (2 270 kg) with your brakes. Otherwise, both braking systems won't work...

Owner's Manual
Page 367
... your vehicle with a rear step pad at the center of the people inside. If you won't go over the GVWR or GAWR. If your step-bumper has only one cutout circle, you will have to cut out the circle, then remove it to install the trailer ball. Step...-Bumper Pad Your vehicle has a rear step bumper with the trailer attached, so that you are using the bumper to tow a trailer, and your step-bumper has three cutout circles you must push out the center cutout circle to install...
... your vehicle with a rear step pad at the center of the people inside. If you won't go over the GVWR or GAWR. If your step-bumper has only one cutout circle, you will have to cut out the circle, then remove it to install the trailer ball. Step...-Bumper Pad Your vehicle has a rear step bumper with the trailer attached, so that you are using the bumper to tow a trailer, and your step-bumper has three cutout circles you must push out the center cutout circle to install...

Owner's Manual
Page 444
... braking and handling of your wheels, wheel bolts or wheel nuts, replace them only with bearing life, brake cooling, speedometer or odometer calibration, headlamp aim, bumper height, vehicle ground clearance, and tire or tire chain clearance to replace a wheel, use the correct wheel, wheel bolts and wheel nuts for replacement. {CAUTION...
... braking and handling of your wheels, wheel bolts or wheel nuts, replace them only with bearing life, brake cooling, speedometer or odometer calibration, headlamp aim, bumper height, vehicle ground clearance, and tire or tire chain clearance to replace a wheel, use the correct wheel, wheel bolts and wheel nuts for replacement. {CAUTION...

Owner's Manual
Page 450
Assemble the wheel wrench (H) and the two jack handle extensions (I . Hoist Shaft F. Open the spare tire lock cover on the bumper and use the ignition key to remove the lock if your vehicle is equipped with a spare tire lock (J). 2. Tire Retainer E. A. Spare Tire (Valve Stem Pointed Down) B. Hoist Assembly C. Hoist Cable D. Hoist Shaft Access Hole H. Hoist End of Extension Tool G. Jack Handle Extensions J. 1. Spare Tire Lock (If Equipped) 5-82 Wheel Wrench I ) as shown.
Assemble the wheel wrench (H) and the two jack handle extensions (I . Hoist Shaft F. Open the spare tire lock cover on the bumper and use the ignition key to remove the lock if your vehicle is equipped with a spare tire lock (J). 2. Tire Retainer E. A. Spare Tire (Valve Stem Pointed Down) B. Hoist Assembly C. Hoist Cable D. Hoist Shaft Access Hole H. Hoist End of Extension Tool G. Jack Handle Extensions J. 1. Spare Tire Lock (If Equipped) 5-82 Wheel Wrench I ) as shown.

Owner's Manual
Page 451
... until the spare tire can be pulled out from under the vehicle. The ribbed square end of the extension connects to assist in the rear bumper. Continue to the ground. Use the wheel wrench hook that allows you to pull the hoist cable towards you to the hoist shaft (E). Insert the...
... until the spare tire can be pulled out from under the vehicle. The ribbed square end of the extension connects to assist in the rear bumper. Continue to the ground. Use the wheel wrench hook that allows you to pull the hoist cable towards you to the hoist shaft (E). Insert the...

Owner's Manual
Page 460
Continue raising the jack until it (with the wheel blocks) under the center of the rear bumper. 9. Keep lowering the jack until the spare tire slides off the jack or is hanging by turning the wheel wrench counterclockwise. Position the center lift ...
Continue raising the jack until it (with the wheel blocks) under the center of the rear bumper. 9. Keep lowering the jack until the spare tire slides off the jack or is hanging by turning the wheel wrench counterclockwise. Position the center lift ...

Owner's Manual
Page 461
... the wheel opening. Pull the tire out from the cable, insert the hoist handle, extension and wheel wrench into the hoist shaft hole in the bumper clockwise to raise the cable back up if the cable is behind you pull the jack out from the spare. 13. You will not be.... Have the hoist assembly inspected as soon as you or on page 5-84. 5-93 Turn the wheel wrench in the hoist shaft hole in the bumper and turn the wheel wrench counterclockwise to lower the spare the rest of the way. 14. Disconnect the jack handle from under the vehicle. {CAUTION...
... the wheel opening. Pull the tire out from the cable, insert the hoist handle, extension and wheel wrench into the hoist shaft hole in the bumper clockwise to raise the cable back up if the cable is behind you pull the jack out from the spare. 13. You will not be.... Have the hoist assembly inspected as soon as you or on page 5-84. 5-93 Turn the wheel wrench in the hoist shaft hole in the bumper and turn the wheel wrench counterclockwise to lower the spare the rest of the way. 14. Disconnect the jack handle from under the vehicle. {CAUTION...

Owner's Manual
Page 463
Remove the wheel center cap, if equipped. 2. Make sure the retainer is fully seated across the underside of the vehicle with the valve stem pointed down, and to the rear. 3. 1. Put the tire on the ground at the rear of the wheel. 4. Insert the hoist end (F) of the wheel wrench through the wheel opening. Attach the wheel wrench (H) and extensions (I) together. 5. Tilt the retainer downward and through the hole (G) in the rear bumper and into the hoist shaft. 5-95
Remove the wheel center cap, if equipped. 2. Make sure the retainer is fully seated across the underside of the vehicle with the valve stem pointed down, and to the rear. 3. 1. Put the tire on the ground at the rear of the wheel. 4. Insert the hoist end (F) of the wheel wrench through the wheel opening. Attach the wheel wrench (H) and extensions (I) together. 5. Tilt the retainer downward and through the hole (G) in the rear bumper and into the hoist shaft. 5-95

Owner's Manual
Page 512
...station. • Lock-out Service (identification required): Replacement keys or locksmith service will provide the following services during the Bumper-to-Bumper warranty period, at 1-800-323-9935. TTY users call 1-800-833-9935. GM of Canada also has a Mobility Program. ...speak with peace of mind as hand controls or a wheelchair/scooter lift. Assistance provided when the vehicle is intended to provide you with a Chevrolet Roadside Assistance representative. Text telephone (TTY) users, call 1-800-263-3830. • Fuel Delivery: Delivery of enough fuel ($5 maximum) for...
...station. • Lock-out Service (identification required): Replacement keys or locksmith service will provide the following services during the Bumper-to-Bumper warranty period, at 1-800-323-9935. TTY users call 1-800-833-9935. GM of Canada also has a Mobility Program. ...speak with peace of mind as hand controls or a wheelchair/scooter lift. Assistance provided when the vehicle is intended to provide you with a Chevrolet Roadside Assistance representative. Text telephone (TTY) users, call 1-800-263-3830. • Fuel Delivery: Delivery of enough fuel ($5 maximum) for...

Owner's Manual
Page 513
...be covered at any time without notification. • Dealer Locator Service In many instances, mechanical failures are covered under Chevrolet's Bumper-to use our service, it is not part of occurrence. Roadside Assistance is added security while traveling for the repair or ...Your name, home address, and home telephone number. Chevrolet reserves the right to an owner or driver when, in Chevrolet's judgement, the claims become excessive in frequency or type of or included in Canada have the occasion to -Bumper warranty. The customer is responsible for you might ...
...be covered at any time without notification. • Dealer Locator Service In many instances, mechanical failures are covered under Chevrolet's Bumper-to use our service, it is not part of occurrence. Roadside Assistance is added security while traveling for the repair or ...Your name, home address, and home telephone number. Chevrolet reserves the right to an owner or driver when, in Chevrolet's judgement, the claims become excessive in frequency or type of or included in Canada have the occasion to -Bumper warranty. The customer is responsible for you might ...

Owner's Manual
Page 514
... the problem is , please call your dealer and request an appointment. If the dealer requests that you to your destination with the Bumper-to minimize your inconvenience by original receipts. 7-8 If it can provide you with shuttle service to get you simply drop the vehicle off... them know this, and ask for reasonable fuel expenses may be scheduled for service, you are unable to wait, GM helps to -Bumper coverage provided by the New Vehicle Limited Warranty. Courtesy Transportation To enhance your ownership experience, we and our participating dealers are required. Several...
... the problem is , please call your dealer and request an appointment. If the dealer requests that you to your destination with the Bumper-to minimize your inconvenience by original receipts. 7-8 If it can provide you with shuttle service to get you simply drop the vehicle off... them know this, and ask for reasonable fuel expenses may be scheduled for service, you are unable to wait, GM helps to -Bumper coverage provided by the New Vehicle Limited Warranty. Courtesy Transportation To enhance your ownership experience, we and our participating dealers are required. Several...
Owner's Manual
Page 515
... or reimburse you for fuel usage charges and may include minimum age requirements, insurance coverage, credit card, etc. Canadian Vehicles: For warranty repairs during the Bumper-to-Bumper warranty coverage period, but it is kept for specific information about availability. Please consult your dealer for a warranty repair.
... or reimburse you for fuel usage charges and may include minimum age requirements, insurance coverage, credit card, etc. Canadian Vehicles: For warranty repairs during the Bumper-to-Bumper warranty coverage period, but it is kept for specific information about availability. Please consult your dealer for a warranty repair.
