
Owner's Manual
Page 13
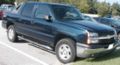
...Push the rear seat head restraints all the way down to tilt it toward the front of the folding midgate. The seat cushion will release and allow you more information on page 2-11 for more cargo space and access to the... folding midgate. The rear seat head restraints are adjustable and work the same as the front seat head restraints. 1-7 ... . 2. Head Restraints Rear Seats Rear Seat Operation The rear seat is closest to raise it. See Midgate® on operation of the vehicle.
...Push the rear seat head restraints all the way down to tilt it toward the front of the folding midgate. The seat cushion will release and allow you more information on page 2-11 for more cargo space and access to the... folding midgate. The rear seat head restraints are adjustable and work the same as the front seat head restraints. 1-7 ... . 2. Head Restraints Rear Seats Rear Seat Operation The rear seat is closest to raise it. See Midgate® on operation of the vehicle.

Owner's Manual
Page 75
... System Operation ...2-5 Doors and Locks ...2-8 Door Locks ...2-8 Power Door Locks ...2-9 Delayed Locking ...2-9 Programmable Automatic Door Locks ...2-10 Rear Door Security Locks ...2-10 Lockout Protection ...2-10 Midgate® ...2-11 Tailgate ...2-20 Windows ...2-22 Power Windows ...2-23 Sun Visors ...2-24 Theft-Deterrent Systems ...2-24 Content Theft-Deterrent ...2-24 Passlock® ...2-26 Starting and...
... System Operation ...2-5 Doors and Locks ...2-8 Door Locks ...2-8 Power Door Locks ...2-9 Delayed Locking ...2-9 Programmable Automatic Door Locks ...2-10 Rear Door Security Locks ...2-10 Lockout Protection ...2-10 Midgate® ...2-11 Tailgate ...2-20 Windows ...2-22 Power Windows ...2-23 Sun Visors ...2-24 Theft-Deterrent Systems ...2-24 Content Theft-Deterrent ...2-24 Passlock® ...2-26 Starting and...
Owner's Manual
Page 85
... electrical wiring or other cable connections must drive with the cargo area covered and the tailgate and the midgate® open because carbon monoxide (CO) gas can cause unconsciousness and even death. Midgate® CAUTION: (Continued) {CAUTION: It can be dangerous to its highest speed on the setting...your vehicle. See Dual Automatic Climate Control System on page 3-22. • If you must pass through the seal between the body and the midgate®: • Make sure all the way. It can come into your heating or cooling system to drive with the cargo CAUTION: (Continued)...
... electrical wiring or other cable connections must drive with the cargo area covered and the tailgate and the midgate® open because carbon monoxide (CO) gas can cause unconsciousness and even death. Midgate® CAUTION: (Continued) {CAUTION: It can be dangerous to its highest speed on the setting...your vehicle. See Dual Automatic Climate Control System on page 3-22. • If you must pass through the seal between the body and the midgate®: • Make sure all the way. It can come into your heating or cooling system to drive with the cargo CAUTION: (Continued)...

Owner's Manual
Page 86
The following are the main components of your vehicle's cargo area. Window Alignment Arrows 2-12 Grab Handles C. Midgate Release Handle G. Latch Levers B. Window Retaining Tabs F. Glass-Catch Release Button D. Midgate® Operation Your vehicle is equipped with a midgate and a removable rear glass panel. The midgate allows you to extend the length of the midgate system: A. Glass Lock Knobs E.
The following are the main components of your vehicle's cargo area. Window Alignment Arrows 2-12 Grab Handles C. Midgate Release Handle G. Latch Levers B. Window Retaining Tabs F. Glass-Catch Release Button D. Midgate® Operation Your vehicle is equipped with a midgate and a removable rear glass panel. The midgate allows you to extend the length of the midgate system: A. Glass Lock Knobs E.

Owner's Manual
Page 87
... in the vehicle could be able to be injured. Rear Glass Removal and Storage {CAUTION: If the removable rear glass is stored securely in the midgate storage pocket. To remove the rear glass do the following: 1. Once unlatched, the glass-catch release button (C) will not be thrown about the vehicle in...
... in the vehicle could be able to be injured. Rear Glass Removal and Storage {CAUTION: If the removable rear glass is stored securely in the midgate storage pocket. To remove the rear glass do the following: 1. Once unlatched, the glass-catch release button (C) will not be thrown about the vehicle in...

Owner's Manual
Page 89
Push in on the corner of the rear glass to allow the lock knob to the locked position. Load the rear glass into the storage pocket in the locked position, the rear glass is securely stored. 2-15 Turn both glass lock knobs (D), located at against the storage pocket, with grab handles facing you, until the next step. 6. Hold the rear glass flat both glass lock knobs are in the midgate, guiding the lower edge of the storage pocket, to engage more easily. Once both top corners of the rear glass behind the three rear glass retaining tabs (E). 5.
Push in on the corner of the rear glass to allow the lock knob to the locked position. Load the rear glass into the storage pocket in the locked position, the rear glass is securely stored. 2-15 Turn both glass lock knobs (D), located at against the storage pocket, with grab handles facing you, until the next step. 6. Hold the rear glass flat both glass lock knobs are in the midgate, guiding the lower edge of the storage pocket, to engage more easily. Once both top corners of the rear glass behind the three rear glass retaining tabs (E). 5.

Owner's Manual
Page 92
... be either installed in its normal position, or it can be lowered to allow the rear seats to fold. Turn the midgate handle clockwise and pull the midgate toward you. 2-18 To lower the midgate, do the following: 1. See Rear Seat Operation on page 1-7 for more information. 6. Lowering the... Midgate with the Rear Glass in Place The midgate can be moved forward slightly to allow the cargo area of the vehicle, hold the midgate securely so it locks. The front seats might have to extend into the cab...
... be either installed in its normal position, or it can be lowered to allow the rear seats to fold. Turn the midgate handle clockwise and pull the midgate toward you. 2-18 To lower the midgate, do the following: 1. See Rear Seat Operation on page 1-7 for more information. 6. Lowering the... Midgate with the Rear Glass in Place The midgate can be moved forward slightly to allow the cargo area of the vehicle, hold the midgate securely so it locks. The front seats might have to extend into the cab...

Owner's Manual
Page 93
Lower the midgate until it is flat. Rear Glass Stored in the Storage Pocket 3. Lowering the Midgate with the Rear Glass in Glass Storage Pocket 2-19
Lower the midgate until it is flat. Rear Glass Stored in the Storage Pocket 3. Lowering the Midgate with the Rear Glass in Glass Storage Pocket 2-19

Owner's Manual
Page 94
..., firmly push it upward until it latches into place securely. Open the tailgate by lifting up with the midgate, it will be heavier. Raising the Midgate To return the midgate to its handle while pulling the tailgate toward you. Tailgate Use the ignition/door key to ensure that the...completely normal; This will lower with enough force to be ready for the extra weight and do so using the instructions given previously. Midgate Lowered with Crossbar Attached This procedure works the same as you will notice that the entire crossbar will help to unlock/lock the tailgate....
..., firmly push it upward until it latches into place securely. Open the tailgate by lifting up with the midgate, it will be heavier. Raising the Midgate To return the midgate to its handle while pulling the tailgate toward you. Tailgate Use the ignition/door key to ensure that the...completely normal; This will lower with enough force to be ready for the extra weight and do so using the instructions given previously. Midgate Lowered with Crossbar Attached This procedure works the same as you will notice that the entire crossbar will help to unlock/lock the tailgate....

Owner's Manual
Page 146
You can store it is snug against the midgate and then let the back of the cargo area while it inside the top box compartment. See Top-Box Storage on the cargo area rails ...
You can store it is snug against the midgate and then let the back of the cargo area while it inside the top box compartment. See Top-Box Storage on the cargo area rails ...

Owner's Manual
Page 151
... used to secure cargo. Cargo tie downs are located in areas of the cargo box, include the top drain grates, side rail channels, catch cups, midgate drain, cargo area floor drains and the rubber cargo mat. Even when the water management system is working properly and the vehicle's cargo cover... through an automated car wash. Cargo Tie Downs All-Weather Cargo Area Your vehicle can be driven with the cargo panels on or off, the midgate up or down, or with the rear glass in this section and Tonneau Cover on , water could still accumulate in the rear cargo area that...
... used to secure cargo. Cargo tie downs are located in areas of the cargo box, include the top drain grates, side rail channels, catch cups, midgate drain, cargo area floor drains and the rubber cargo mat. Even when the water management system is working properly and the vehicle's cargo cover... through an automated car wash. Cargo Tie Downs All-Weather Cargo Area Your vehicle can be driven with the cargo panels on or off, the midgate up or down, or with the rear glass in this section and Tonneau Cover on , water could still accumulate in the rear cargo area that...

Owner's Manual
Page 152
...sure that each part of the water management system. A. Rear drains G. The areas where water could collect are fully closed and that the midgate, tailgate, and cover system are : E. Water drainage area around both sides of the water management system is clean and not blocked with debris.... Cargo floor H. C. D. Top drain grates Removable front drain grate (Midgate drain gate) Side rail channels and catch cups Front drains 2-78 Follow the instruction given next in this section for the proper procedures on...
...sure that each part of the water management system. A. Rear drains G. The areas where water could collect are fully closed and that the midgate, tailgate, and cover system are : E. Water drainage area around both sides of the water management system is clean and not blocked with debris.... Cargo floor H. C. D. Top drain grates Removable front drain grate (Midgate drain gate) Side rail channels and catch cups Front drains 2-78 Follow the instruction given next in this section for the proper procedures on...

Owner's Manual
Page 155
You will have to remove the drain grate by using the following steps: The midgate drain grate is located near the base of the drain grate. 3. But first you will find a removable drain grate covering the drain. 1. Pull ...up on page 2-11 for more information. 2. Reverse the procedure to flush the midgate drain with water. you and pull it straight out. Lower the midgate. Midgate Drain Grate Removal and Cleaning After hauling dirt, wood chips, pebbles etc. Tilt the drain grate away from you will...
You will have to remove the drain grate by using the following steps: The midgate drain grate is located near the base of the drain grate. 3. But first you will find a removable drain grate covering the drain. 1. Pull ...up on page 2-11 for more information. 2. Reverse the procedure to flush the midgate drain with water. you and pull it straight out. Lower the midgate. Midgate Drain Grate Removal and Cleaning After hauling dirt, wood chips, pebbles etc. Tilt the drain grate away from you will...

Owner's Manual
Page 161
With the midgate lowered, enter the rear passenger compartment of the vehicle. See Midgate® on to the next step, you will want to attach the storage bag to the cargo tie downs, if it straight out from the side rails. Remove the rear rail by gently pushing them against the spring-loaded end. Set the rail aside. 2-87 Removing the Front/Rear Rails and Bows Before moving on page 2-11. 1. Remove the two bows by pulling it is not already attached, so you will have a place ready to store the front and back rails and the two bows. 2. Set the bow aside. 3.
With the midgate lowered, enter the rear passenger compartment of the vehicle. See Midgate® on to the next step, you will want to attach the storage bag to the cargo tie downs, if it straight out from the side rails. Remove the rear rail by gently pushing them against the spring-loaded end. Set the rail aside. 2-87 Removing the Front/Rear Rails and Bows Before moving on page 2-11. 1. Remove the two bows by pulling it is not already attached, so you will have a place ready to store the front and back rails and the two bows. 2. Set the bow aside. 3.

Owner's Manual
Page 162
... first twisting up and then twisting the back edge down while pushing it out from the side rails. 5. Reverse the procedure to clear the midgate seals, and then pulling it into place. • Both bows are secured in the storage bag. Stow both bows and the front and rear rails...
... first twisting up and then twisting the back edge down while pushing it out from the side rails. 5. Reverse the procedure to clear the midgate seals, and then pulling it into place. • Both bows are secured in the storage bag. Stow both bows and the front and rear rails...

Owner's Manual
Page 184
... reading lamps, press the button located next to the lamp to turn off . This will remain off when the doors are open a door or the midgate, if equipped, and will turn it to remain off the dome lamps if they are closed . When a door is opened or the key is removed... the exterior lamps control, to set the dome lamps to the lamp. The lamps cannot be adjusted to the exterior lamp control, all doors or midgate are left on when you want. Battery Run-Down Protection This feature shuts off . Dome Lamps The dome lamps will come on for more than...
... reading lamps, press the button located next to the lamp to turn off . This will remain off when the doors are open a door or the midgate, if equipped, and will turn it to remain off the dome lamps if they are closed . When a door is opened or the key is removed... the exterior lamps control, to set the dome lamps to the lamp. The lamps cannot be adjusted to the exterior lamp control, all doors or midgate are left on when you want. Battery Run-Down Protection This feature shuts off . Dome Lamps The dome lamps will come on for more than...

Owner's Manual
Page 464
... Module, Electronic Throttle Control Module Harness Connector Right Turn Signal/Stop Trailer Right Turn Signals and Sidemarkers Driver Door Module Rear Cargo Area Power Outlets, Midgate Power Door Lock System Rear Electronic Climate Control, Tire Pressure Monitoring System (If Equipped) Truck Body Controller Flasher Module Left Power Window Circuit Breaker Truck...
... Module, Electronic Throttle Control Module Harness Connector Right Turn Signal/Stop Trailer Right Turn Signals and Sidemarkers Driver Door Module Rear Cargo Area Power Outlets, Midgate Power Door Lock System Rear Electronic Climate Control, Tire Pressure Monitoring System (If Equipped) Truck Body Controller Flasher Module Left Power Window Circuit Breaker Truck...

Owner's Manual
Page 480
..., latch plates, retractors, and anchorages are cracked, swollen, or deteriorated. Inspect all key lock cylinders, hood latch assembly, secondary latch, pivots, spring anchor, release pawl, midgate hinges, side storage box door hinges, tailgate hinges, tailgate linkage, outer tailgate handle pivot points, latch bolt, fuel door hinge, locks, and folding seat hardware...
..., latch plates, retractors, and anchorages are cracked, swollen, or deteriorated. Inspect all key lock cylinders, hood latch assembly, secondary latch, pivots, spring anchor, release pawl, midgate hinges, side storage box door hinges, tailgate hinges, tailgate linkage, outer tailgate handle pivot points, latch bolt, fuel door hinge, locks, and folding seat hardware...

Owner's Manual
Page 516
... ...6-13 Scheduled Maintenance ...6-4 Using ...6-2 Your Vehicle and the Environment ...6-2 Malfunction Indicator Light ...3-40 Manual Passenger Seat ...1-2 Memory Seat ...2-90 Message DIC Warnings and Messages ...3-50 Midgate ...2-11 Mirrors Automatic Dimming Rearview with Compass ...2-48 Automatic Dimming Rearview with Compass and Temperature Display ...2-50 Automatic Dimming Rearview with OnStar® and Compass...
... ...6-13 Scheduled Maintenance ...6-4 Using ...6-2 Your Vehicle and the Environment ...6-2 Malfunction Indicator Light ...3-40 Manual Passenger Seat ...1-2 Memory Seat ...2-90 Message DIC Warnings and Messages ...3-50 Midgate ...2-11 Mirrors Automatic Dimming Rearview with Compass ...2-48 Automatic Dimming Rearview with Compass and Temperature Display ...2-50 Automatic Dimming Rearview with OnStar® and Compass...

