
Owner's Manual
Page 84
A: We have any of the airbag sensors. The phone numbers and addresses for Customer Assistance are in Step Two of the Customer Satisfaction Procedure in flation. Will it may cause an airbag in this , you should contact Customer Assistance before you modify ...
A: We have any of the airbag sensors. The phone numbers and addresses for Customer Assistance are in Step Two of the Customer Satisfaction Procedure in flation. Will it may cause an airbag in this , you should contact Customer Assistance before you modify ...

Owner's Manual
Page 85
... Your Restraint Systems Now and then, make sure the safety belt reminder light and all your belts, buckles, latch plates, retractors and anchorages are in Step Two of the front seats, safety belts, the airbag sensing and diagnostic module (located under the driver's seat), or the inside rearview mirror can rip...
... Your Restraint Systems Now and then, make sure the safety belt reminder light and all your belts, buckles, latch plates, retractors and anchorages are in Step Two of the front seats, safety belts, the airbag sensing and diagnostic module (located under the driver's seat), or the inside rearview mirror can rip...

Owner's Manual
Page 91
... interference received, including interference that may need to the left or right, hold the transmitter higher, and try this equipment. This is necessary. Take a few steps to stand closer during rainy or snowy weather. • Check the location.
... interference received, including interference that may need to the left or right, hold the transmitter higher, and try this equipment. This is necessary. Take a few steps to stand closer during rainy or snowy weather. • Check the location.
Owner's Manual
Page 97
.... 3. This is the mode that is the mode that you have left the program mode. You can program this occurs, you perform the next step. 2. Begin with Step 1 to indicate that you are not pressed while in LOCK, release the turn signal/multifunction lever toward you and hold it there while you...
.... 3. This is the mode that is the mode that you have left the program mode. You can program this occurs, you perform the next step. 2. Begin with Step 1 to indicate that you are not pressed while in LOCK, release the turn signal/multifunction lever toward you and hold it there while you...
Owner's Manual
Page 98
... currently selected. Then, with the ignition off. You are leaving the program mode. The number of chimes tells you perform the next step. 2. You can repeat the procedure beginning with Step 1 to re-enter the programming mode. See your vehicle. Choose one , two, three, or four chimes. Begin with the key in...
... currently selected. Then, with the ignition off. You are leaving the program mode. The number of chimes tells you perform the next step. 2. You can repeat the procedure beginning with Step 1 to re-enter the programming mode. See your vehicle. Choose one , two, three, or four chimes. Begin with the key in...

Owner's Manual
Page 106
... armed. If the alarm does not sound when it to see Fuses and Circuit Breakers on the remote keyless entry transmitter or by following these steps: 1. If the alarm does not sound or the vehicle's headlamps do not flash, the vehicle should but the vehicle's headlamps flash, check to...
... armed. If the alarm does not sound when it to see Fuses and Circuit Breakers on the remote keyless entry transmitter or by following these steps: 1. If the alarm does not sound or the vehicle's headlamps do not flash, the vehicle should but the vehicle's headlamps flash, check to...
Owner's Manual
Page 136
... engine running, the vehicle can roll. Your vehicle can move , even when you are pulling a trailer, see Towing a Trailer on fairly level ground, use the steps that follow. Turn the ignition key to get out of your right foot and set . Hold the brake pedal down with the parking brake fi...
... engine running, the vehicle can roll. Your vehicle can move , even when you are pulling a trailer, see Towing a Trailer on fairly level ground, use the steps that follow. Turn the ignition key to get out of your right foot and set . Hold the brake pedal down with the parking brake fi...
Owner's Manual
Page 138
... before you cannot shift out of commercial medium duty trucks. If you can . 2-52 Start the vehicle and then shift to NEUTRAL (N). 4. Shifting Out of Step 4. 3. There is equipped with a park pawl designed to hold the brake until the end of Park (P) (Automatic Transmission) Your vehicle has an automatic transmission shift...
... before you cannot shift out of commercial medium duty trucks. If you can . 2-52 Start the vehicle and then shift to NEUTRAL (N). 4. Shifting Out of Step 4. 3. There is equipped with a park pawl designed to hold the brake until the end of Park (P) (Automatic Transmission) Your vehicle has an automatic transmission shift...
Owner's Manual
Page 141
... (P) with the transfer case in NEUTRAL will allow the vehicle to roll, even if your automatic transmission shift lever is in NEUTRAL. Follow the proper steps to be sure your vehicle will not move suddenly.
... (P) with the transfer case in NEUTRAL will allow the vehicle to roll, even if your automatic transmission shift lever is in NEUTRAL. Follow the proper steps to be sure your vehicle will not move suddenly.
Owner's Manual
Page 154
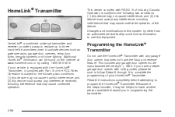
... can be helpful to have another person available to use the HomeLink® Transmitter with rolling codes, please be sure to follow Steps 6 through 8 to activate devices such as gate operators, garage door openers, entry door locks, security systems and home lighting. Changes... a combined universal transmitter and receiver, provides a way to replace up to three hand-held transmitters used to complete the programming of the steps involved, it complies with Part 15 of Industry Canada. Operation is subject to the following two conditions: (1) this device may cause undesired ...
... can be helpful to have another person available to use the HomeLink® Transmitter with rolling codes, please be sure to follow Steps 6 through 8 to activate devices such as gate operators, garage door openers, entry door locks, security systems and home lighting. Changes... a combined universal transmitter and receiver, provides a way to replace up to three hand-held transmitters used to complete the programming of the steps involved, it complies with Part 15 of Industry Canada. Operation is subject to the following two conditions: (1) this device may cause undesired ...

Owner's Manual
Page 155
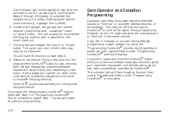
...and garage door openers may require you are clear of the garage door or gate operator you to substitute Step 3 with Step 2 under "Programming HomeLink®." Do not repeat Step 1 as for quicker and more accurate transmission of the radio frequency. 2. If the indicator light stays ...on constantly, programming is also recommended that people and objects are programming. Follow these steps to program up to flash, after HomeLink® successfully receives the frequency signal from the HomeLink® buttons while keeping the...
...and garage door openers may require you are clear of the garage door or gate operator you to substitute Step 3 with Step 2 under "Programming HomeLink®." Do not repeat Step 1 as for quicker and more accurate transmission of the radio frequency. 2. If the indicator light stays ...on constantly, programming is also recommended that people and objects are programming. Follow these steps to program up to flash, after HomeLink® successfully receives the frequency signal from the HomeLink® buttons while keeping the...
Owner's Manual
Page 156
...button. This may vary by using the "Programming HomeLink® " procedures (regardless of "Programming HomeLink®." You do not want to repeat Step 1, as this sequence a third time to complete the programming. If you press and release every two seconds (cycle) your rolling-code equipped ... of the button may not be found where the hanging antenna wire is attached to the motor-head unit. 7. Return to start Step 8. 8. Proceed with Step 4 under "Programming HomeLink® " with the following to complete the programming of transmission. Locate in the same manner. Similarly,...
...button. This may vary by using the "Programming HomeLink® " procedures (regardless of "Programming HomeLink®." You do not want to repeat Step 1, as this sequence a third time to complete the programming. If you press and release every two seconds (cycle) your rolling-code equipped ... of the button may not be found where the hanging antenna wire is attached to the motor-head unit. 7. Return to start Step 8. 8. Proceed with Step 4 under "Programming HomeLink® " with the following to complete the programming of transmission. Locate in the same manner. Similarly,...
Owner's Manual
Page 157
.... 2. Press and hold both buttons until the indicator light begins to HomeLink® using a HomeLink® button previously trained, follow these steps: 1. Release both buttons. For questions or comments, contact HomeLink® at 1-800-355-3515, or on while the signal is now ...least half of a second. See "Reprogramming a Single HomeLink® Button" following : 1. While still holding the HomeLink® button, proceed with Step 2 under "Programming HomeLink® " shown earlier in this section. ® Resetting Defaults To reset HomeLink® to flash after 20 ...
.... 2. Press and hold both buttons until the indicator light begins to HomeLink® using a HomeLink® button previously trained, follow these steps: 1. Release both buttons. For questions or comments, contact HomeLink® at 1-800-355-3515, or on while the signal is now ...least half of a second. See "Reprogramming a Single HomeLink® Button" following : 1. While still holding the HomeLink® button, proceed with Step 2 under "Programming HomeLink® " shown earlier in this section. ® Resetting Defaults To reset HomeLink® to flash after 20 ...
Owner's Manual
Page 162
... be recalled. If the vehicle is not set . To store the memory settings, do one of the memory control for a second driver, follow the preceding steps, but press the other numbered memory control button. If the parking brake is not in PARK (P). Press and hold the 1 or 2 button of the memory...
... be recalled. If the vehicle is not set . To store the memory settings, do one of the memory control for a second driver, follow the preceding steps, but press the other numbered memory control button. If the parking brake is not in PARK (P). Press and hold the 1 or 2 button of the memory...
Owner's Manual
Page 163
... and release the 1 or 2 button. The seat position can be saved for three seconds. Easy Exit Seat The controls for a second driver, follow the preceding steps, but press the other numbered memory control button. • If you have a manual transmission, press and release the exit button on the memory control while...
... and release the 1 or 2 button. The seat position can be saved for three seconds. Easy Exit Seat The controls for a second driver, follow the preceding steps, but press the other numbered memory control button. • If you have a manual transmission, press and release the exit button on the memory control while...

Owner's Manual
Page 177
... cruise control or the ignition, your cruise control set speed memory is held for 60 seconds or Erasing Speed Memory When you may want to step on steep hills. If your vehicle has the StabiliTrak feature, cruise control will turn off the Daytime Running Lamps (DRL) and the automatic headlamps. 3-...brake takes you may have to brake or shift to a lower gear to this to activate. longer, cruise control will turn off the cruise control: Step lightly on the brake pedal, move the cruise control switch to off . ® The control on hills depends upon your speed, load and the ...
... cruise control or the ignition, your cruise control set speed memory is held for 60 seconds or Erasing Speed Memory When you may want to step on steep hills. If your vehicle has the StabiliTrak feature, cruise control will turn off the Daytime Running Lamps (DRL) and the automatic headlamps. 3-...brake takes you may have to brake or shift to a lower gear to this to activate. longer, cruise control will turn off the cruise control: Step lightly on the brake pedal, move the cruise control switch to off . ® The control on hills depends upon your speed, load and the ...
Owner's Manual
Page 190
... the entire system in recirculation. 2. Automatic Operation AUTO (Automatic): When automatic operation is selected, the display will remain at the maximum heat setting. Use the steps below to cover the sensor located on the button will be automatically controlled. When AUTO is active the system will be displayed under and to...
... the entire system in recirculation. 2. Automatic Operation AUTO (Automatic): When automatic operation is selected, the display will remain at the maximum heat setting. Use the steps below to cover the sensor located on the button will be automatically controlled. When AUTO is active the system will be displayed under and to...
Owner's Manual
Page 209
... flash, when it is possible If the light stops flashing and remains on and the engine is still flashing, follow the previous steps, and see "If the Light Is On Steady" following . Turn the key off, wait at least 10 seconds and restart the engine. If the light...
... flash, when it is possible If the light stops flashing and remains on and the engine is still flashing, follow the previous steps, and see "If the Light Is On Steady" following . Turn the key off, wait at least 10 seconds and restart the engine. If the light...

Owner's Manual
Page 210
... the fuel brand you from getting a vehicle registration. Poor fuel quality will not pass this inspection could prevent you use. If none of the above steps have developed. Your vehicle will cause your vehicle? The diagnostic system can check the vehicle. Your dealer has the proper test equipment and diagnostic tools...
... the fuel brand you from getting a vehicle registration. Poor fuel quality will not pass this inspection could prevent you use. If none of the above steps have developed. Your vehicle will cause your vehicle? The diagnostic system can check the vehicle. Your dealer has the proper test equipment and diagnostic tools...

Owner's Manual
Page 235
... If a station is pressed, the station that was set will only seek and scan stations with a strong signal that function or by performing the following steps: 1. Setting Preset Stations Up to 18 stations (six FM1, six FM2, and six AM) can be programmed on the six numbered pushbuttons, by waiting .... Finding a Station AM FM: Press this knob to switch between FM1, FM2, or AM. TUNE: Turn this button to select radio stations. 3. Repeat the steps for a few seconds, then go to the next or to the next station. To scan stations, press and hold AUDIO for a few seconds, then go...
... If a station is pressed, the station that was set will only seek and scan stations with a strong signal that function or by performing the following steps: 1. Setting Preset Stations Up to 18 stations (six FM1, six FM2, and six AM) can be programmed on the six numbered pushbuttons, by waiting .... Finding a Station AM FM: Press this knob to switch between FM1, FM2, or AM. TUNE: Turn this button to select radio stations. 3. Repeat the steps for a few seconds, then go to the next or to the next station. To scan stations, press and hold AUDIO for a few seconds, then go...

