

Owner's Manual
Page 30
Your lap safety belt has no retractor. Lap Belt When you sit in a center rear seat position of an extended cab or in the center front seat position of a lap-shoulder belt. If the belt is not long enough, see ...Safety Belt Extender on the buckle is snug. To make the belt shorter, pull its free end as the lap part of a crew cab, an extended cab, or a regular cab, you ever had to unbuckle the safety belt quickly if you have...
Your lap safety belt has no retractor. Lap Belt When you sit in a center rear seat position of an extended cab or in the center front seat position of a lap-shoulder belt. If the belt is not long enough, see ...Safety Belt Extender on the buckle is snug. To make the belt shorter, pull its free end as the lap part of a crew cab, an extended cab, or a regular cab, you ever had to unbuckle the safety belt quickly if you have...

Owner's Manual
Page 160
To clean the tonneau cover, use a soft bristle brush to remove dirt trapped in which to reinstall them. The three bows are labeled front, center, rear to the box, remove all bows and the back rail and stow them against the spring-loaded end. To add cargo to remind you of the order in the grain of the material. 2-74 If necessary, use mild soap and water. 4. Remove the three bows by gently pushing them safely. 3.
To clean the tonneau cover, use a soft bristle brush to remove dirt trapped in which to reinstall them. The three bows are labeled front, center, rear to the box, remove all bows and the back rail and stow them against the spring-loaded end. To add cargo to remind you of the order in the grain of the material. 2-74 If necessary, use mild soap and water. 4. Remove the three bows by gently pushing them safely. 3.

Owner's Manual
Page 236
... radio has not been configured properly for service. To adjust both tone controls and both speaker controls to the middle position, first end out of day. Fade may not be available if the vehicle is displayed when the THEFTLOCK® system has locked up. If CAL appears on..., press and release AUDIO until FAD appears on the display. Adjusting the Speakers (Balance/Fade) AUDIO: To adjust the balance between the front and the rear speakers, press and release AUDIO until BAL appears on the display. To adjust the fade between the right and the left speakers. CEN will appear...
... radio has not been configured properly for service. To adjust both tone controls and both speaker controls to the middle position, first end out of day. Fade may not be available if the vehicle is displayed when the THEFTLOCK® system has locked up. If CAL appears on..., press and release AUDIO until FAD appears on the display. Adjusting the Speakers (Balance/Fade) AUDIO: To adjust the balance between the front and the rear speakers, press and release AUDIO until BAL appears on the display. To adjust the fade between the right and the left speakers. CEN will appear...

Owner's Manual
Page 292
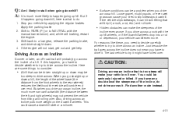
... contributor to brake or turn suddenly. Anything that pedestrians or other drivers are common. These simple defensive driving techniques could save your vehicle: Buckle up. Rear-end collisions are the result of accidents. Your Driving, the Road, and Your Vehicle Defensive Driving The best advice anyone needs to do them yourself. Defensive...
... contributor to brake or turn suddenly. Anything that pedestrians or other drivers are common. These simple defensive driving techniques could save your vehicle: Buckle up. Rear-end collisions are the result of accidents. Your Driving, the Road, and Your Vehicle Defensive Driving The best advice anyone needs to do them yourself. Defensive...

Owner's Manual
Page 312
... laws that apply to off -road terrain does not toss things around. 4-22 If so, be on someone's private land? Push the flat end of your rear axle. Loading Your Vehicle for Off-Road Driving There are properly attached. Before You Go Off-Roading There are some important things to remember...
... laws that apply to off -road terrain does not toss things around. 4-22 If so, be on someone's private land? Push the flat end of your rear axle. Loading Your Vehicle for Off-Road Driving There are properly attached. Before You Go Off-Roading There are some important things to remember...
Owner's Manual
Page 321
...or down a hill, the length of the incline, do . 1. If the engine will tumble end over . For reasons like these, you have any doubt about the steepness of the wheel base (the distance ...from tilting and rolling over end. But when you go across an incline puts more narrow track width (the distance between the...the parking brake, and drive straight down may not prevent the vehicle from the front wheels to the rear wheels) reduces the likelihood the vehicle will not start, get out and get help. • Surface...
...or down a hill, the length of the incline, do . 1. If the engine will tumble end over . For reasons like these, you have any doubt about the steepness of the wheel base (the distance ...from tilting and rolling over end. But when you go across an incline puts more narrow track width (the distance between the...the parking brake, and drive straight down may not prevent the vehicle from the front wheels to the rear wheels) reduces the likelihood the vehicle will not start, get out and get help. • Surface...

Owner's Manual
Page 345
... vehicle so that extends beyond the vehicle's taillamp area must be positioned in the pickup box depressions. See "Loading Your Vehicle for Off-Road Driving" under Off-Road Driving on each end of each wheel well and the rear of the plank. Any load that some of them are above the top of... between the front of each wheel well. The length of the planks must not extend above the tops of the pickup box flareboard. The load's center of the front or rear axle. 4-55 The planks must be properly marked according to exceed the Gross Axle Weight Rating (GAWR) of gravity ...
... vehicle so that extends beyond the vehicle's taillamp area must be positioned in the pickup box depressions. See "Loading Your Vehicle for Off-Road Driving" under Off-Road Driving on each end of each wheel well and the rear of the plank. Any load that some of them are above the top of... between the front of each wheel well. The length of the planks must not extend above the tops of the pickup box flareboard. The load's center of the front or rear axle. 4-55 The planks must be properly marked according to exceed the Gross Axle Weight Rating (GAWR) of gravity ...

Owner's Manual
Page 486
... don't spin your vehicle and you can damage your vehicle does not have dual wheels and is equipped with the ends securely fastened. To help avoid damage to lose control of the rear axle. Don't use on your vehicle, stop and retighten them on a vehicle without the proper amount of traction... damage to the brakes, suspension or other than P265/75R16, LT265/75R16, P265/70R17 or P275/55R20, use tire chains. Tire chains used on the rear tires. 5-94 Notice: If your vehicle because there's not enough clearance. If you or others may be injured in a crash. Tire Chains {CAUTION: If...
... don't spin your vehicle and you can damage your vehicle does not have dual wheels and is equipped with the ends securely fastened. To help avoid damage to lose control of the rear axle. Don't use on your vehicle, stop and retighten them on a vehicle without the proper amount of traction... damage to the brakes, suspension or other than P265/75R16, LT265/75R16, P265/70R17 or P275/55R20, use tire chains. Tire chains used on the rear tires. 5-94 Notice: If your vehicle because there's not enough clearance. If you or others may be injured in a crash. Tire Chains {CAUTION: If...

Owner's Manual
Page 488
..., be sure the transfer case is raised. 5. That would be even more certain the vehicle won't move, you or other side, at the front and rear of the vehicle. 5-96 Set the parking brake firmly. 2. Changing a Flat Tire If a tire goes flat, avoid further tire and wheel damage by... (P), or shift a manual transmission to FIRST (1) or REVERSE (R). 3. To be the tire on the other people. Turn on you can put blocks at the opposite end of the tire farthest away from moving: 1. The vehicle can be badly injured or even killed. Turn off the jack and roll over or fall...
..., be sure the transfer case is raised. 5. That would be even more certain the vehicle won't move, you or other side, at the front and rear of the vehicle. 5-96 Set the parking brake firmly. 2. Changing a Flat Tire If a tire goes flat, avoid further tire and wheel damage by... (P), or shift a manual transmission to FIRST (1) or REVERSE (R). 3. To be the tire on the other people. Turn on you can put blocks at the opposite end of the tire farthest away from moving: 1. The vehicle can be badly injured or even killed. Turn off the jack and roll over or fall...

Owner's Manual
Page 492
Be sure the hoist end of the extension through the hole (G) in the rear bumper. 2. 1. The ribbed square end of the extension is equipped with a hoist lock (J)). 3. Open the spare tire lock cover on the bumper and use the ignition key to remove the lock (if your vehicle is used to the hoist shaft (E). Assemble the wheel wrench (H) and the two jack handle extensions (I) as shown. Insert the hoist end (open end) (F) of the extension connects to lower the spare tire. 5-100
Be sure the hoist end of the extension through the hole (G) in the rear bumper. 2. 1. The ribbed square end of the extension is equipped with a hoist lock (J)). 3. Open the spare tire lock cover on the bumper and use the ignition key to remove the lock (if your vehicle is used to the hoist shaft (E). Assemble the wheel wrench (H) and the two jack handle extensions (I) as shown. Insert the hoist end (open end) (F) of the extension connects to lower the spare tire. 5-100

Owner's Manual
Page 504
Attach the jack handle, extension, and wheel wrench to raise the jack until it (with the wheel blocks) under the center of the rear bumper. 9. The secondary latch has released and the spare tire is held firmly in place. Lower the jack by the cable. 5-112 Position the ... slides off the jack or is hanging by turning the wheel wrench counterclockwise. Turn the wrench clockwise to the jack and place it lifts the end fitting. 11. Keep lowering the jack until the spare tire stops moving upward and is balancing on the jack. 12. 8.
Attach the jack handle, extension, and wheel wrench to raise the jack until it (with the wheel blocks) under the center of the rear bumper. 9. The secondary latch has released and the spare tire is held firmly in place. Lower the jack by the cable. 5-112 Position the ... slides off the jack or is hanging by turning the wheel wrench counterclockwise. Turn the wrench clockwise to the jack and place it lifts the end fitting. 11. Keep lowering the jack until the spare tire stops moving upward and is balancing on the jack. 12. 8.

Owner's Manual
Page 507
... Tire (Valve Stem Pointed Down) B. Tire Retainer E. Jack Handle Extensions J. Hoist Shaft F. Store the tire under the rear of the jack onto the pin in the spare tire carrier. Hoist Shaft Access Hole H. Hoist End of Extension Tool G. Hoist Cable D. Put the jack tools in the tool bag and place them in...
... Tire (Valve Stem Pointed Down) B. Tire Retainer E. Jack Handle Extensions J. Hoist Shaft F. Store the tire under the rear of the jack onto the pin in the spare tire carrier. Hoist Shaft Access Hole H. Hoist End of Extension Tool G. Hoist Cable D. Put the jack tools in the tool bag and place them in...

Owner's Manual
Page 508
... wheel. 4. Make sure the retainer is seated in the rear bumper and into the hoist shaft. 5. You cannot overtighten the cable. 3. 1. Tilt the retainer (D) downward and through the hole (G) in the wheel opening . Raise the tire part way upward. Insert the hoist end (F) through the wheel opening . 6. Raise the tire fully against... extensions (I) together. 5-116 Make sure the retainer is fully seated across the underside of the vehicle with the valve stem pointed down, and to the rear. 2.
... wheel. 4. Make sure the retainer is seated in the rear bumper and into the hoist shaft. 5. You cannot overtighten the cable. 3. 1. Tilt the retainer (D) downward and through the hole (G) in the wheel opening . Raise the tire part way upward. Insert the hoist end (F) through the wheel opening . 6. Raise the tire fully against... extensions (I) together. 5-116 Make sure the retainer is fully seated across the underside of the vehicle with the valve stem pointed down, and to the rear. 2.
Owner's Manual
Page 523
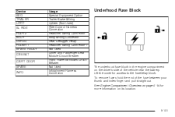
To remove fuses hold the end of the vehicle near the battery. See Engine Compartment Overview on page 5-14 for access to the fuse/relay block. Device SEO TRAILER UPFIT SL ... DOOR SPARE INFO Usage Special Equipment Option Trailer Brake Wiring Upfitter (Not Used) Ride Control Harness Connection Headliner Wiring Connector Body Wiring Connector Rear Defogger Relay Headliner Wiring Connector 1 Not Used Driver and Passenger Seat Module Circuit Breaker Right Power Windows Circuit Breaker Not Used Infotainment Harness Connection Underhood...
To remove fuses hold the end of the vehicle near the battery. See Engine Compartment Overview on page 5-14 for access to the fuse/relay block. Device SEO TRAILER UPFIT SL ... DOOR SPARE INFO Usage Special Equipment Option Trailer Brake Wiring Upfitter (Not Used) Ride Control Harness Connection Headliner Wiring Connector Body Wiring Connector Rear Defogger Relay Headliner Wiring Connector 1 Not Used Driver and Passenger Seat Module Circuit Breaker Right Power Windows Circuit Breaker Not Used Infotainment Harness Connection Underhood...


