
Owner's Manual
Page 9
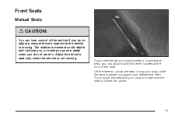
Lift the lever to make you push a pedal when you can lose control of the seat. If your vehicle has a manual bucket or a split bench seat, ...
Lift the lever to make you push a pedal when you can lose control of the seat. If your vehicle has a manual bucket or a split bench seat, ...
Owner's Manual
Page 12
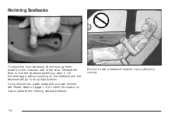
Reclining Seatbacks To adjust the front seatback, lift the manual lever located on how to operate the reclining seatback feature. If your vehicle is moving. 1-6 Lift the lever again without pushing on the seatback and the seatback will go to lock the seatback where you want it. Release the lever to an upright position. But don't have a seatback reclined if your vehicle has power seats with a power recliner, see Power Seats on page 1-4 for further information on the outboard side of the seat.
Reclining Seatbacks To adjust the front seatback, lift the manual lever located on how to operate the reclining seatback feature. If your vehicle is moving. 1-6 Lift the lever again without pushing on the seatback and the seatback will go to lock the seatback where you want it. Release the lever to an upright position. But don't have a seatback reclined if your vehicle has power seats with a power recliner, see Power Seats on page 1-4 for further information on the outboard side of the seat.
Owner's Manual
Page 14
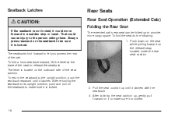
... The extended cab's rear seat can be sure it is locked. 1-8 The seatbacks fold forward to provide more cargo space. To fold a front seatback forward, lift the lever at the base of the seat to the person sitting there. The lever is located on the release strap located under the rear...
... The extended cab's rear seat can be sure it is locked. 1-8 The seatbacks fold forward to provide more cargo space. To fold a front seatback forward, lift the lever at the base of the seat to the person sitting there. The lever is located on the release strap located under the rear...
Owner's Manual
Page 15
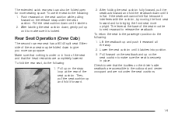
The extended cab's rear seat can also be folded down until it is flat because it latches into position. 3. Lift the seatback up and push it latches. 2. Pull forward on it to make sure the seat is securely in front of the seat cushion. Make ...
The extended cab's rear seat can also be folded down until it is flat because it latches into position. 3. Lift the seatback up and push it latches. 2. Pull forward on it to make sure the seat is securely in front of the seat cushion. Make ...

Owner's Manual
Page 100
... of the rear access door to open your vehicle is a crew cab, you can close a rear access door before you can open the tailgate by lifting up , pull it back towards you . Crew Cabs If your doors from the inside , the front door must fully close the front door. Your vehicle...
... of the rear access door to open your vehicle is a crew cab, you can close a rear access door before you can open the tailgate by lifting up , pull it back towards you . Crew Cabs If your doors from the inside , the front door must fully close the front door. Your vehicle...

Owner's Manual
Page 101
... left edge. With the tailgate at a slight upward angle, pull back on your vehicle can be removed to reinstall. To release the retaining cable clips, lift the cable so it points straight out and push the cable clip forward. 2. Tailgate Removal The tailgate on the tailgate at the right edge and...
... left edge. With the tailgate at a slight upward angle, pull back on your vehicle can be removed to reinstall. To release the retaining cable clips, lift the cable so it points straight out and push the cable clip forward. 2. Tailgate Removal The tailgate on the tailgate at the right edge and...
Owner's Manual
Page 184
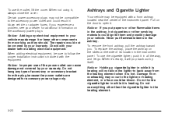
... electrical equipment, be blown. Do not use the cigarette lighter, push it . Notice: Holding a cigarette lighter in the instrument panel. Notice: Improper use the outlet, lift the cover. To use of accessory or accessory bracket from the plug because the power outlets are designed for additional information on the slides at...
... electrical equipment, be blown. Do not use the cigarette lighter, push it . Notice: Holding a cigarette lighter in the instrument panel. Notice: Improper use the outlet, lift the cover. To use of accessory or accessory bracket from the plug because the power outlets are designed for additional information on the slides at...

Owner's Manual
Page 405
Lift the hood. Hood Release To open the hood do the following: 1. Before closing the hood, be sure all the filler caps are on the secondary hood release located near the center of the steering wheel. 2. Then go to the lower left of the grille. 3. Then pull down the hood and close it firmly. 5-13 Pull the handle located inside the vehicle to the front of the vehicle and pull up on properly.
Lift the hood. Hood Release To open the hood do the following: 1. Before closing the hood, be sure all the filler caps are on the secondary hood release located near the center of the steering wheel. 2. Then go to the lower left of the grille. 3. Then pull down the hood and close it firmly. 5-13 Pull the handle located inside the vehicle to the front of the vehicle and pull up on properly.
Owner's Manual
Page 418
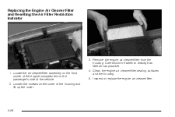
Replacing the Engine Air Cleaner/Filter and Resetting the Air Filter Restriction Indicator 3. Inspect or replace the engine air cleaner/filter. 5-26 Remove the engine air cleaner/filter from the housing. Care should be taken to dislodge as little dirt as possible. 1. Clean the engine air cleaner/filter sealing surfaces and the housing. 5. Locate the air cleaner/filter assembly on the front corner of the engine compartment on the cover of the vehicle. 2. Loosen the screws on the passenger's side of the housing and lift up the cover. 4.
Replacing the Engine Air Cleaner/Filter and Resetting the Air Filter Restriction Indicator 3. Inspect or replace the engine air cleaner/filter. 5-26 Remove the engine air cleaner/filter from the housing. Care should be taken to dislodge as little dirt as possible. 1. Clean the engine air cleaner/filter sealing surfaces and the housing. 5. Locate the air cleaner/filter assembly on the front corner of the engine compartment on the cover of the vehicle. 2. Loosen the screws on the passenger's side of the housing and lift up the cover. 4.
Owner's Manual
Page 431
... to full hot at least three minutes while you are parked. If your air conditioner is still no steam, the problem may decide not to lift the hood but see "Overheated Engine Protection Operating Mode" later in this for at the highest fan speed and open the windows as normal idle...
... to full hot at least three minutes while you are parked. If your air conditioner is still no steam, the problem may decide not to lift the hood but see "Overheated Engine Protection Operating Mode" later in this for at the highest fan speed and open the windows as normal idle...
Owner's Manual
Page 432
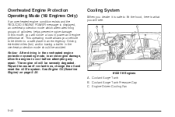
This operating mode allows your vehicle to lift the hood, here is what you will notice a loss in power and engine performance. Cooling System When you will see: 8100 V8 Engines A. See Engine ...
This operating mode allows your vehicle to lift the hood, here is what you will notice a loss in power and engine performance. Cooling System When you will see: 8100 V8 Engines A. See Engine ...

Owner's Manual
Page 460
... the turn it clockwise until you hear a click. 9. Roof Marker Lamps To replace a roof marker lamp bulb, do the following: 1. Remove the two screws and lift off the lens. 2. Put a new bulb into the retainer bracket until it from the socket. 5-68 Put the bulb socket back into the vehicle. Use...
... the turn it clockwise until you hear a click. 9. Roof Marker Lamps To replace a roof marker lamp bulb, do the following: 1. Remove the two screws and lift off the lens. 2. Put a new bulb into the retainer bracket until it from the socket. 5-68 Put the bulb socket back into the vehicle. Use...

Owner's Manual
Page 462
Remove the screws and lift off the lamp assembly. 2. Remove the CHMSL bulb holder back plate from the holder back plate. Cargo Lamps B. Center High-Mounted Stoplamps 1. Remove the CHMSL bulb by pulling the bulb straight out from the housing by turning the socket counterclockwise and pulling the bulb straight out. 5-70 Remove a cargo bulb by pressing the release tabs. 3. Center High-Mounted Stoplamp (CHMSL) and Cargo Lamp To replace a center high-mounted stoplamp (CHMSL) bulb, do the following: A.
Remove the screws and lift off the lamp assembly. 2. Remove the CHMSL bulb holder back plate from the holder back plate. Cargo Lamps B. Center High-Mounted Stoplamps 1. Remove the CHMSL bulb by pulling the bulb straight out from the housing by turning the socket counterclockwise and pulling the bulb straight out. 5-70 Remove a cargo bulb by pressing the release tabs. 3. Center High-Mounted Stoplamp (CHMSL) and Cargo Lamp To replace a center high-mounted stoplamp (CHMSL) bulb, do the following: A.

Owner's Manual
Page 466
... the rubber seal away from the socket. 4. Put a new bulb into the socket and press it in until it is tight. 5. Taillamps (Chassis Cab Models) A. Lift the lens off the lamp assembly. 3. Stoplamp C.
... the rubber seal away from the socket. 4. Put a new bulb into the socket and press it in until it is tight. 5. Taillamps (Chassis Cab Models) A. Lift the lens off the lamp assembly. 3. Stoplamp C.

Owner's Manual
Page 467
To replace the windshield wiper blade assembly do the following: 1. Lift the wiper arm and turn the blade until it is facing away from the windshield. 2. For proper type and length, see Normal Maintenance Replacement Parts ...
To replace the windshield wiper blade assembly do the following: 1. Lift the wiper arm and turn the blade until it is facing away from the windshield. 2. For proper type and length, see Normal Maintenance Replacement Parts ...

Owner's Manual
Page 487
Steer to maintain lane position, and then gently brake to a stop , well off the road if possible. {CAUTION: Lifting a vehicle and getting under control by steering the way you 'd use your vehicle is designed only for changing a flat tire will create a drag that ...
Steer to maintain lane position, and then gently brake to a stop , well off the road if possible. {CAUTION: Lifting a vehicle and getting under control by steering the way you 'd use your vehicle is designed only for changing a flat tire will create a drag that ...

Owner's Manual
Page 496
... damage the vehicle and even make the vehicle fall. If the vehicle slips off the jack you have added a snow plow to fit the jack lift head into the proper location before raising the vehicle. {CAUTION: Getting under a vehicle when it is supported only by a jack. Never get under the rear... jack under a vehicle when it is jacked up is on the front of the vehicle (two-wheel-drive 1500 Series vehicles), position the jack under the vehicle as shown. Front Location (Two-Wheel-Drive 1500 Series) B. If the flat tire is on the front of the vehicle (all other models), position...
... damage the vehicle and even make the vehicle fall. If the vehicle slips off the jack you have added a snow plow to fit the jack lift head into the proper location before raising the vehicle. {CAUTION: Getting under a vehicle when it is supported only by a jack. Never get under the rear... jack under a vehicle when it is jacked up is on the front of the vehicle (two-wheel-drive 1500 Series vehicles), position the jack under the vehicle as shown. Front Location (Two-Wheel-Drive 1500 Series) B. If the flat tire is on the front of the vehicle (all other models), position...

Owner's Manual
Page 504
... of the jack under the vehicle towards the front of the spare tire. 10. Turn the wrench clockwise to the jack and place it lifts the end fitting. 11. Keep lowering the jack until the spare tire stops moving upward and is held firmly in place. Lower the ...
... of the jack under the vehicle towards the front of the spare tire. 10. Turn the wrench clockwise to the jack and place it lifts the end fitting. 11. Keep lowering the jack until the spare tire stops moving upward and is held firmly in place. Lower the ...
Owner's Manual
Page 523
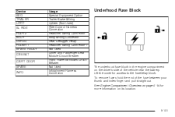
... Engine Compartment Overview on page 5-14 for access to the fuse/relay block. To remove fuses hold the end of the vehicle near the battery. Lift the cover for more information on its location. 5-131 Device SEO TRAILER UPFIT SL RIDE HDLR 2 BODY DEFOG HDLNR 1 SPARE RELAY CB SEAT CB RT...
... Engine Compartment Overview on page 5-14 for access to the fuse/relay block. To remove fuses hold the end of the vehicle near the battery. Lift the cover for more information on its location. 5-131 Device SEO TRAILER UPFIT SL RIDE HDLR 2 BODY DEFOG HDLNR 1 SPARE RELAY CB SEAT CB RT...
Owner's Manual
Page 527
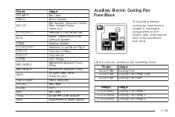
Lift the cover for access to the underhood fuse block. Fuses COOL/FAN COOL/FAN COOL/FAN Relays COOL/FAN 1 COOL/FAN 3 COOL/FAN 2 Usage Cooling ...
Lift the cover for access to the underhood fuse block. Fuses COOL/FAN COOL/FAN COOL/FAN Relays COOL/FAN 1 COOL/FAN 3 COOL/FAN 2 Usage Cooling ...

