

Owner's Manual
Page 10
... the lower cushion and lower back of the seat. Release the lever to turn the heater on the seatback. Reclining Seatbacks To adjust a manual seatback, lift the lever on the outboard side of the switch to an upright position, pull up on the lever without pushing on high. Put the switch...
... the lower cushion and lower back of the seat. Release the lever to turn the heater on the seatback. Reclining Seatbacks To adjust a manual seatback, lift the lever on the outboard side of the switch to an upright position, pull up on the lever without pushing on high. Put the switch...

Owner's Manual
Page 13
... sure it is improperly routed, not properly attached, or twisted won't provide the protection needed in a sudden stop or crash. To tilt the seatback forward, lift up on the lever located at the base of the seatback on the seatback to be tilted forward to let you reach the area behind...
... sure it is improperly routed, not properly attached, or twisted won't provide the protection needed in a sudden stop or crash. To tilt the seatback forward, lift up on the lever located at the base of the seatback on the seatback to be tilted forward to let you reach the area behind...

Owner's Manual
Page 95
If your glove box, lift the lever on the front of the glove box and lower the door. The glove box should not be equipped with heated outside rearview mirrors. ...
If your glove box, lift the lever on the front of the glove box and lower the door. The glove box should not be equipped with heated outside rearview mirrors. ...

Owner's Manual
Page 102
... crossrails attached to the roof to secure cargo. It is equipped with your vehicle. If your vehicle has a console compartment, squeeze the front lever while lifting the top to lose control. Garment Hooks Your vehicle is located on the headliner in the front of your vehicle.
... crossrails attached to the roof to secure cargo. It is equipped with your vehicle. If your vehicle has a console compartment, squeeze the front lever while lifting the top to lose control. Garment Hooks Your vehicle is located on the headliner in the front of your vehicle.

Owner's Manual
Page 121
... come on if the DOME OVERRIDE button is located on again. 3-15 Entry Lighting Your vehicle is in the button when the fog lamps are lifted and released, the lamps will come on . When either front door is opened, the dome lamps will stay on the driver's side of the instrument...
... come on if the DOME OVERRIDE button is located on again. 3-15 Entry Lighting Your vehicle is in the button when the fog lamps are lifted and released, the lamps will come on . When either front door is opened, the dome lamps will stay on the driver's side of the instrument...

Owner's Manual
Page 254
... will burn onto a hot engine. 2. Be careful not to drop or spill things that burn can get on the lower left side of the hood. 3. Lift the hood. 5-10 You or others could be burned. Pull the handle located inside the vehicle on hot engine parts and start a fire. Checking...
... will burn onto a hot engine. 2. Be careful not to drop or spill things that burn can get on the lower left side of the hood. 3. Lift the hood. 5-10 You or others could be burned. Pull the handle located inside the vehicle on hot engine parts and start a fire. Checking...

Owner's Manual
Page 255
Then, pull the hood down firmly to relieve pressure on the hood prop. Release the hood prop from the slot in the hood. 5-11 Then lift the hood to close. Remove the hood prop from its retainer. Before closing the hood, be sure all the filler caps are on the hood. 4. It will latch when dropped from about 10 to 12 inches (25 to its retainer and put the hood prop into the slot in the hood and return the prop to 30 cm) without pressing on properly.
Then, pull the hood down firmly to relieve pressure on the hood prop. Release the hood prop from the slot in the hood. 5-11 Then lift the hood to close. Remove the hood prop from its retainer. Before closing the hood, be sure all the filler caps are on the hood. 4. It will latch when dropped from about 10 to 12 inches (25 to its retainer and put the hood prop into the slot in the hood and return the prop to 30 cm) without pressing on properly.

Owner's Manual
Page 263
... have the air cleaner/filter in place. {CAUTION: Operating the engine with the air cleaner/filter off can cause you are driving. 5-19 Lift out the engine air cleaner/filter, if needed. 3. Do not drive with it is off, a backfire can easily get into your engine...
... have the air cleaner/filter in place. {CAUTION: Operating the engine with the air cleaner/filter off can cause you are driving. 5-19 Lift out the engine air cleaner/filter, if needed. 3. Do not drive with it is off, a backfire can easily get into your engine...
Owner's Manual
Page 272
If the warning continues, pull over, stop, and park your heater to lift the hood but see or hear no steam, the problem may not be safe, drive slower for long periods in NEUTRAL while stopped. If there's ...
If the warning continues, pull over, stop, and park your heater to lift the hood but see or hear no steam, the problem may not be safe, drive slower for long periods in NEUTRAL while stopped. If there's ...
Owner's Manual
Page 273
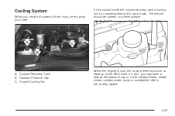
Cooling System When you decide it cools down. If it isn't, you 'll see: If the coolant inside the coolant recovery tank is boiling, don't do anything else until it 's safe to the ADD mark. A. Engine Cooling Fan When the engine is cold, the coolant level should be at least up to lift the hood, here's what you may have a leak at the pressure cap or in the radiator hoses, heater hoses, radiator, water pump or somewhere else in the cooling system. 5-29 The vehicle should be parked on a level surface. Radiator Pressure Cap C. Coolant Recovery Tank B.
Cooling System When you decide it cools down. If it isn't, you 'll see: If the coolant inside the coolant recovery tank is boiling, don't do anything else until it 's safe to the ADD mark. A. Engine Cooling Fan When the engine is cold, the coolant level should be at least up to lift the hood, here's what you may have a leak at the pressure cap or in the radiator hoses, heater hoses, radiator, water pump or somewhere else in the cooling system. 5-29 The vehicle should be parked on a level surface. Radiator Pressure Cap C. Coolant Recovery Tank B.

Owner's Manual
Page 297
Open the hood. 5. Turn the bulb assembly counterclockwise to remove it is tight. 7. Put the new bulb into the vehicle. 9. Put the headlamp assembly back into the bulb assembly and reinstall it in the electrical connector. 2. Plug in the headlamp assembly by lifting up. 3. Unplug the electrical connector. 8. Install the two retaining clips. 10. Remove the black retainer clips by turning it clockwise until it from the headlamp assembly. 6. Close the hood. 5-53 Headlamps One-Piece Composite Headlamp System 1. Pull the headlamp assembly out. 4.
Open the hood. 5. Turn the bulb assembly counterclockwise to remove it is tight. 7. Put the new bulb into the vehicle. 9. Put the headlamp assembly back into the bulb assembly and reinstall it in the electrical connector. 2. Plug in the headlamp assembly by lifting up. 3. Unplug the electrical connector. 8. Install the two retaining clips. 10. Remove the black retainer clips by turning it clockwise until it from the headlamp assembly. 6. Close the hood. 5-53 Headlamps One-Piece Composite Headlamp System 1. Pull the headlamp assembly out. 4.

Owner's Manual
Page 298
Put the new bulb into the vehicle. 9. Close the hood. 2. Turn the bulb assembly counterclockwise to remove it is tight. 7. Put the headlamp lens assembly back into the bulb assembly and reinstall it in the electrical connector. 8. Remove the black retainer clips by turning it clockwise until it from the headlamp assembly. 6. Plug in the headlamp assembly by lifting up. 3. Unplug the electrical connector. 4. Two-Piece Composite Headlamp System 1. Install the two retaining clips. 10. Pull the headlamp lens assembly out. 5-54 Open the hood. 5.
Put the new bulb into the vehicle. 9. Close the hood. 2. Turn the bulb assembly counterclockwise to remove it is tight. 7. Put the headlamp lens assembly back into the bulb assembly and reinstall it in the electrical connector. 8. Remove the black retainer clips by turning it clockwise until it from the headlamp assembly. 6. Plug in the headlamp assembly by lifting up. 3. Unplug the electrical connector. 4. Two-Piece Composite Headlamp System 1. Install the two retaining clips. 10. Pull the headlamp lens assembly out. 5-54 Open the hood. 5.

Owner's Manual
Page 303
Blade Pivot B. Remove the insert from the blade assembly. 5-59 To remove the old wiper blades, lift the wiper arm until it from the wiper arm hook. 3. Arm Assembly E. Arm Hook 2. Press down on the blade assembly pivot locking tab. See "Wiper ...
Blade Pivot B. Remove the insert from the blade assembly. 5-59 To remove the old wiper blades, lift the wiper arm until it from the wiper arm hook. 3. Arm Assembly E. Arm Hook 2. Press down on the blade assembly pivot locking tab. See "Wiper ...

Owner's Manual
Page 325
.... Take your foot from the accelerator pedal. A rear blowout, particularly on a curve, acts much more likely to a stop , well off the road if possible. {CAUTION: Lifting a vehicle and getting under control by steering the way you want the vehicle to use in a skid. Gently brake to a stop well out of a tire...
.... Take your foot from the accelerator pedal. A rear blowout, particularly on a curve, acts much more likely to a stop , well off the road if possible. {CAUTION: Lifting a vehicle and getting under control by steering the way you want the vehicle to use in a skid. Gently brake to a stop well out of a tire...
Owner's Manual
Page 331
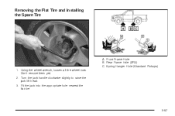
Removing the Flat Tire and Installing the Spare Tire A. Rear Frame Hole (ZR2) C. Don't remove them yet. 2. Using the wheel wrench, loosen all the wheel nuts. Spring Hanger Hole (Standard Pickups) 1. Fit the jack into the appropriate hole nearest the flat tire. 5-87 Turn the jack handle clockwise slightly to raise the jack lift head. 3. Front Frame Hole B.
Removing the Flat Tire and Installing the Spare Tire A. Rear Frame Hole (ZR2) C. Don't remove them yet. 2. Using the wheel wrench, loosen all the wheel nuts. Spring Hanger Hole (Standard Pickups) 1. Fit the jack into the appropriate hole nearest the flat tire. 5-87 Turn the jack handle clockwise slightly to raise the jack lift head. 3. Front Frame Hole B.

Owner's Manual
Page 332
... badly injured or killed. Raise the vehicle far enough off the ground so there is enough room for the spare tire to fit the jack lift head into the proper location before raising the vehicle. 4. Remove all the wheel nuts and take off the jack you could be sure to fi...
... badly injured or killed. Raise the vehicle far enough off the ground so there is enough room for the spare tire to fit the jack lift head into the proper location before raising the vehicle. 4. Remove all the wheel nuts and take off the jack you could be sure to fi...

Owner's Manual
Page 399
... Long Distance: 011-52-53 29 0 800 This program can reimburse you up to determine your vehicle's eligibility, see your vehicle (hand controls, wheelchair/ scooter lifts, etc.). Overseas - Customer Assistance Please contact the local General Motors Business Unit. de R.L. Virgin Islands) - Customer Assistance General Motors de Mexico, S. Text telephone (TTY) users...
... Long Distance: 011-52-53 29 0 800 This program can reimburse you up to determine your vehicle's eligibility, see your vehicle (hand controls, wheelchair/ scooter lifts, etc.). Overseas - Customer Assistance Please contact the local General Motors Business Unit. de R.L. Virgin Islands) - Customer Assistance General Motors de Mexico, S. Text telephone (TTY) users...

