

Owner's Manual
Page 11
... your vehicle has this feature, the controls are located on the outboard side of the switch to an upright position. Heated Seats If your seatback, lift the lever on the outboard side of the vehicle. 1-5
... your vehicle has this feature, the controls are located on the outboard side of the switch to an upright position. Heated Seats If your seatback, lift the lever on the outboard side of the vehicle. 1-5

Owner's Manual
Page 15
..., not properly attached, or twisted won't provide the protection needed in the upright, locked position. 3. After raising the rear seatback, always check to fold down . 4. Lift the seatback up and push it . 4. Grasp the loop located on the side of the seatback you hear a click. {CAUTION: A safety belt that the safety...
..., not properly attached, or twisted won't provide the protection needed in the upright, locked position. 3. After raising the rear seatback, always check to fold down . 4. Lift the seatback up and push it . 4. Grasp the loop located on the side of the seatback you hear a click. {CAUTION: A safety belt that the safety...
Owner's Manual
Page 126
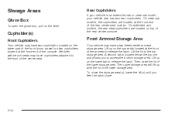
... cab models, the cupholders are located on top of the center seat. Cupholder(s) Front Cupholders Your vehicle may have cupholders attached to release the latch. Lift up on the lower tab to the top storage area. Then, raise the lid of the armrest to the front of the rear center console... allows you feel the latch close the storage area(s), lower the lid(s) until you to access the bottom storage area. The upper storage area will lift up on the upper tab located at the front of the lower storage area. Storage Areas Glove Box To open the glove box, pull on...
... cab models, the cupholders are located on top of the center seat. Cupholder(s) Front Cupholders Your vehicle may have cupholders attached to release the latch. Lift up on the lower tab to the top storage area. Then, raise the lid of the armrest to the front of the rear center console... allows you feel the latch close the storage area(s), lower the lid(s) until you to access the bottom storage area. The upper storage area will lift up on the upper tab located at the front of the lower storage area. Storage Areas Glove Box To open the glove box, pull on...

Owner's Manual
Page 150
Lift up or push down on the thumbwheel located in the center of the outlet to direct the air up or down, or slide the thumbwheel ...
Lift up or push down on the thumbwheel located in the center of the outlet to direct the air up or down, or slide the thumbwheel ...

Owner's Manual
Page 281
... the hood. 5-11 Pull the handle located inside the vehicle on the hood. It will latch when dropped from the slot in the hood. Then lift the hood to its retainer and put the hood prop into the slot in the hood and return the prop to relieve pressure on properly...
... the hood. 5-11 Pull the handle located inside the vehicle on the hood. It will latch when dropped from the slot in the hood. Then lift the hood to its retainer and put the hood prop into the slot in the hood and return the prop to relieve pressure on properly...
Owner's Manual
Page 288
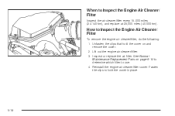
...). Reinstall the engine air cleaner/filter cover. Unfasten the clips that hold the cover in place. 5-18 Inspect or replace the air filter. Lift out the engine air cleaner/filter. 3. See Normal Maintenance Replacement Parts on and remove the cover. 2. Fasten the clips to hold the cover on...
...). Reinstall the engine air cleaner/filter cover. Unfasten the clips that hold the cover in place. 5-18 Inspect or replace the air filter. Lift out the engine air cleaner/filter. 3. See Normal Maintenance Replacement Parts on and remove the cover. 2. Fasten the clips to hold the cover on...

Owner's Manual
Page 299
... warning continues, pull over, stop, and park your heater to full hot at least three minutes while you're parked. You may decide not to lift the hood but to be too serious. Idle for three minutes while you're parked. Tow a trailer. In heavy traffic, let the engine idle in...
... warning continues, pull over, stop, and park your heater to full hot at least three minutes while you're parked. You may decide not to lift the hood but to be too serious. Idle for three minutes while you're parked. Tow a trailer. In heavy traffic, let the engine idle in...

Owner's Manual
Page 300
If it isn't, you may have a leak at least up to lift the hood, here's what you decide it's safe to the FULL COLD mark. Engine Cooling Fan C. If the coolant inside the coolant recovery tank is cold, the coolant level should be at the pressure cap or in the radiator hoses, heater hoses, radiator, water pump or somewhere else in the cooling system. Cooling System When you 'll see: A. Radiator Pressure Cap When the engine is boiling, don't do anything else until it cools down. Coolant Recovery Tank B. The vehicle should be parked on a level surface. 5-30
If it isn't, you may have a leak at least up to lift the hood, here's what you decide it's safe to the FULL COLD mark. Engine Cooling Fan C. If the coolant inside the coolant recovery tank is cold, the coolant level should be at the pressure cap or in the radiator hoses, heater hoses, radiator, water pump or somewhere else in the cooling system. Cooling System When you 'll see: A. Radiator Pressure Cap When the engine is boiling, don't do anything else until it cools down. Coolant Recovery Tank B. The vehicle should be parked on a level surface. 5-30

Owner's Manual
Page 323
... Stoplamp (CHMSL) Taillamps, Turn Signal, Stoplamps and Back-up Lamps 1. Insert the new bulb into the housing and turn until tight. 5. Remove the screws and lift off the lamp assembly. 2. Insert the bulb socket into the socket and press it from the housing. 3. Open the tailgate. Turn the bulb socket counterclockwise...
... Stoplamp (CHMSL) Taillamps, Turn Signal, Stoplamps and Back-up Lamps 1. Insert the new bulb into the housing and turn until tight. 5. Remove the screws and lift off the lamp assembly. 2. Insert the bulb socket into the socket and press it from the housing. 3. Open the tailgate. Turn the bulb socket counterclockwise...

Owner's Manual
Page 325
... and cracking. Any damage that occurs would not be inspected at one end that are removed in different ways. To remove the old wiper blades, lift the wiper arm until it from the wiper arm hook. 3. Arm Hook 2. Press down on the blade assembly pivot locking tab. Notice: Allowing the wiper...
... and cracking. Any damage that occurs would not be inspected at one end that are removed in different ways. To remove the old wiper blades, lift the wiper arm until it from the wiper arm hook. 3. Arm Hook 2. Press down on the blade assembly pivot locking tab. Notice: Allowing the wiper...
Owner's Manual
Page 343
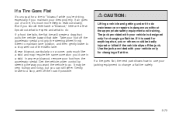
... air goes out of the traffic lane. Steer to maintain lane position, and then gently brake to a stop , well off the road if possible. {CAUTION: Lifting a vehicle and getting under control by steering the way you or others could be very bumpy and noisy, but you should ever have a "blowout," here...
... air goes out of the traffic lane. Steer to maintain lane position, and then gently brake to a stop , well off the road if possible. {CAUTION: Lifting a vehicle and getting under control by steering the way you or others could be very bumpy and noisy, but you should ever have a "blowout," here...
Owner's Manual
Page 351
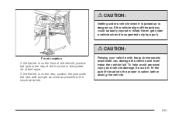
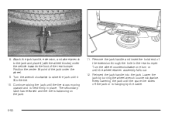
... as close as possible to the rear of the front tire in the pocket off the jack you could be sure to fit the jack lift head into the proper location before raising the vehicle. 5-81 To help avoid personal injury and vehicle damage, be badly injured or killed. If the...
... as close as possible to the rear of the front tire in the pocket off the jack you could be sure to fit the jack lift head into the proper location before raising the vehicle. 5-81 To help avoid personal injury and vehicle damage, be badly injured or killed. If the...
Owner's Manual
Page 362
... jack under the vehicle towards the front of the extension through the hole in place. Turn the wrench clockwise to the jack and place it lifts the tire. 10. Reinsert the jack handle into the jack. Continue raising the jack until it (with the wheel blocks) under the wheel. 9. Lower the...
... jack under the vehicle towards the front of the extension through the hole in place. Turn the wrench clockwise to the jack and place it lifts the tire. 10. Reinsert the jack handle into the jack. Continue raising the jack until it (with the wheel blocks) under the wheel. 9. Lower the...
Owner's Manual
Page 376
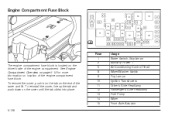
... location of the engine compartment fuse block. To reinstall the cover, line up the tab and push down on the end of the cover and lift. To remove the cover, push in on the tab on the cover until the tab clicks into place. 5 8 9 10 11 12 13 14 15 5-106...
... location of the engine compartment fuse block. To reinstall the cover, line up the tab and push down on the end of the cover and lift. To remove the cover, push in on the tab on the cover until the tab clicks into place. 5 8 9 10 11 12 13 14 15 5-106...

Owner's Manual
Page 403
..., or to $1,000 toward eligible aftermarket driver or passenger adaptive equipment you up to determine your vehicle's eligibility, see your vehicle (hand controls, wheelchair/ scooter lifts, etc.). All TTY users call 1-800-833-9935. Mexico, Central America and Caribbean Islands/Countries (Except Puerto Rico and U.S. Virgin Islands) - Customer Assistance General Motors...
..., or to $1,000 toward eligible aftermarket driver or passenger adaptive equipment you up to determine your vehicle's eligibility, see your vehicle (hand controls, wheelchair/ scooter lifts, etc.). All TTY users call 1-800-833-9935. Mexico, Central America and Caribbean Islands/Countries (Except Puerto Rico and U.S. Virgin Islands) - Customer Assistance General Motors...