

Owner's Manual
Page 116
Don't shift down the grade to overspeed and enter the tachometer red lines. If your engine speed drops below 600 rpm, or if the engine is not running smoothly, you could injure yourself or others. Engine overspeed ...
Don't shift down the grade to overspeed and enter the tachometer red lines. If your engine speed drops below 600 rpm, or if the engine is not running smoothly, you could injure yourself or others. Engine overspeed ...

Owner's Manual
Page 131
... (4.8 km/h) with the transmission in NEUTRAL (N) and the ignition in RUN. Press and release the 4HI, AUTO 4WD or 2HI switch. Shifting into gear. The red NEUTRAL light will come on when the transfer case shift to towing. 2-51 Release the parking brake prior to NEUTRAL is complete. 8. The preferred method...
... (4.8 km/h) with the transmission in NEUTRAL (N) and the ignition in RUN. Press and release the 4HI, AUTO 4WD or 2HI switch. Shifting into gear. The red NEUTRAL light will come on when the transfer case shift to towing. 2-51 Release the parking brake prior to NEUTRAL is complete. 8. The preferred method...

Owner's Manual
Page 132
... RUN with the engine off. 3. Press the button for driving in two-wheel drive. 2-52 Shifting Out of NEUTRAL To shift out of NEUTRAL the red light will go out. 5. Shift the transmission to NEUTRAL (N) and turn the ignition to the desired position. Your front axle is for the desired transfer...
... RUN with the engine off. 3. Press the button for driving in two-wheel drive. 2-52 Shifting Out of NEUTRAL To shift out of NEUTRAL the red light will go out. 5. Shift the transmission to NEUTRAL (N) and turn the ignition to the desired position. Your front axle is for the desired transfer...
Owner's Manual
Page 135
The red NEUTRAL light will not roll: 1. Place the transmission shift lever in NEUTRAL (N). 5. Release the parking brake prior to DRIVE (D) for one second, then shift the ... the transmission in PARK (P). 10. Set the parking brake and apply the regular brake pedal. 2. Shifting Out of NEUTRAL To shift out of NEUTRAL the red light will go out. 5. Shifting into NEUTRAL To shift the transfer case to NEUTRAL, first make sure the vehicle is parked so that it will...
The red NEUTRAL light will not roll: 1. Place the transmission shift lever in NEUTRAL (N). 5. Release the parking brake prior to DRIVE (D) for one second, then shift the ... the transmission in PARK (P). 10. Set the parking brake and apply the regular brake pedal. 2. Shifting Out of NEUTRAL To shift out of NEUTRAL the red light will go out. 5. Shifting into NEUTRAL To shift the transfer case to NEUTRAL, first make sure the vehicle is parked so that it will...
Owner's Manual
Page 171
... all of the system. OnStar Services The following services. The system can then attempt to locate and track your vehicle and the advisor will be red in the event of an OnStar system malfunction. Volume Control: You can control the volume of the engine on-board computer, and recommend what action...
... all of the system. OnStar Services The following services. The system can then attempt to locate and track your vehicle and the advisor will be red in the event of an OnStar system malfunction. Volume Control: You can control the volume of the engine on-board computer, and recommend what action...

Owner's Manual
Page 177
To display the odometer reading with the tachometer in the red area isn't covered by your vehicle is running. NOTICE: On vehicles with a manual transmission, if you operate the engine with the ignition off , press and ... for up to toggle between the trip odometer and the regular odometer. Damage to your engine or vehicle caused by operating the engine in the red area, your vehicle has been driven since you last set the trip odometer to zero. The hour meter will reset it. Your instrument cluster is...
To display the odometer reading with the tachometer in the red area isn't covered by your vehicle is running. NOTICE: On vehicles with a manual transmission, if you operate the engine with the ignition off , press and ... for up to toggle between the trip odometer and the regular odometer. Damage to your engine or vehicle caused by operating the engine in the red area, your vehicle has been driven since you last set the trip odometer to zero. The hour meter will reset it. Your instrument cluster is...

Owner's Manual
Page 204
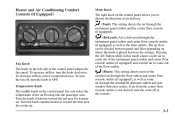
Turn the knob counterclockwise toward the red area for cooler air. 3-2 The air flow can be divided between floor and defrost depending upon where the knob is placed between the settings. (Floor): ...
Turn the knob counterclockwise toward the red area for cooler air. 3-2 The air flow can be divided between floor and defrost depending upon where the knob is placed between the settings. (Floor): ...
Owner's Manual
Page 205
... come out of the instrument panel outlets and center floor console outlets (if equipped) and warmer air to OFF. Turn the knob counterclockwise toward the red area for cooler air. 3-3 To turn the fan off at the console. The air flow can be divided between the settings. Fan Knob The knob...
... come out of the instrument panel outlets and center floor console outlets (if equipped) and warmer air to OFF. Turn the knob counterclockwise toward the red area for cooler air. 3-3 To turn the fan off at the console. The air flow can be divided between the settings. Fan Knob The knob...

Owner's Manual
Page 212
... with an automatic transmission, you keep the windshield and side windows clear. The lines warm the glass. If you see "Engine Coolant Heater" in the red area. Rear Window Defogger (If Equipped) If you use of as much snow or ice as possible. 3-10 For best results, clear the window of..., use defrost to the right. Defogging and Defrosting On cool, humid days, use the floor or bi-level setting with the temperature knob toward the red area and the fan control turned all the way to keep your vehicle has a rear window defogger. Use defrost to the fan knob.
... with an automatic transmission, you keep the windshield and side windows clear. The lines warm the glass. If you see "Engine Coolant Heater" in the red area. Rear Window Defogger (If Equipped) If you use of as much snow or ice as possible. 3-10 For best results, clear the window of..., use defrost to the right. Defogging and Defrosting On cool, humid days, use the floor or bi-level setting with the temperature knob toward the red area and the fan control turned all the way to keep your vehicle has a rear window defogger. Use defrost to the fan knob.

Owner's Manual
Page 266
... with city streets is busy enough to need it. D Try to use the freeways that have not cleared the intersection or may be running the red light. 4-38 You'll want to increase your trip into an unknown part of the city just as a warning signal. Here are ways to watch...
... with city streets is busy enough to need it. D Try to use the freeways that have not cleared the intersection or may be running the red light. 4-38 You'll want to increase your trip into an unknown part of the city just as a warning signal. Here are ways to watch...

Owner's Manual
Page 272
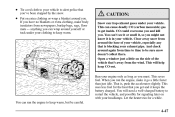
... items in your vehicle in your vehicle. D You may want to help provide traction. Winter Driving Here are some winter outer clothing, a small shovel, a flashlight, a red cloth and reflective warning triangles.
... items in your vehicle in your vehicle. D You may want to help provide traction. Winter Driving Here are some winter outer clothing, a small shovel, a flashlight, a red cloth and reflective warning triangles.
Owner's Manual
Page 275
... know it is , push the accelerator slightly. Clear away snow from around you. That is in your engine only as long as you must. D Tie a red cloth to your vehicle to alert police that you get inside. D Put on with your headlamps.
... know it is , push the accelerator slightly. Clear away snow from around you. That is in your engine only as long as you must. D Tie a red cloth to your vehicle to alert police that you get inside. D Put on with your headlamps.
Owner's Manual
Page 320
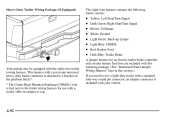
... trailer circuits: D D D D D D D D Yellow: Left Stop/Turn Signal Dark Green: Right Stop/Turn Signal Brown: Taillamps White: Ground Light Green: Back-up Lamps Light Blue: CHMSL Red: Battery Feed Dark Blue: Trailer Brake Your pickup may be equipped with the eight-wire trailer towing harness.
... trailer circuits: D D D D D D D D Yellow: Left Stop/Turn Signal Dark Green: Right Stop/Turn Signal Brown: Taillamps White: Ground Light Green: Back-up Lamps Light Blue: CHMSL Red: Battery Feed Dark Blue: Trailer Brake Your pickup may be equipped with the eight-wire trailer towing harness.
Owner's Manual
Page 321
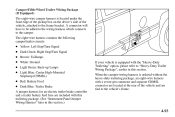
... vehicle's frame. Camper/Fifth-Wheel Trailer Wiring Package (If Equipped) The eight-wire camper harness is located under the front edge of the pickup box on the driver's side of the vehicle and are included with this trailering package. (See "Instrument Panel Jumper Wiring Harness" later in... this section.) 4-93 A connector will have to be added to the wiring harness which connects to the frame bracket. D Red: Battery Feed D Dark Blue: Trailer Brake A jumper harness for an electric trailer brake controller and a trailer battery feed fuse are tied to "Heavy...
... vehicle's frame. Camper/Fifth-Wheel Trailer Wiring Package (If Equipped) The eight-wire camper harness is located under the front edge of the pickup box on the driver's side of the vehicle and are included with this trailering package. (See "Instrument Panel Jumper Wiring Harness" later in... this section.) 4-93 A connector will have to be added to the wiring harness which connects to the frame bracket. D Red: Battery Feed D Dark Blue: Trailer Brake A jumper harness for an electric trailer brake controller and a trailer battery feed fuse are tied to "Heavy...
Owner's Manual
Page 331
...) installed in your eyes or on your skin, flush the place with water and get it is there. The remote negative (-) terminal is located behind a red plastic cover near a battery can burn you . Be sure the batteries have been blinded. You don't need more information on all V8 and diesel engines... instead of the other vehicle. On V6 engines the remote negative (-) terminal is located on the battery. To uncover the remote positive (+) terminal, open the red plastic cover. If you need to add water to the engine accessory drive bracket where it is marked "GND." 5.
...) installed in your eyes or on your skin, flush the place with water and get it is there. The remote negative (-) terminal is located behind a red plastic cover near a battery can burn you . Be sure the batteries have been blinded. You don't need more information on all V8 and diesel engines... instead of the other vehicle. On V6 engines the remote negative (-) terminal is located on the battery. To uncover the remote positive (+) terminal, open the red plastic cover. If you need to add water to the engine accessory drive bracket where it is marked "GND." 5.

Owner's Manual
Page 332
... part or a remote negative (-) terminal if the vehicle has one . 5-6 If they do, you should know. On vehicles equipped with the dead battery. Connect the red positive (+) cable to the positive (+) terminal of the vehicle with dual batteries, make all battery connections to the negative (-) terminal on the dead battery because...
... part or a remote negative (-) terminal if the vehicle has one . 5-6 If they do, you should know. On vehicles equipped with the dead battery. Connect the red positive (+) cable to the positive (+) terminal of the vehicle with dual batteries, make all battery connections to the negative (-) terminal on the dead battery because...
Owner's Manual
Page 335
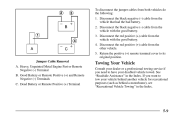
Disconnect the black negative (-) cable from the other vehicle. 5. Disconnect the red positive (+) cable from the vehicle that had the bad battery. 2. Jumper Cable Removal A. Good Battery or Remote Positive (+) and Remote Negative (-) Terminals C. Dead... the black negative (-) cable from both vehicles do the following: 1. To disconnect the jumper cables from the vehicle with the good battery. 4. Disconnect the red positive (+) cable from the vehicle with the good battery. 3. If you need to its original position. Return the positive (+) remote terminal cover to have ...
Disconnect the black negative (-) cable from the other vehicle. 5. Disconnect the red positive (+) cable from the vehicle that had the bad battery. 2. Jumper Cable Removal A. Good Battery or Remote Positive (+) and Remote Negative (-) Terminals C. Dead... the black negative (-) cable from both vehicles do the following: 1. To disconnect the jumper cables from the vehicle with the good battery. 4. Disconnect the red positive (+) cable from the vehicle with the good battery. 3. If you need to its original position. Return the positive (+) remote terminal cover to have ...

Owner's Manual
Page 389
... in all the way, wait three seconds and then pull it back out again. 6-24 Then, without shutting off the engine, follow these steps: The red transmission dipstick handle labeled "TRANS/LOCK", or labeled with a clean rag or paper towel. 2. Checking the Fluid Level Prepare your vehicle as follows: D Park your...
... in all the way, wait three seconds and then pull it back out again. 6-24 Then, without shutting off the engine, follow these steps: The red transmission dipstick handle labeled "TRANS/LOCK", or labeled with a clean rag or paper towel. 2. Checking the Fluid Level Prepare your vehicle as follows: D Park your...