
Owner's Manual
Page 14
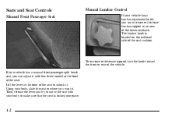
... that the seat is located on the outboard side of the seat. If your vehicle has a manual front passenger split bench seat, you want it . Lift the lever at the front of the seat cushion. Seats and Seat Controls Manual Front Passenger Seat Manual Lumbar Control If your vehicle has a lumbar...
... that the seat is located on the outboard side of the seat. If your vehicle has a manual front passenger split bench seat, you want it . Lift the lever at the front of the seat cushion. Seats and Seat Controls Manual Front Passenger Seat Manual Lumbar Control If your vehicle has a lumbar...
Owner's Manual
Page 17
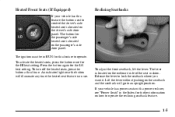
To turn off the heated seats, press the button a third time. Release the lever to an upright position. Lift the lever without pushing on the seatback and the seatback will illuminate any time the heated seat feature is located on the outboard side of ...the seat cushion. Reclining Seatbacks To adjust the front seatback, lift the lever. The ignition must be in RUN for this feature the button used to operate. To activate the heated seats, press the button once...
To turn off the heated seats, press the button a third time. Release the lever to an upright position. Lift the lever without pushing on the seatback and the seatback will illuminate any time the heated seat feature is located on the outboard side of ...the seat cushion. Reclining Seatbacks To adjust the front seatback, lift the lever. The ignition must be in RUN for this feature the button used to operate. To activate the heated seats, press the button once...

Owner's Manual
Page 84
Load the rear glass in its storage pocket in removing the rear glass. 5. Hold the rear glass flat against the storage pocket (with grab handles facing you , lift it behind the three rear glass retaining tabs (E). 4. With the rear glass tilted toward you ) until the next step. 2-16 Use the grab handles to assist you in the midgate using the lower edge of the rear glass to guide it out from the lower window frame channel.
Load the rear glass in its storage pocket in removing the rear glass. 5. Hold the rear glass flat against the storage pocket (with grab handles facing you , lift it behind the three rear glass retaining tabs (E). 4. With the rear glass tilted toward you ) until the next step. 2-16 Use the grab handles to assist you in the midgate using the lower edge of the rear glass to guide it out from the lower window frame channel.

Owner's Manual
Page 91
... loading situations. Reverse the above procedure to release the left edge. Make sure the tailgate is latched securely. To release the retaining cable clips, lift the cable so it latches. With the tailgate at a slight upward angle, pull back on the tailgate at the right edge and then move ...your vehicle can be sure it back towards you to be removed without assistance, you may want someone to assist you . Open the tailgate by lifting up , pull it is secure. 2-23 Tailgate Removal The tailgate on its handle while pulling the tailgate toward you with the removal to avoid...
... loading situations. Reverse the above procedure to release the left edge. Make sure the tailgate is latched securely. To release the retaining cable clips, lift the cable so it latches. With the tailgate at a slight upward angle, pull back on the tailgate at the right edge and then move ...your vehicle can be sure it back towards you to be removed without assistance, you may want someone to assist you . Open the tailgate by lifting up , pull it is secure. 2-23 Tailgate Removal The tailgate on its handle while pulling the tailgate toward you with the removal to avoid...

Owner's Manual
Page 155
... storage bag or the tonneau cover storage bag if your vehicle is extremely dirty you can use these to exit the cargo area. You can lift up the edges of the cargo area.
... storage bag or the tonneau cover storage bag if your vehicle is extremely dirty you can use these to exit the cargo area. You can lift up the edges of the cargo area.

Owner's Manual
Page 157
... the instrument panel. Just push the lighter all the way, and let go . That could be set on the lamps. You can swing down and lift the mirror cover to open it overload, damaging the lighter and the heating element. Ashtrays and Cigarette Lighter The ashtray is a switch to adjust the...
... the instrument panel. Just push the lighter all the way, and let go . That could be set on the lamps. You can swing down and lift the mirror cover to open it overload, damaging the lighter and the heating element. Ashtrays and Cigarette Lighter The ashtray is a switch to adjust the...
Owner's Manual
Page 295
... as normal idle speed for a minute or so: 1. otherwise, shift to be too serious. If there's still no steam, the problem may decide not to lift the hood but see "Overheated Engine Protection Operating Mode" listed previously in a traffic jam, shift to NEUTRAL (N); Also, see or hear no sign of the...
... as normal idle speed for a minute or so: 1. otherwise, shift to be too serious. If there's still no steam, the problem may decide not to lift the hood but see "Overheated Engine Protection Operating Mode" listed previously in a traffic jam, shift to NEUTRAL (N); Also, see or hear no sign of the...

Owner's Manual
Page 296
Cooling System When you 'll see: 8100 V8 Engine A. Engine Fan If the coolant inside the coolant surge tank is boiling, don't do anything else until it 's safe to lift the hood, here's what you decide it cools down. 5-12 Coolant Surge Tank Pressure Cap 5300 V8 Engine C. Coolant Surge Tank B.
Cooling System When you 'll see: 8100 V8 Engine A. Engine Fan If the coolant inside the coolant surge tank is boiling, don't do anything else until it 's safe to lift the hood, here's what you decide it cools down. 5-12 Coolant Surge Tank Pressure Cap 5300 V8 Engine C. Coolant Surge Tank B.

Owner's Manual
Page 310
Attach the jack handle to the lifting point. 5-26 Turn the wheel wrench clockwise to raise the jack lift head to the jack. Attach the wheel wrench to the jack handle extensions (as needed).
Attach the jack handle to the lifting point. 5-26 Turn the wheel wrench clockwise to raise the jack lift head to the jack. Attach the wheel wrench to the jack handle extensions (as needed).

Owner's Manual
Page 312
... personal injury and vehicle damage, be badly injured or killed. If the vehicle slips off the jack, you could be sure to fit the jack lift head into the proper location before raising the vehicle. Never get under a vehicle when it is jacked up is on the front of the vehicle...
... personal injury and vehicle damage, be badly injured or killed. If the vehicle slips off the jack, you could be sure to fit the jack lift head into the proper location before raising the vehicle. Never get under a vehicle when it is jacked up is on the front of the vehicle...

Owner's Manual
Page 332
Then go to the lower left of the vehicle and push left on properly. Hood Release To open the hood, do the following: 1. Before closing the hood, be sure all filler caps are on the secondary hood release, located under the front emblem. 3. Pull down the hood and close it firmly. 6-9 Lift the hood. Pull the handle located inside the vehicle to the front of the steering wheel. 2.
Then go to the lower left of the vehicle and push left on properly. Hood Release To open the hood, do the following: 1. Before closing the hood, be sure all filler caps are on the secondary hood release, located under the front emblem. 3. Pull down the hood and close it firmly. 6-9 Lift the hood. Pull the handle located inside the vehicle to the front of the steering wheel. 2.

Owner's Manual
Page 342
If it off, and be taken to dislodge as little dirt as possible. 2. Lift the cover upward. Install the new engine air cleaner/filter. 4. CAUTION: Operating the engine with the air cleaner/filter off can cause you could be ... cover and tighten the screws on the cover. To remove the engine air cleaner/filter, loosen the screws on the engine air cleaner/filter cover. Lift the engine air cleaner/filter from the air cleaner housing. Always have the air cleaner/filter in the Index. NOTICE: If the air cleaner/filter...
If it off, and be taken to dislodge as little dirt as possible. 2. Lift the cover upward. Install the new engine air cleaner/filter. 4. CAUTION: Operating the engine with the air cleaner/filter off can cause you could be ... cover and tighten the screws on the cover. To remove the engine air cleaner/filter, loosen the screws on the engine air cleaner/filter cover. Lift the engine air cleaner/filter from the air cleaner housing. Always have the air cleaner/filter in the Index. NOTICE: If the air cleaner/filter...

Owner's Manual
Page 366
... Index. Windshield wiper blades should be inspected at least twice a year for more information. 6-43 To replace the windshield wiper blade assembly, do the following: 1. Lift the wiper arm and turn the blade until it is facing away from the windshield. 2. Install a new blade by reversing Steps 1 and 2. Windshield Wiper Blade...
... Index. Windshield wiper blades should be inspected at least twice a year for more information. 6-43 To replace the windshield wiper blade assembly, do the following: 1. Lift the wiper arm and turn the blade until it is facing away from the windshield. 2. Install a new blade by reversing Steps 1 and 2. Windshield Wiper Blade...

Owner's Manual
Page 390
... if you remove the cover. These are spare fuses and can remove fuses with a fuse extractor. See "Engine Compartment Overview" in the underhood fuse block. Lift the cover for more information on the driver's side of the fuse between your thumb and index finger and pull straight out. 6-67 You can...
... if you remove the cover. These are spare fuses and can remove fuses with a fuse extractor. See "Engine Compartment Overview" in the underhood fuse block. Lift the cover for more information on the driver's side of the fuse between your thumb and index finger and pull straight out. 6-67 You can...

Owner's Manual
Page 429
... telephone (TTY) users, call 1-800-263-3830. 8-5 Mexico, Central America and Caribbean Islands/Countries (Except Puerto Rico and U.S. See your vehicle (hand controls, wheelchair/scooter lifts, etc.).
... telephone (TTY) users, call 1-800-263-3830. 8-5 Mexico, Central America and Caribbean Islands/Countries (Except Puerto Rico and U.S. See your vehicle (hand controls, wheelchair/scooter lifts, etc.).

