Owner's Manual
Page 5
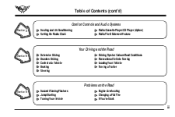
Table of Contents (cont'd) Comfort Controls and Audio Systems Section 3 Heating and Air Conditioning Setting the Radio Clock Radio/Cassette Player/CD Player (Option) Radio Theft-Deterrent Feature Your Driving and the Road Section 4 Defensive Driving Drunken Driving Control of a Vehicle Braking Steering Driving Tips for Various Road Conditions Recreational Vehicle Towing Loading Your Vehicle Towing a Trailer Problems on the Road Section 5 Hazard Warning Flashers Jump Starting Towing Your Vehicle Engine Overheating Changing a Flat Tire If You're Stuck iii
Table of Contents (cont'd) Comfort Controls and Audio Systems Section 3 Heating and Air Conditioning Setting the Radio Clock Radio/Cassette Player/CD Player (Option) Radio Theft-Deterrent Feature Your Driving and the Road Section 4 Defensive Driving Drunken Driving Control of a Vehicle Braking Steering Driving Tips for Various Road Conditions Recreational Vehicle Towing Loading Your Vehicle Towing a Trailer Problems on the Road Section 5 Hazard Warning Flashers Jump Starting Towing Your Vehicle Engine Overheating Changing a Flat Tire If You're Stuck iii
Owner's Manual
Page 21
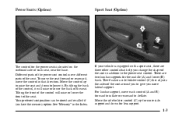
...addition to deflate. For lumbar support, move the control in that adjusts the sides of the seat around you to give you have the memory option. Move the control up for more lateral support. Move the side bolster control (C) up to raise the seat and down for less support. ...1-3 Power Seats (Option) Sport Seat (Option) The control for the power seats is equipped with a sport seat, there are two lumbar supports for the middle (A) and lower (B) back....
...addition to deflate. For lumbar support, move the control in that adjusts the sides of the seat around you to give you have the memory option. Move the control up for more lateral support. Move the side bolster control (C) up to raise the seat and down for less support. ...1-3 Power Seats (Option) Sport Seat (Option) The control for the power seats is equipped with a sport seat, there are two lumbar supports for the middle (A) and lower (B) back....
Owner's Manual
Page 63
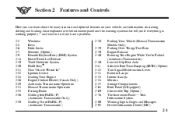
.... 2-2 2-4 2-6 2-7 2-9 2-14 2-19 2-20 2-21 2-22 2-24 2-26 2-28 2-31 2-35 2-36 2-38 Windows Keys Door Locks Memory (Option) Remote Keyless Entry (RKE) System Hatch/Trunk Lid Release Theft-Deterrent System PASS-KeyR New Vehicle "Break-In" Ignition Switch Starting Your Engine Engine Coolant... Parked (Automatic Transmission) Limited-Slip Rear Axle Selective Real Time Damping (SRTD) (Option) Turn Signal/Multifunction Lever Exterior Lamps Interior Lamps Mirrors Storage Compartments Roof Panel (If Equipped) Convertible Top (Option) The Instrument Panel -- and what to do if you if everything is working...
.... 2-2 2-4 2-6 2-7 2-9 2-14 2-19 2-20 2-21 2-22 2-24 2-26 2-28 2-31 2-35 2-36 2-38 Windows Keys Door Locks Memory (Option) Remote Keyless Entry (RKE) System Hatch/Trunk Lid Release Theft-Deterrent System PASS-KeyR New Vehicle "Break-In" Ignition Switch Starting Your Engine Engine Coolant... Parked (Automatic Transmission) Limited-Slip Rear Axle Selective Real Time Damping (SRTD) (Option) Turn Signal/Multifunction Lever Exterior Lamps Interior Lamps Mirrors Storage Compartments Roof Panel (If Equipped) Convertible Top (Option) The Instrument Panel -- and what to do if you if everything is working...
Owner's Manual
Page 69
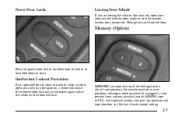
..., tone, volume, playback mode (AM/FM, tape or CD), last displayed station, compact disc position and tape direction and the last climate control setting. 2-7 Memory (Option) Press the power door switch on either door to unlock or lock both doors at once. Then get out and close the door.
..., tone, volume, playback mode (AM/FM, tape or CD), last displayed station, compact disc position and tape direction and the last climate control setting. 2-7 Memory (Option) Press the power door switch on either door to unlock or lock both doors at once. Then get out and close the door.
Owner's Manual
Page 74
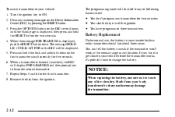
... to get close to your body transferred to change the battery. You can tell the battery is displayed, push the RESET button once. Press the OPTIONS button on the Driver Information Center (DIC) by pressing the RESET button. 3. Repeat Steps 5 and 6 for five seconds. 6. Remove the key from your vehicle before...
... to get close to your body transferred to change the battery. You can tell the battery is displayed, push the RESET button once. Press the OPTIONS button on the Driver Information Center (DIC) by pressing the RESET button. 3. Repeat Steps 5 and 6 for five seconds. 6. Remove the key from your vehicle before...
Owner's Manual
Page 103
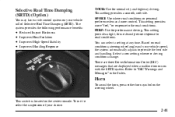
... highway driving. There are three Driver Information Center (DIC) messages that are displayed when a malfunction occurs with the SRTD system. Selective Real Time Damping (SRTD) (Option) You may have a ride control system on your vehicle speed, the system automatically adjusts to provide the best ride and handling. This setting provides more...
... highway driving. There are three Driver Information Center (DIC) messages that are displayed when a malfunction occurs with the SRTD system. Selective Real Time Damping (SRTD) (Option) You may have a ride control system on your vehicle speed, the system automatically adjusts to provide the best ride and handling. This setting provides more...

Owner's Manual
Page 107
..., push the turn signal lever toward you intend to the other driver that you . The high-beam indicator will hear a chime reminding you have the optional fog lamps on, the fog lamps will be open the doors manually using the knob next to opening the hood. Lamps on Reminder If you...
..., push the turn signal lever toward you intend to the other driver that you . The high-beam indicator will hear a chime reminding you have the optional fog lamps on, the fog lamps will be open the doors manually using the knob next to opening the hood. Lamps on Reminder If you...
Owner's Manual
Page 114
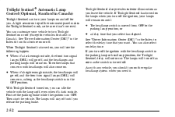
Twilight SentinelR Automatic Lamp Control (Optional, Standard in the Index to turn this feature on or off. A light sensor on , you will also come on with any vehicle, you leave the ...
Twilight SentinelR Automatic Lamp Control (Optional, Standard in the Index to turn this feature on or off. A light sensor on , you will also come on with any vehicle, you leave the ...

Owner's Manual
Page 117
... adjust for up to three seconds to night positions while driving under lights and through traffic. Electrochromic Day/Night Inside Rearview Mirror with Map Lamps (Option) Your vehicle may have an automatic electrochromic day/night rearview mirror with glass cleaner. This mirror automatically changes to reduce glare from the day to...
... adjust for up to three seconds to night positions while driving under lights and through traffic. Electrochromic Day/Night Inside Rearview Mirror with Map Lamps (Option) Your vehicle may have an automatic electrochromic day/night rearview mirror with glass cleaner. This mirror automatically changes to reduce glare from the day to...

Owner's Manual
Page 118
... seconds after the last adjustment. It controls the driver's and passenger's mirrors. If you cut too sharply into the right lane, you have the memory option.
... seconds after the last adjustment. It controls the driver's and passenger's mirrors. If you cut too sharply into the right lane, you have the memory option.

Owner's Manual
Page 120
... the elastic loops on the front corners (A) of the shade to the hooks recessed inside the rear hatch frame, near the rear corners. Security Shade (Option) The security shade can provide hidden storage in the rear area of the rear hatch frame. The shade is also helpful in blocking the glare...
... the elastic loops on the front corners (A) of the shade to the hooks recessed inside the rear hatch frame, near the rear corners. Security Shade (Option) The security shade can provide hidden storage in the rear area of the rear hatch frame. The shade is also helpful in blocking the glare...

Owner's Manual
Page 121
... you do not store items such as liquids or sharp objects that could damage the underbody. 2-59 NOTICE: If your vehicle is equipped with the optional trunk-mounted CD changer, it is in the hatch/trunk area.
... you do not store items such as liquids or sharp objects that could damage the underbody. 2-59 NOTICE: If your vehicle is equipped with the optional trunk-mounted CD changer, it is in the hatch/trunk area.

Owner's Manual
Page 122
...: Don't hold a cigarette lighter in front of the lid. Ashtray and Cigarette Lighter The ashtray and cigarette lighter are not using it 's ready. Convenience Net (Option) Your vehicle may have a convenience net. The convenience net is heating. To use the ashtray, lift up on fire, causing damage. That can lodge behind...
...: Don't hold a cigarette lighter in front of the lid. Ashtray and Cigarette Lighter The ashtray and cigarette lighter are not using it 's ready. Convenience Net (Option) Your vehicle may have a convenience net. The convenience net is heating. To use the ashtray, lift up on fire, causing damage. That can lodge behind...
Owner's Manual
Page 124
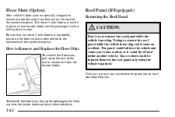
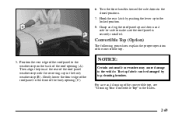
... into place. 2-62 Until you are specially designed to remain in position under your feet and out of reach of the accelerator pedal. Floor Mats (Option) Your vehicle's floor mats are sure you can remove the panel alone, have someone help you to lose control, or it does not block the...
... into place. 2-62 Until you are specially designed to remain in position under your feet and out of reach of the accelerator pedal. Floor Mats (Option) Your vehicle's floor mats are sure you can remove the panel alone, have someone help you to lose control, or it does not block the...
Owner's Manual
Page 131
... is securely installed. The top fabric can be damaged by pushing the lever up and down and side-to-side to the vehicle. Convertible Top (Option) The following procedures explain the proper operation of the roof panel weatherstrip with the receiving cup in the Index. 2-69 6.
... is securely installed. The top fabric can be damaged by pushing the lever up and down and side-to-side to the vehicle. Convertible Top (Option) The following procedures explain the proper operation of the roof panel weatherstrip with the receiving cup in the Index. 2-69 6.
Owner's Manual
Page 139
...Lever D. Center Air Vents J. Audio System K. Ignition Switch O. Shift Lever (Automatic Shown) P. Selective Real Time Damping (SRTD) (Option) S. Air Bag Off Light T. Ashtray and Cigarette Lighter W. Parking Brake X. Glove Box Y. Instrument Panel Fuse Block (Located behind...) Switch/Active Handling Switch Q. Instrument Panel Cupholder U. Air Bag Off Switch (Located in the Center Console) V. Head-Up Display Controls (Option) C. Hazard Warning Flasher Button I. Comfort Controls L. Instrument Panel Cluster F. Windshield Wiper/Washer Lever G. Remote Hatch Release Button (Coupe) or...
...Lever D. Center Air Vents J. Audio System K. Ignition Switch O. Shift Lever (Automatic Shown) P. Selective Real Time Damping (SRTD) (Option) S. Air Bag Off Light T. Ashtray and Cigarette Lighter W. Parking Brake X. Glove Box Y. Instrument Panel Fuse Block (Located behind...) Switch/Active Handling Switch Q. Instrument Panel Cupholder U. Air Bag Off Switch (Located in the Center Console) V. Head-Up Display Controls (Option) C. Hazard Warning Flasher Button I. Comfort Controls L. Instrument Panel Cluster F. Windshield Wiper/Washer Lever G. Remote Hatch Release Button (Coupe) or...

Owner's Manual
Page 155
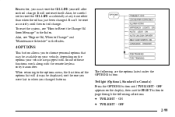
... Information Center (DIC) will reset system functions and turn off or acknowledge messages on the DIC control panel which is located to choose personal options that are located on the Driver Information Center (DIC). At the top of the instrument panel cluster. 1 FUEL: Press this button to ...change the display between English and metric units. The following buttons are available on your vehicle, depending on the options your average speed and the engine oil life. 4 OPTIONS: This button allows you to the right of the DIC control buttons is located in the instrument panel cluster below...
... Information Center (DIC) will reset system functions and turn off or acknowledge messages on the DIC control panel which is located to choose personal options that are located on the Driver Information Center (DIC). At the top of the instrument panel cluster. 1 FUEL: Press this button to ...change the display between English and metric units. The following buttons are available on your vehicle, depending on the options your average speed and the engine oil life. 4 OPTIONS: This button allows you to the right of the DIC control buttons is located in the instrument panel cluster below...
Owner's Manual
Page 161
...selections: D TWILIGHT - ON D TWILIGHT - OFF 2-99 To reset the system, see "Engine Oil, When to Change" and "Maintenance Schedule" in the Index. 4 OPTIONS This button allows you to Reset the Change Oil Soon Message" in the Index. When returning to page through the following are the...changed . Remember, you must reset the OIL LIFE yourself after each oil change . OFF appears on the options your vehicle, depending on the display, then use the RESET button to the options menu, the first item of these functions work along with . Also, be reset accurately until TWILIGHT - ...
...selections: D TWILIGHT - ON D TWILIGHT - OFF 2-99 To reset the system, see "Engine Oil, When to Change" and "Maintenance Schedule" in the Index. 4 OPTIONS This button allows you to Reset the Change Oil Soon Message" in the Index. When returning to page through the following are the...changed . Remember, you must reset the OIL LIFE yourself after each oil change . OFF appears on the options your vehicle, depending on the display, then use the RESET button to the options menu, the first item of these functions work along with . Also, be reset accurately until TWILIGHT - ...

Owner's Manual
Page 162
..., then use the RESET button to page through the following selections: If you choose LOCK & ARM - If you choose LOCK & ARM - Alarm Press the OPTIONS button until LOCK & ARM appears on the display, then use the RESET button to page through the following selections: D D D D LOCK & ARM -... If you choose LOCK & ARM - Use the OPTIONS button to 12 seconds. LIGHTS ONLY, only your exterior lamps will flash briefly to let you know when your alarm system has armed when locking...
..., then use the RESET button to page through the following selections: If you choose LOCK & ARM - If you choose LOCK & ARM - Alarm Press the OPTIONS button until LOCK & ARM appears on the display, then use the RESET button to page through the following selections: D D D D LOCK & ARM -... If you choose LOCK & ARM - Use the OPTIONS button to 12 seconds. LIGHTS ONLY, only your exterior lamps will flash briefly to let you know when your alarm system has armed when locking...
Owner's Manual
Page 163
...ignition. In a vehicle with an automatic transmission, both doors will occur only when it is set to ON as described previously. Auto Lock Press the OPTIONS button until AUTO LOCK appears on the display, then use the RESET button to page through the following choices: D AUTO UNLOCK DRIVER D AUTO UNLOCK...you choose APPROACH LIGHTS ON, the fog lamps, front turn the vehicle off and pull the key out of PARK (P). Approach Lights Press the OPTIONS button until AUTO UNLOCK appears on the display, then use the RESET button to page through the following choices: If you choose AUTO LOCK ...
...ignition. In a vehicle with an automatic transmission, both doors will occur only when it is set to ON as described previously. Auto Lock Press the OPTIONS button until AUTO LOCK appears on the display, then use the RESET button to page through the following choices: D AUTO UNLOCK DRIVER D AUTO UNLOCK...you choose APPROACH LIGHTS ON, the fog lamps, front turn the vehicle off and pull the key out of PARK (P). Approach Lights Press the OPTIONS button until AUTO UNLOCK appears on the display, then use the RESET button to page through the following choices: If you choose AUTO LOCK ...