

Owner's Manual
Page 11
... Index. Also see : ENGINE COOLANT TEMP WINDSHIELD WASHER BATTERY CHARGING SYSTEM FUSE TURN SIGNALS LIGHTER DOOR LOCK UNLOCK PARKING LAMPS WINDSHIELD DEFROSTER HORN BRAKE FASTEN SEAT BELTS HAZARD WARNING FLASHER POWER WINDOW DAYTIME RUNNING LAMPS REAR WINDOW DEFOGGER COOLANT FUEL ENGINE OIL PRESSURE VENTILATING FAN AIR BAG FOG LAMPS ANTI-LOCK BRAKES...
... Index. Also see : ENGINE COOLANT TEMP WINDSHIELD WASHER BATTERY CHARGING SYSTEM FUSE TURN SIGNALS LIGHTER DOOR LOCK UNLOCK PARKING LAMPS WINDSHIELD DEFROSTER HORN BRAKE FASTEN SEAT BELTS HAZARD WARNING FLASHER POWER WINDOW DAYTIME RUNNING LAMPS REAR WINDOW DEFOGGER COOLANT FUEL ENGINE OIL PRESSURE VENTILATING FAN AIR BAG FOG LAMPS ANTI-LOCK BRAKES...

Owner's Manual
Page 44
How does an air bag restrain? Air bags supplement the protection provided by opening a window or door. 1-31 Air bags should get out as soon as anything more gradually. the steering wheel hub for the driver's air bag, or the instrument panel ... air. The parts of the vehicle after an air bag inflates? The inflator, air bag and related hardware are all part of collisions, including rollovers, rear impacts and side impacts, primarily because an occupant's motion is dust in the deflated air bags. This dust could cause breathing problems for people with...
How does an air bag restrain? Air bags supplement the protection provided by opening a window or door. 1-31 Air bags should get out as soon as anything more gradually. the steering wheel hub for the driver's air bag, or the instrument panel ... air. The parts of the vehicle after an air bag inflates? The inflator, air bag and related hardware are all part of collisions, including rollovers, rear impacts and side impacts, primarily because an occupant's motion is dust in the deflated air bags. This dust could cause breathing problems for people with...

Owner's Manual
Page 80
...2-8 2-11 2-14 2-17 2-18 2-19 2-19 2-20 2-21 2-23 2-24 2-27 2-28 2-31 2-31 Windows Keys Front Doors Rear Doors Door Locks Keyless Entry System (Option) Sliding Door Hatch Theft PasslockR New Vehicle "Break-In" Ignition Positions Starting Your Engine Engine Coolant Heater (If Equipped) Automatic Transmission Operation Parking Brake...2-41 2-44 2-45 2-47 2-55 2-56 2-57 2-57 2-62 2-65 Engine Exhaust Running Your Engine While You're Parked Locking Rear Axle (If Equipped) All-Wheel Drive (Option) Horn Tilt Wheel (If Equipped) Turn Signal/Multifunction Lever Exterior Lamps Interior Lamps Mirrors Storage...
...2-8 2-11 2-14 2-17 2-18 2-19 2-19 2-20 2-21 2-23 2-24 2-27 2-28 2-31 2-31 Windows Keys Front Doors Rear Doors Door Locks Keyless Entry System (Option) Sliding Door Hatch Theft PasslockR New Vehicle "Break-In" Ignition Positions Starting Your Engine Engine Coolant Heater (If Equipped) Automatic Transmission Operation Parking Brake...2-41 2-44 2-45 2-47 2-55 2-56 2-57 2-57 2-62 2-65 Engine Exhaust Running Your Engine While You're Parked Locking Rear Axle (If Equipped) All-Wheel Drive (Option) Horn Tilt Wheel (If Equipped) Turn Signal/Multifunction Lever Exterior Lamps Interior Lamps Mirrors Storage...

Owner's Manual
Page 85
See "Hatch Release" in the Index. Cargo Door Shown 2-6 Grasp the handle and pull the door open the hatch first. Rear doors can only be opened from the outside . Front Doors To open a front door from the outside , grasp the handle and pull the door open. Rear Doors If you have the "Dutch doors," you and push the door open. To open a front door from the inside, pull the lever toward you must open . Open the passenger's side rear door first.
See "Hatch Release" in the Index. Cargo Door Shown 2-6 Grasp the handle and pull the door open the hatch first. Rear doors can only be opened from the outside . Front Doors To open a front door from the outside , grasp the handle and pull the door open. Rear Doors If you have the "Dutch doors," you and push the door open. To open a front door from the inside, pull the lever toward you must open . Open the passenger's side rear door first.

Owner's Manual
Page 86
To open the rear doors, push in on the clip and lift the check assembly up off the mounting bracket. Replace the check assemblies on each door. Check to keep the doors from opening beyond 90 degrees. The rear doors have a check assembly to make sure both doors are completely closed. To close the rear doors, close the driver's side door first. Do this on the mounting brackets before closing the doors. 2-7 To fully open the driver's side rear door, pull on the latch release handle located on the inside of the door.
To open the rear doors, push in on the clip and lift the check assembly up off the mounting bracket. Replace the check assemblies on each door. Check to keep the doors from opening beyond 90 degrees. The rear doors have a check assembly to make sure both doors are completely closed. To close the rear doors, close the driver's side door first. Do this on the mounting brackets before closing the doors. 2-7 To fully open the driver's side rear door, pull on the latch release handle located on the inside of the door.

Owner's Manual
Page 88
... this, you press the power door lock switch, the sliding door will lock or unlock the rear hatch and Dutch doors. Turn your vehicle has power door locks, press the power door lock switch to program your power door locks. If the sliding door is locked, the inside door handle will not open the door. Once you do the following...
... this, you press the power door lock switch, the sliding door will lock or unlock the rear hatch and Dutch doors. Turn your vehicle has power door locks, press the power door lock switch to program your power door locks. If the sliding door is locked, the inside door handle will not open the door. Once you do the following...
Owner's Manual
Page 91
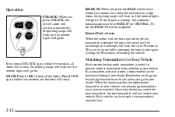
... you press the REAR button twice within five seconds, all the doors. Remote Panic Alarm When the button with you when you go to your...is pressed, the horn will sound and the headlamps and taillamps will flash for up to unlock the rear hatch or cargo doors, the parking lamps will flash and the interior lights will go on . Matching Transmitter(s) to Your... Remember to bring any remaining transmitters must be matched. Operation UNLOCK: When you press UNLOCK, the driver's door will unlock automatically, the parking lamps will flash and the interior lights will go on the key transmitter is...
... you press the REAR button twice within five seconds, all the doors. Remote Panic Alarm When the button with you when you go to your...is pressed, the horn will sound and the headlamps and taillamps will flash for up to unlock the rear hatch or cargo doors, the parking lamps will flash and the interior lights will go on . Matching Transmitter(s) to Your... Remember to bring any remaining transmitters must be matched. Operation UNLOCK: When you press UNLOCK, the driver's door will unlock automatically, the parking lamps will flash and the interior lights will go on the key transmitter is...

Owner's Manual
Page 93
...signal it rests in the open the sliding side door, pull the handle toward the front and slide the door forward. 2-14 The receiver will prevent anyone from recording and playing back the signal from the transmitter. The door locks should cycle to the receiver. The transmitter does... your transmitter, stand close the sliding side door, pull the handle toward the back and slide the door to the security method used by this system. Sliding Door To open position. Resynchronization Resynchronization may be necessary due to the rear until it has been sent previously. If the...
...signal it rests in the open the sliding side door, pull the handle toward the front and slide the door forward. 2-14 The receiver will prevent anyone from recording and playing back the signal from the transmitter. The door locks should cycle to the receiver. The transmitter does... your transmitter, stand close the sliding side door, pull the handle toward the back and slide the door to the security method used by this system. Sliding Door To open position. Resynchronization Resynchronization may be necessary due to the rear until it has been sent previously. If the...

Owner's Manual
Page 94
... from opening the sliding side door from the outside . 2. Close the door. You should let adults and older children know how the security door lock works, and how to remind you that you don't cancel the security lock feature, adults or older children who ride in the rear won't be seen from the... outside . To open it from the inside . Unlock the door and open the sliding side door while the security lock is located near the security...
... from opening the sliding side door from the outside . 2. Close the door. You should let adults and older children know how the security door lock works, and how to remind you that you don't cancel the security lock feature, adults or older children who ride in the rear won't be seen from the... outside . To open it from the inside . Unlock the door and open the sliding side door while the security lock is located near the security...

Owner's Manual
Page 96
...D Turn the fan on your key to drive with the rear hatch or rear doors open or if electrical wiring or other cable connections must pass through the seal between the body and the rear hatch or rear doors: D Make sure all other doors from the outside air into your vehicle. D If you must... drive with the rear hatch or rear doors open because carbon monoxide (CO) gas can come into the hatch release ...
...D Turn the fan on your key to drive with the rear hatch or rear doors open or if electrical wiring or other cable connections must pass through the seal between the body and the rear hatch or rear doors: D Make sure all other doors from the outside air into your vehicle. D If you must... drive with the rear hatch or rear doors open because carbon monoxide (CO) gas can come into the hatch release ...

Owner's Manual
Page 206
... also tells you with this example. The label shows the size of the center line. To find out the actual loads on your front and rear axles, you should spread it out. 4-28 This is found on both sides of your original tires and the inflation pressures needed to a weigh...Vehicle Weight Rating (GVWR). Never exceed the GVWR for your load equally on the rear edge of the vehicle, all occupants, fuel, cargo and tongue weight, if pulling a trailer. The GVWR includes the weight of the driver's door. Be sure to this . Loading Your Vehicle The Certification/Tire label is called the...
... also tells you with this example. The label shows the size of the center line. To find out the actual loads on your front and rear axles, you should spread it out. 4-28 This is found on both sides of your original tires and the inflation pressures needed to a weigh...Vehicle Weight Rating (GVWR). Never exceed the GVWR for your load equally on the rear edge of the vehicle, all occupants, fuel, cargo and tongue weight, if pulling a trailer. The GVWR includes the weight of the driver's door. Be sure to this . Loading Your Vehicle The Certification/Tire label is called the...

Owner's Manual
Page 213
... between your vehicle and your trailer. D If you can turn with your rig. You'll find these numbers on the Certification label at the rear edge of the proper size. See "Carbon Monoxide" in the Index. Never allow safety chains to help prevent the tongue from contacting the road ... manufacturer's recommendation for attaching safety chains and do , then be sure to use a properly mounted, weight-distributing hitch and sway control of the driver's door or see "Tire Loading" in the Index. Then be provided by the hitch manufacturer or by and rough roads are some rules to make any...
... between your vehicle and your trailer. D If you can turn with your rig. You'll find these numbers on the Certification label at the rear edge of the proper size. See "Carbon Monoxide" in the Index. Never allow safety chains to help prevent the tongue from contacting the road ... manufacturer's recommendation for attaching safety chains and do , then be sure to use a properly mounted, weight-distributing hitch and sway control of the driver's door or see "Tire Loading" in the Index. Then be provided by the hitch manufacturer or by and rough roads are some rules to make any...
Owner's Manual
Page 218
... both sides so that may be used by a qualified electrical technician. The harness is taped or strapped to your vehicle between the rear door and the floor, with enough of six wires that the trailer or the body won 't be wired by after-market trailer hitch ...installers. Light Green: Back-up lamps. Store the harness in its original place. D D D D D D D D Brown: Rear lamps. White (Heavy Gage): Ground. Yellow: Left stoplamp and turn signal. Blue: Auxiliary circuit (eight-wire harness only). The eight-wire harness must be routed...
... both sides so that may be used by a qualified electrical technician. The harness is taped or strapped to your vehicle between the rear door and the floor, with enough of six wires that the trailer or the body won 't be wired by after-market trailer hitch ...installers. Light Green: Back-up lamps. Store the harness in its original place. D D D D D D D D Brown: Rear lamps. White (Heavy Gage): Ground. Yellow: Left stoplamp and turn signal. Blue: Auxiliary circuit (eight-wire harness only). The eight-wire harness must be routed...

Owner's Manual
Page 238
Remove the jack cover by your vehicle's rear doors, along the passenger's side wall. Remove the nut and washer, then pull the wheel blocks off the bolt. Push down to release the tabs securing ...
Remove the jack cover by your vehicle's rear doors, along the passenger's side wall. Remove the nut and washer, then pull the wheel blocks off the bolt. Push down to release the tabs securing ...

Owner's Manual
Page 240
... Be sure the flat end connects into the hoist shaft. Put the flat end of the cable and pull it through the hole in the rear door frame, above the bumper. When the tire has been lowered, tilt the retainer plate at the end of the extension on an angle through the...
... Be sure the flat end connects into the hoist shaft. Put the flat end of the cable and pull it through the hole in the rear door frame, above the bumper. When the tire has been lowered, tilt the retainer plate at the end of the extension on an angle through the...

Owner's Manual
Page 249
... the vehicle. Storing a Flat or Spare Tire and Tools 3. CAUTION: Storing a jack, a tire or other equipment in the rear door frame, above the bumper. Tilt the retainer plate downward and through the hole in the passenger compartment of the extension on the ground at least ...
... the vehicle. Storing a Flat or Spare Tire and Tools 3. CAUTION: Storing a jack, a tire or other equipment in the rear door frame, above the bumper. Tilt the retainer plate downward and through the hole in the passenger compartment of the extension on the ground at least ...

Owner's Manual
Page 293
Pull out the taillamp assembly so you can see the socket. 6-41 Remove the two screws from behind the door. 3. Taillamps 1. Open the rear door. 2.
Pull out the taillamp assembly so you can see the socket. 6-41 Remove the two screws from behind the door. 3. Taillamps 1. Open the rear door. 2.

Owner's Manual
Page 295
... cold. CAUTION: (Continued) D D Inflation -- Worn, old tires can cause overheating as a result of the driver's door, shows the correct inflation pressures for your tires when they're cold. "Cold" means your tread is on the rear edge of too much friction. If you hit a pothole. CAUTION: (Continued) D Underinflated tires pose the same...
... cold. CAUTION: (Continued) D D Inflation -- Worn, old tires can cause overheating as a result of the driver's door, shows the correct inflation pressures for your tires when they're cold. "Cold" means your tread is on the rear edge of too much friction. If you hit a pothole. CAUTION: (Continued) D Underinflated tires pose the same...
Owner's Manual
Page 311
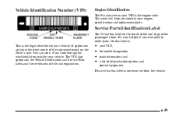
... to order parts. Vehicle Identification Number (VIN) Engine Identification The 8th character in the front corner of the instrument panel, on the inside of the rear edge of the passenger's door.
... to order parts. Vehicle Identification Number (VIN) Engine Identification The 8th character in the front corner of the instrument panel, on the inside of the rear edge of the passenger's door.

Owner's Manual
Page 315
... Amplifier Crank Circuit Fuse, Park/Neutral Switch, Starter Enable Relay License Plate Lamp, Taillamps, Parking Lamps, Ashtray Lamp, Panel Lights, Trailer Taillamps, Front and Rear Sidemarker Lamps, Door Switch Illumination, Headlamp Switch Illumination, Rear Seat Audio Illumination, TBC Module Air Bag System Not Used Fuse/Circuit Breaker 12 Usage L, M1, M2 Blower Motor...
... Amplifier Crank Circuit Fuse, Park/Neutral Switch, Starter Enable Relay License Plate Lamp, Taillamps, Parking Lamps, Ashtray Lamp, Panel Lights, Trailer Taillamps, Front and Rear Sidemarker Lamps, Door Switch Illumination, Headlamp Switch Illumination, Rear Seat Audio Illumination, TBC Module Air Bag System Not Used Fuse/Circuit Breaker 12 Usage L, M1, M2 Blower Motor...


