
Owner's Manual
Page 51
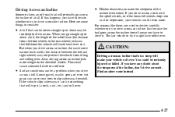
... Passenger Positions To make the belt shorter, pull its free end as the lap part of this section. Make sure the release button on the buckle is snug. Rear Seat Passengers It's very important for rear seat passengers to . 1-38 Rear passengers who aren't safety belted can strike others in crashes ...so you would be thrown out of the vehicle in a crash. If the belt isn't long enough, see "Safety Belt Extender" at the end of a lap-shoulder belt. Accident statistics show that unbelted people in the rear seat are hurt more often in the vehicle who are wearing safety belts.
... Passenger Positions To make the belt shorter, pull its free end as the lap part of this section. Make sure the release button on the buckle is snug. Rear Seat Passengers It's very important for rear seat passengers to . 1-38 Rear passengers who aren't safety belted can strike others in crashes ...so you would be thrown out of the vehicle in a crash. If the belt isn't long enough, see "Safety Belt Extender" at the end of a lap-shoulder belt. Accident statistics show that unbelted people in the rear seat are hurt more often in the vehicle who are wearing safety belts.

Owner's Manual
Page 133
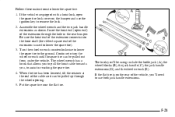
... the shade in the vehicle, first make sure it from the retaining sockets. On Suburban/Yukon XL models there are cargo tie downs in the rear cargo area that allow you to strap cargo in the holder faces rearward with the round surface facing down out of the vehicle. Cargo Tie... to the full retracted position. When not using the tie downs, flip them down . Latch the shade posts into the trim slot. Move the other end of the shade forward and hold the shade at an angle and place the shade holder tab into the holder. The endcap should lock in...
... the shade in the vehicle, first make sure it from the retaining sockets. On Suburban/Yukon XL models there are cargo tie downs in the rear cargo area that allow you to strap cargo in the holder faces rearward with the round surface facing down out of the vehicle. Cargo Tie... to the full retracted position. When not using the tie downs, flip them down . Latch the shade posts into the trim slot. Move the other end of the shade forward and hold the shade at an angle and place the shade holder tab into the holder. The endcap should lock in...

Owner's Manual
Page 135
...snaps securely into the siderail. Do not store papers and other things that burn in the area over the rear wheels (behind the rear side door on the latch release handle at each end. Push the release handle back into the latched position and slide the crossrail back and forth slightly to 58...load to block or damage the CHMSL unit. into place. Your vehicle has a Center High-Mounted Stoplamp (CHMSL) located above the glass or above the rear load doors. If items are loaded on the bottom of the ashtray door to the crossrails or the siderail supports. D If small heavy objects are...
...snaps securely into the siderail. Do not store papers and other things that burn in the area over the rear wheels (behind the rear side door on the latch release handle at each end. Push the release handle back into the latched position and slide the crossrail back and forth slightly to 58...load to block or damage the CHMSL unit. into place. Your vehicle has a Center High-Mounted Stoplamp (CHMSL) located above the glass or above the rear load doors. If items are loaded on the bottom of the ashtray door to the crossrails or the siderail supports. D If small heavy objects are...

Owner's Manual
Page 203
... a safe place to do . Defensive driving requires that a driver concentrate on a cellular telephone call, reading, or reaching for their mistakes. Please start with resulting injury. Rear-end collisions are about driving is going to be ready for anything." On city streets, rural roads or freeways, it means "always expect the unexpected." Assume...
... a safe place to do . Defensive driving requires that a driver concentrate on a cellular telephone call, reading, or reaching for their mistakes. Please start with resulting injury. Rear-end collisions are about driving is going to be ready for anything." On city streets, rural roads or freeways, it means "always expect the unexpected." Assume...
Owner's Manual
Page 228
...can be driven straight up or down may not prevent the vehicle from the front wheels to slip sideways, downhill. When you have rolled over end. Also, driving across . The last vehicle to try it can hit something that can tilt even more weight on the downhill wheels. If...go across a rock with the uphill wheels, or if the downhill wheels drop into a rut or depression, your tires to the rear wheels) reduces the likelihood the vehicle will tumble end over . If you drive 4-27 D Surface conditions can make your vehicle roll over . If the vehicle slips sideways, it ...
...can be driven straight up or down may not prevent the vehicle from the front wheels to slip sideways, downhill. When you have rolled over end. Also, driving across . The last vehicle to try it can hit something that can tilt even more weight on the downhill wheels. If...go across a rock with the uphill wheels, or if the downhill wheels drop into a rut or depression, your tires to the rear wheels) reduces the likelihood the vehicle will tumble end over . If you drive 4-27 D Surface conditions can make your vehicle roll over . If the vehicle slips sideways, it ...

Owner's Manual
Page 285
... Tire If a tire goes flat, avoid further tire and wheel damage by driving slowly to FIRST (1) or REVERSE (R). 3. Put the wheel blocks at the opposite end. To help prevent the vehicle from the one being changed. Turn on the other people. The following steps will tell you or other side of...
... Tire If a tire goes flat, avoid further tire and wheel damage by driving slowly to FIRST (1) or REVERSE (R). 3. Put the wheel blocks at the opposite end. To help prevent the vehicle from the one being changed. Turn on the other people. The following steps will tell you or other side of...

Owner's Manual
Page 286
... by turning the wing nut counterclockwise. J. I. For Utility Models, the equipment is located under the storage tray in the left trim panel in the rear of Extension Tool 5-20 To remove it 's holder, turn the wing nut counterclockwise. 3. Jack Handle Extensions D. Valve Stem, Pointed Up F. H. ...B. To release the bottle jack from it , turn the knob on the bottle jack counterclockwise to remove the underbody-mounted spare tire. Hoist End of the vehicle. Wheel Wrench C. You'll use the jack handle extensions and the wheel wrench to lower the jack head. 4. Removing the...
... by turning the wing nut counterclockwise. J. I. For Utility Models, the equipment is located under the storage tray in the left trim panel in the rear of Extension Tool 5-20 To remove it 's holder, turn the wing nut counterclockwise. 3. Jack Handle Extensions D. Valve Stem, Pointed Up F. H. ...B. To release the bottle jack from it , turn the knob on the bottle jack counterclockwise to remove the underbody-mounted spare tire. Hoist End of the vehicle. Wheel Wrench C. You'll use the jack handle extensions and the wheel wrench to lower the jack head. 4. Removing the...
Owner's Manual
Page 287
...tire has been lowered, tilt the retainer at the end of the extension through the wheel opening. 5. The tools you'll be pulled up through the hole in reaching the spare tire. 4. If the flat tire is used to assist in the rear bumper. Follow these instructions to the ground. Assemble ...the wheel wrench and the two jack handle extensions as shown. Be sure the hoist end of the extension connects into the hoist shaft (the ribbed square...
...tire has been lowered, tilt the retainer at the end of the extension through the wheel opening. 5. The tools you'll be pulled up through the hole in reaching the spare tire. 4. If the flat tire is used to assist in the rear bumper. Follow these instructions to the ground. Assemble ...the wheel wrench and the two jack handle extensions as shown. Be sure the hoist end of the extension connects into the hoist shaft (the ribbed square...

Owner's Manual
Page 293
Turn the wheel wrench counterclockwise to lower the vehicle. After mounting the spare, replace the wheel nuts with the rounded end of the nuts toward the wheel. Front Position 5-27 Rear Position 1500 Series Rear Position 2500 Series 6. Lower the jack completely. Tighten each wheel nut by hand using the wheel wrench until the wheel is held against the hub. 5.
Turn the wheel wrench counterclockwise to lower the vehicle. After mounting the spare, replace the wheel nuts with the rounded end of the nuts toward the wheel. Front Position 5-27 Rear Position 1500 Series Rear Position 2500 Series 6. Lower the jack completely. Tighten each wheel nut by hand using the wheel wrench until the wheel is held against the hub. 5.

Owner's Manual
Page 295
... the wheel wrench until the tire is secure and the cable is fully seated across the underside of the wheel. 3. Store the tire under the rear of the vehicle with the valve stem pointed upward. 2. Make sure the retainer is tight. If the tire moves, use the wheel wrench to rotate... or turn the tire. To store the tire: 1. Tilt the retainer downward and through the hole in the spare tire carrier. Insert the hoist end through the wheel opening . 5. CAUTION: Storing a jack, a tire or other equipment in the passenger compartment of the vehicle. Push, pull, and then try to ...
... the wheel wrench until the tire is secure and the cable is fully seated across the underside of the wheel. 3. Store the tire under the rear of the vehicle with the valve stem pointed upward. 2. Make sure the retainer is tight. If the tire moves, use the wheel wrench to rotate... or turn the tire. To store the tire: 1. Tilt the retainer downward and through the hole in the spare tire carrier. Insert the hoist end through the wheel opening . 5. CAUTION: Storing a jack, a tire or other equipment in the passenger compartment of the vehicle. Push, pull, and then try to ...

Owner's Manual
Page 344
.... And always open your doors or windows when you strike a match or get them as tightly as possible with chains on the tires of the rear axle. and they can all damage your vehicle, too. 6-45 Tighten them on the tires of the front axle. Never use these to clean your... Remover They can all be hazardous -- Install them . If you breathe their fumes in a closed space. Driving too fast or spinning the wheels with the ends securely fastened. Some are dangerous if you can be sure to clean your vehicle, be hazardous. When you must. Some are the proper size for...
.... And always open your doors or windows when you strike a match or get them as tightly as possible with chains on the tires of the rear axle. and they can all damage your vehicle, too. 6-45 Tighten them on the tires of the front axle. Never use these to clean your... Remover They can all be hazardous -- Install them . If you breathe their fumes in a closed space. Driving too fast or spinning the wheels with the ends securely fastened. Some are dangerous if you can be sure to clean your vehicle, be hazardous. When you must. Some are the proper size for...


