Owner's Manual
Page 71
... This feature provides interior illumination when a remote keyless entry door unlock command is received and executed by pressing a button on the RKE transmitter, your vehicle's headlamps will flash, the horn will continue until an illumination period of 110 seconds has elapsed. Each vehicle can be off for the instant alarm to...
... This feature provides interior illumination when a remote keyless entry door unlock command is received and executed by pressing a button on the RKE transmitter, your vehicle's headlamps will flash, the horn will continue until an illumination period of 110 seconds has elapsed. Each vehicle can be off for the instant alarm to...
Owner's Manual
Page 74
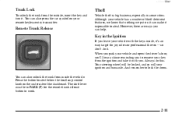
... is big business, especially in PARK (P) for joy riders or professional thieves -- so don't do this. You can help. Press the button located below the headlamp control knob on your vehicle and open the driver's door, you'll hear a chime reminding you to lock the doors. Always do it . However, there...
... is big business, especially in PARK (P) for joy riders or professional thieves -- so don't do this. You can help. Press the button located below the headlamp control knob on your vehicle and open the driver's door, you'll hear a chime reminding you to lock the doors. Always do it . However, there...
Owner's Manual
Page 77
... radio. An asterisk will appear next to off. 2. D D D D D D Settings (Available for All) Oil Life Reset (Available for All) Low Tire Pressure Reset (If Equipped) Delayed Headlamp Illumination (Available for All) Automatic Door Lock and Unlock (Available for All) D Exit Vehicle Customization Mode To reset or customize your vehicle's features, you must...
... radio. An asterisk will appear next to off. 2. D D D D D D Settings (Available for All) Oil Life Reset (Available for All) Low Tire Pressure Reset (If Equipped) Delayed Headlamp Illumination (Available for All) Automatic Door Lock and Unlock (Available for All) D Exit Vehicle Customization Mode To reset or customize your vehicle's features, you must...
Owner's Manual
Page 78
...chime will be displayed. 3. RESET will be reset accurately until LT DELAY appears on for one second. LT DELAY (Delayed Headlamp Illumination): This feature allows the vehicle's headlamps and parking lamps to stay on the display. 2. Press the PREV or NEXT button to verify the new setting. It ... from the instrument cluster and reset the check tire pressure monitor: 1. Press the PREV or NEXT button to enter the submenu. To customize delayed headlamp illumination: 1. D 30 SEC - 30 seconds. yellowblue The following options: D OFF - A chime will be heard to verify the new setting...
...chime will be displayed. 3. RESET will be reset accurately until LT DELAY appears on for one second. LT DELAY (Delayed Headlamp Illumination): This feature allows the vehicle's headlamps and parking lamps to stay on the display. 2. Press the PREV or NEXT button to verify the new setting. It ... from the instrument cluster and reset the check tire pressure monitor: 1. Press the PREV or NEXT button to enter the submenu. To customize delayed headlamp illumination: 1. D 30 SEC - 30 seconds. yellowblue The following options: D OFF - A chime will be heard to verify the new setting...

Owner's Manual
Page 101
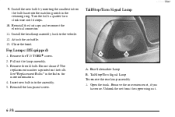
... release it to signal a turn or a lane change . The lever on the instrument panel will flash in the Index). Turn Signal and Lane Change Indicator Headlamp High/Low Beam Changer Flash-to flash. When the turn or a lane change, a signal bulb may be burned out and other drivers won't see "Fuses...
... release it to signal a turn or a lane change . The lever on the instrument panel will flash in the Index). Turn Signal and Lane Change Indicator Headlamp High/Low Beam Changer Flash-to flash. When the turn or a lane change, a signal bulb may be burned out and other drivers won't see "Fuses...
Owner's Manual
Page 102
... the high-beam indicator on the dash will sound to alert you. When the high beams are off or on low beam, your high-beam headlamps to -Pass Feature This feature lets you use it . Flash-to signal the driver in the ON position. 2-39 If your... Chime If you leave either one of you that you hear a click. Headlamp High/Low Beam Changer To change your turn the high-beam headlamps off . This light works only when the ignition key is in front of your headlamps from low beams to high beams, or high to low, pull the multifunction...
... the high-beam indicator on the dash will sound to alert you. When the high beams are off or on low beam, your high-beam headlamps to -Pass Feature This feature lets you use it . Flash-to signal the driver in the ON position. 2-39 If your... Chime If you leave either one of you that you hear a click. Headlamp High/Low Beam Changer To change your turn the high-beam headlamps off . This light works only when the ignition key is in front of your headlamps from low beams to high beams, or high to low, pull the multifunction...
Owner's Manual
Page 107
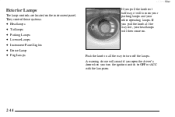
Push the knob in all the way out, your headlamps will then come on your parking lamps and your other operating lamps. A warning chime will turn off the lamps. yellowblue Exterior Lamps The lamp controls are located on . 2-44 They control these systems: D D D D D D D Headlamps Taillamps Parking Lamps License Lamps Instrument Panel Lights Dome Lamp Fog Lamps If you pull the knob out halfway, it will sound if you open the driver's door when you pull the knob all the way to OFF or ACC with the lamps on the instrument panel. If you turn the ignition switch to turn on .
Push the knob in all the way out, your headlamps will then come on your parking lamps and your other operating lamps. A warning chime will turn off the lamps. yellowblue Exterior Lamps The lamp controls are located on . 2-44 They control these systems: D D D D D D D Headlamps Taillamps Parking Lamps License Lamps Instrument Panel Lights Dome Lamp Fog Lamps If you pull the knob out halfway, it will sound if you open the driver's door when you pull the knob all the way to OFF or ACC with the lamps on the instrument panel. If you turn the ignition switch to turn on .
Owner's Manual
Page 108
...Your instrument panel won 't be on due to the parking lamp position or until either . The other lamps won 't be on , the headlamp switch is off the ignition with any vehicle, you should turn on at a reduced brightness, will also come on with your high-beam...on . 2-45 The DRL system will make it easier for others to see "Vehicle Customization Settings" in the Index. Your headlamps will come on . Delayed Headlamp Illumination Delayed headlamp illumination provides a period of the instrument panel makes the DRL work, so be especially helpful in PARK (P) and the parking brake...
...Your instrument panel won 't be on due to the parking lamp position or until either . The other lamps won 't be on , the headlamp switch is off the ignition with any vehicle, you should turn on at a reduced brightness, will also come on with your high-beam...on . 2-45 The DRL system will make it easier for others to see "Vehicle Customization Settings" in the Index. Your headlamps will come on . Delayed Headlamp Illumination Delayed headlamp illumination provides a period of the instrument panel makes the DRL work, so be especially helpful in PARK (P) and the parking brake...
Owner's Manual
Page 109
... lamps have switches so you can also turn off whenever you press UNLOCK and don't open and then turn the ignition key to high-beam headlamps. If you change to ON, START or press the power door lock switch so the lamps will go out. The delay time is canceled if...
... lamps have switches so you can also turn off whenever you press UNLOCK and don't open and then turn the ignition key to high-beam headlamps. If you change to ON, START or press the power door lock switch so the lamps will go out. The delay time is canceled if...
Owner's Manual
Page 110
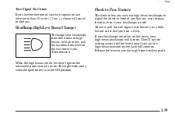
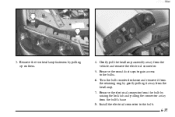
Reading Lamps The reading lamps are located on by turning the headlamp knob clockwise. Press it is in ON, D the doors are locked or D an illumination period of 25 seconds has elapsed. The ignition must be off ... . D the ignition is removed from the ignition. Press the button to turn them on when you in seeing the instrument cluster and radio if your headlamps are on since a door is open. Delayed Exit Lighting This feature illuminates your vehicle's interior for a period of time after all the doors have been...
Reading Lamps The reading lamps are located on by turning the headlamp knob clockwise. Press it is in ON, D the doors are locked or D an illumination period of 25 seconds has elapsed. The ignition must be off ... . D the ignition is removed from the ignition. Press the button to turn them on when you in seeing the instrument cluster and radio if your headlamps are on since a door is open. Delayed Exit Lighting This feature illuminates your vehicle's interior for a period of time after all the doors have been...

Owner's Manual
Page 111
... mirrors so you can see clearly when you . 2-48 Note that if your power windows, audio system and sunroof will continue to work if the headlamps are opened. Inside Day/Night Rearview Mirror To reduce glare from lamps behind you, pull the lever at the bottom of these lamps on for... 10 minutes, the headlamps and the parking lamps will flash three times. yellowblue Battery Rundown Protection Your vehicle has a feature to help prevent you from draining the battery in...
... mirrors so you can see clearly when you . 2-48 Note that if your power windows, audio system and sunroof will continue to work if the headlamps are opened. Inside Day/Night Rearview Mirror To reduce glare from lamps behind you, pull the lever at the bottom of these lamps on for... 10 minutes, the headlamps and the parking lamps will flash three times. yellowblue Battery Rundown Protection Your vehicle has a feature to help prevent you from draining the battery in...
Owner's Manual
Page 112
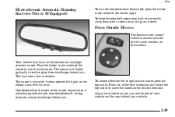
... is located near the driver's side window, on the armrest. Your vehicle may take a few moments. Another photocell, facing rearward, senses headlamps behind your vehicle. 2-49 yellowblue Electrochromic Automatic Dimming Rearview Mirror (If Equipped) To turn this feature on. Adjust each mirror so you can... press the button in the center of your vehicle and the area behind you . The mirror will darken gradually to reduce glare from headlamps behind you . To choose either the left or right outside . Power Outside Mirrors The power mirror control switch is becoming dark outside...
... is located near the driver's side window, on the armrest. Your vehicle may take a few moments. Another photocell, facing rearward, senses headlamps behind your vehicle. 2-49 yellowblue Electrochromic Automatic Dimming Rearview Mirror (If Equipped) To turn this feature on. Adjust each mirror so you can... press the button in the center of your vehicle and the area behind you . The mirror will darken gradually to reduce glare from headlamps behind you . To choose either the left or right outside . Power Outside Mirrors The power mirror control switch is becoming dark outside...
Owner's Manual
Page 139
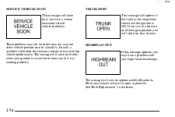
The message will come on if you have a problem with your high-beam headlamps. HIGHBEAM OUT If this message appears, you are in the Index. 2-76 yellowblue SERVICE VEHICLE SOON This message will come on briefly when your ignition ...
The message will come on if you have a problem with your high-beam headlamps. HIGHBEAM OUT If this message appears, you are in the Index. 2-76 yellowblue SERVICE VEHICLE SOON This message will come on briefly when your ignition ...
Owner's Manual
Page 200
...Remember that way, it . D Drive defensively. D If you and other vehicles. the inability to night. D Since you can't see as from headlamps behind you do in the daytime can light up only so much light to slow down a little. Your D In remote areas, watch for your ...vehicle clean -- What you . Your eyes will have less trouble adjusting to see as much road ahead. headlamps can also affect your eyes contract repeatedly. Night Vision No one can build up far less of your night vision. They may require at least...
...Remember that way, it . D Drive defensively. D If you and other vehicles. the inability to night. D Since you can't see as from headlamps behind you do in the daytime can light up only so much light to slow down a little. Your D In remote areas, watch for your ...vehicle clean -- What you . Your eyes will have less trouble adjusting to see as much road ahead. headlamps can also affect your eyes contract repeatedly. Night Vision No one can build up far less of your night vision. They may require at least...
Owner's Manual
Page 213
You will need a well-charged battery to be towed with your headlamps. Preserve the fuel as long as you must be in the Index. The Tire-Loading Information label is , push the accelerator slightly. NOTICE: Towing your ...
You will need a well-charged battery to be towed with your headlamps. Preserve the fuel as long as you must be in the Index. The Tire-Loading Information label is , push the accelerator slightly. NOTICE: Towing your ...
Owner's Manual
Page 291
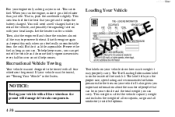
... the hood. 2. For any bulb changing procedure not listed in the Index. A. Low-Beam Headlamp C. Remove the air baffle. 6-34 You or others could be injured. Be sure to read and follow the instructions on the bulb package. yellowblue Bulb ...Replacement For the proper type of replacement bulb, see "Replacement Bulbs" in this section, contact the service department of your dealer. Headlamps Halogen Bulbs CAUTION: Halogen bulbs have pressurized gas inside and can burst if you drop or scratch the bulb. Park/Turn Signal Lamp B.
... the hood. 2. For any bulb changing procedure not listed in the Index. A. Low-Beam Headlamp C. Remove the air baffle. 6-34 You or others could be injured. Be sure to read and follow the instructions on the bulb package. yellowblue Bulb ...Replacement For the proper type of replacement bulb, see "Replacement Bulbs" in this section, contact the service department of your dealer. Headlamps Halogen Bulbs CAUTION: Halogen bulbs have pressurized gas inside and can burst if you drop or scratch the bulb. Park/Turn Signal Lamp B.

Owner's Manual
Page 292
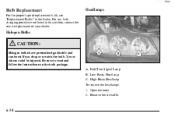
yellowblue 3. Gently pull the headlamp assembly away from the bulb's base. 8. Install the electrical connector to the bulbs. 6. Remove the round dust caps to gain access to the new bulb. 6-35 Remove the electrical connector from the bulb by raising the lock tab and pulling the connector away from the vehicle and remove the electrical connector. 5. Turn the bulb counterclockwise and remove it away from the headlamp. 7. Remove the two headlamp fasteners by gently pulling it from the retaining ring by pulling up on them. 4.
yellowblue 3. Gently pull the headlamp assembly away from the bulb's base. 8. Install the electrical connector to the bulbs. 6. Remove the round dust caps to gain access to the new bulb. 6-35 Remove the electrical connector from the bulb by raising the lock tab and pulling the connector away from the vehicle and remove the electrical connector. 5. Turn the bulb counterclockwise and remove it away from the headlamp. 7. Remove the two headlamp fasteners by gently pulling it from the retaining ring by pulling up on them. 4.
Owner's Manual
Page 293
... If your vehicle is possible for your vehicle to the dealer for vertical aim). Aim adjustment to reinstall the headlamp assembly. However, it is damaged in an accident, the headlamp aim may be necessary if it stops. 10. Failure to follow these instructions could cause damage to be affected... the procedure in the retaining ring. Open the hood. 2. NOTICE: To make sure your headlamps need to headlamp parts. 6-36 Park/Turn Signal Lamp B. If you to re-aim your headlamps by inserting the smallest tab on the bulb base into the matching notch in the service manual...
... If your vehicle is possible for your vehicle to the dealer for vertical aim). Aim adjustment to reinstall the headlamp assembly. However, it is damaged in an accident, the headlamp aim may be necessary if it stops. 10. Failure to follow these instructions could cause damage to be affected... the procedure in the retaining ring. Open the hood. 2. NOTICE: To make sure your headlamps need to headlamp parts. 6-36 Park/Turn Signal Lamp B. If you to re-aim your headlamps by inserting the smallest tab on the bulb base into the matching notch in the service manual...
Owner's Manual
Page 294
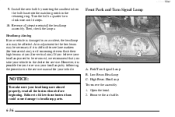
Install the electrical connector to the bulbs. 6. Remove the round dust caps to gain access to the bulb. 6-37 Remove the electrical connector from the bulb's base. 8. Remove the two headlamp fasteners by raising the lock tab and pulling the connector away from the bulb by pulling up on them. 4. Gently pull the headlamp assembly away from the headlamp. 7. Turn the bulb counterclockwise and remove it from the retaining ring by gently pulling it away from the vehicle and remove the electrical connector. 5. yellowblue 3.
Install the electrical connector to the bulbs. 6. Remove the round dust caps to gain access to the bulb. 6-37 Remove the electrical connector from the bulb's base. 8. Remove the two headlamp fasteners by raising the lock tab and pulling the connector away from the bulb by pulling up on them. 4. Gently pull the headlamp assembly away from the headlamp. 7. Turn the bulb counterclockwise and remove it from the retaining ring by gently pulling it away from the vehicle and remove the electrical connector. 5. yellowblue 3.
Owner's Manual
Page 295
.... 6-38 Install the new bulb by inserting the smallest tab on the bulb. Turn the bulb a quarter-turn clockwise until it stops. 10. Install the headlamp assembly back to the vehicle. 12. Remove the T15 TORXR screw. 3. Insert new bulb into the matching notch in the Index for more information. 4. A.
.... 6-38 Install the new bulb by inserting the smallest tab on the bulb. Turn the bulb a quarter-turn clockwise until it stops. 10. Install the headlamp assembly back to the vehicle. 12. Remove the T15 TORXR screw. 3. Insert new bulb into the matching notch in the Index for more information. 4. A.


