Owner's Manual
Page 49
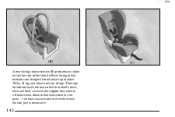
yellowblue A rear-facing infant restraint (B) positions an infant to about 20 lbs. (9 kg) and about one year of age. the base stays secured in two parts -- Some infant seats come in the vehicle and the seat part is removable. 1-42 This type of the vehicle. Rear-facing infant restraints are designed for infants of up to face the rear of restraint faces the rear so that the infant's head, neck and body can have the support they need in a frontal crash.
yellowblue A rear-facing infant restraint (B) positions an infant to about 20 lbs. (9 kg) and about one year of age. the base stays secured in two parts -- Some infant seats come in the vehicle and the seat part is removable. 1-42 This type of the vehicle. Rear-facing infant restraints are designed for infants of up to face the rear of restraint faces the rear so that the infant's head, neck and body can have the support they need in a frontal crash.

Owner's Manual
Page 142
... traveled with the display showing all segments of half a second. distance that can only be displayed. D In the absence of vehicle communications, a double dash "--" is based on for at least two seconds. If one of driving. A reset can be displayed. The reset is acknowledged with the remaining fuel. Turn the ignition...
... traveled with the display showing all segments of half a second. distance that can only be displayed. D In the absence of vehicle communications, a double dash "--" is based on for at least two seconds. If one of driving. A reset can be displayed. The reset is acknowledged with the remaining fuel. Turn the ignition...
Owner's Manual
Page 195
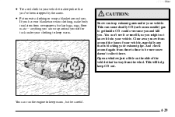
... depending on good weather and road conditions. First apply your speed as you can from between parked cars and stops right in Emergencies There are based on the space available. 4-12 but, unless you come over a hill and find a truck stopped in emergencies like these problems by braking -- yellowblue Suppose you...
... depending on good weather and road conditions. First apply your speed as you can from between parked cars and stops right in Emergencies There are based on the space available. 4-12 but, unless you come over a hill and find a truck stopped in emergencies like these problems by braking -- yellowblue Suppose you...
Owner's Manual
Page 212
..., so you can cause deadly CO (carbon monoxide) gas to be careful. 4-29 Open a window just a little on extra clothing or wrap a blanket around the base of the vehicle that's away from the wind. anything you might not know it is blocking your vehicle. If you 've been stopped by the...
..., so you can cause deadly CO (carbon monoxide) gas to be careful. 4-29 Open a window just a little on extra clothing or wrap a blanket around the base of the vehicle that's away from the wind. anything you might not know it is blocking your vehicle. If you 've been stopped by the...
Owner's Manual
Page 242
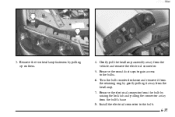
... the bracket on the engine. yellowblue 6. Otherwise, close the valve. Remove the oil fill tube, with the proper DEX-COOLR coolant mixture, up to the base of coolant coming from an air bleed valve, close the valves after the radiator is filled. 5-21 Place the hole in the cover shield over...
... the bracket on the engine. yellowblue 6. Otherwise, close the valve. Remove the oil fill tube, with the proper DEX-COOLR coolant mixture, up to the base of coolant coming from an air bleed valve, close the valves after the radiator is filled. 5-21 Place the hole in the cover shield over...
Owner's Manual
Page 243
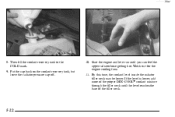
Watch out for the engine cooling fans. 11. Put the cap back on the coolant recovery tank, but leave the radiator pressure cap off. 10. By this time, the coolant level inside the radiator filler neck may be lower. Then fill the coolant recovery tank to the COLD mark. 9. Start the engine and let it run until the level reaches the base of the filler neck. 5-22 If the level is lower, add more of the proper DEX-COOLR coolant mixture through the filler neck until you can feel the upper radiator hose getting hot. yellowblue 8.
Watch out for the engine cooling fans. 11. Put the cap back on the coolant recovery tank, but leave the radiator pressure cap off. 10. By this time, the coolant level inside the radiator filler neck may be lower. Then fill the coolant recovery tank to the COLD mark. 9. Start the engine and let it run until the level reaches the base of the filler neck. 5-22 If the level is lower, add more of the proper DEX-COOLR coolant mixture through the filler neck until you can feel the upper radiator hose getting hot. yellowblue 8.
Owner's Manual
Page 274
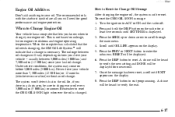
... Message After changing the engine oil, the system must be heard to verify the exit. A chime will be displayed for one second. 7. This is not based on mileage, but on the radio for good performance and engine protection. When the computer has calculated that the oil needs changing, the GM Oil...
... Message After changing the engine oil, the system must be heard to verify the exit. A chime will be displayed for one second. 7. This is not based on mileage, but on the radio for good performance and engine protection. When the computer has calculated that the oil needs changing, the GM Oil...
Owner's Manual
Page 288
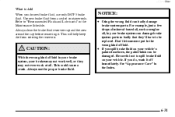
.... Always use only DOT-3 brake fluid. This will help keep dirt from a sealed container only. Don't let someone put in the wrong kind of mineral-based oil, such as engine oil, in your brake system, your brake system can badly damage brake system parts. If you do need brake fluid, use...
.... Always use only DOT-3 brake fluid. This will help keep dirt from a sealed container only. Don't let someone put in the wrong kind of mineral-based oil, such as engine oil, in your brake system, your brake system can badly damage brake system parts. If you do need brake fluid, use...

Owner's Manual
Page 292
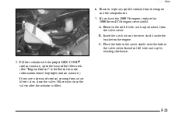
Turn the bulb counterclockwise and remove it away from the headlamp. 7. yellowblue 3. Gently pull the headlamp assembly away from the bulb's base. 8. Remove the electrical connector from the bulb by gently pulling it from the retaining ring by raising the lock tab and pulling the connector away from the vehicle and remove the electrical connector. 5. Remove the two headlamp fasteners by pulling up on them. 4. Remove the round dust caps to gain access to the new bulb. 6-35 Install the electrical connector to the bulbs. 6.
Turn the bulb counterclockwise and remove it away from the headlamp. 7. yellowblue 3. Gently pull the headlamp assembly away from the bulb's base. 8. Remove the electrical connector from the bulb by gently pulling it from the retaining ring by raising the lock tab and pulling the connector away from the vehicle and remove the electrical connector. 5. Remove the two headlamp fasteners by pulling up on them. 4. Remove the round dust caps to gain access to the new bulb. 6-35 Install the electrical connector to the bulbs. 6.
Owner's Manual
Page 293
... reinstall the headlamp assembly. Failure to follow these instructions could cause damage to re-aim your headlamps by inserting the smallest tab on the bulb base into the matching notch in the retaining ring. If you believe your headlamps are aimed properly, read all steps to the low beam may be...
... reinstall the headlamp assembly. Failure to follow these instructions could cause damage to re-aim your headlamps by inserting the smallest tab on the bulb base into the matching notch in the retaining ring. If you believe your headlamps are aimed properly, read all steps to the low beam may be...
Owner's Manual
Page 294
Remove the round dust caps to gain access to the bulb. 6-37 Install the electrical connector to the bulbs. 6. Turn the bulb counterclockwise and remove it from the retaining ring by gently pulling it away from the bulb's base. 8. Remove the electrical connector from the bulb by pulling up on them. 4. yellowblue 3. Remove the two headlamp fasteners by raising the lock tab and pulling the connector away from the headlamp. 7. Gently pull the headlamp assembly away from the vehicle and remove the electrical connector. 5.
Remove the round dust caps to gain access to the bulb. 6-37 Install the electrical connector to the bulbs. 6. Turn the bulb counterclockwise and remove it from the retaining ring by gently pulling it away from the bulb's base. 8. Remove the electrical connector from the bulb by pulling up on them. 4. yellowblue 3. Remove the two headlamp fasteners by raising the lock tab and pulling the connector away from the headlamp. 7. Gently pull the headlamp assembly away from the vehicle and remove the electrical connector. 5.
Owner's Manual
Page 295
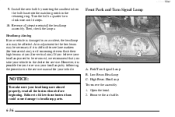
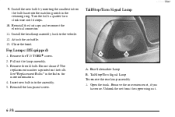
.../Turn Signal Lamp To remove the rear lamp assembly: 1. Remove the convenience net, if you have one. The replacement number is printed on the bulb base into the assembly. 5. Reinstall the lamps and screw. Remove the old bulb. Unhook the net from the upper wing nut. 6-38 yellowblue 9. Tail/Stop/Turn...
.../Turn Signal Lamp To remove the rear lamp assembly: 1. Remove the convenience net, if you have one. The replacement number is printed on the bulb base into the assembly. 5. Reinstall the lamps and screw. Remove the old bulb. Unhook the net from the upper wing nut. 6-38 yellowblue 9. Tail/Stop/Turn...

Owner's Manual
Page 298
... two screws with a E8 TORXR socket. 4. Tighten the socket by turning it . 6. Remove the old bulb from the small prongs extending from the dome lamp base plate; Open the trunk. To remove a socket press the tab, turn the socket counterclockwise and pull it out. 5. hook the new bulb onto the prongs...
... two screws with a E8 TORXR socket. 4. Tighten the socket by turning it . 6. Remove the old bulb from the small prongs extending from the dome lamp base plate; Open the trunk. To remove a socket press the tab, turn the socket counterclockwise and pull it out. 5. hook the new bulb onto the prongs...
Owner's Manual
Page 306
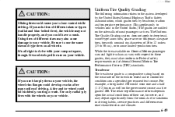
.... (This applies only to use on your vehicle. Be sure to vehicles sold in road characteristics and climate. Treadwear The treadwear grade is a comparative rating based on the wear rate of the tire when tested under controlled conditions on the government course as a tire graded 100. A tire and/or wheel could...
.... (This applies only to use on your vehicle. Be sure to vehicles sold in road characteristics and climate. Treadwear The treadwear grade is a comparative rating based on the wear rate of the tire when tested under controlled conditions on the government course as a tire graded 100. A tire and/or wheel could...
Owner's Manual
Page 307
... properly inflated and not overloaded. Temperature -- However, if you the longest tire life and best overall performance. Warning: The temperature grade for a tire that is based on specified government test surfaces of asphalt and concrete. If the wheel leaks air, replace it (except some aluminum wheels, which all passenger car tires...
... properly inflated and not overloaded. Temperature -- However, if you the longest tire life and best overall performance. Warning: The temperature grade for a tire that is based on specified government test surfaces of asphalt and concrete. If the wheel leaks air, replace it (except some aluminum wheels, which all passenger car tires...
Owner's Manual
Page 312
... cloth with lukewarm water and a mild soap or saddle soap and wipe dry with mild soap and lukewarm water. Do not use oils, varnishes, solvent-based or abrasive cleaners, furniture polish or shoe polish on the inside rear window, since they might not be attached across the defogger grid. CAUTION: Do...
... cloth with lukewarm water and a mild soap or saddle soap and wipe dry with mild soap and lukewarm water. Do not use oils, varnishes, solvent-based or abrasive cleaners, furniture polish or shoe polish on the inside rear window, since they might not be attached across the defogger grid. CAUTION: Do...
Owner's Manual
Page 313
... all soap residue completely. Washing Your Vehicle The best way to preserve your vehicle in the Index.) 6-56 Don't use cleaning agents that are petroleum based, or that look worn. Be sure to rinse the vehicle well, removing all -cotton towel to keep it clean by wiping vigorously with a cloth soaked...
... all soap residue completely. Washing Your Vehicle The best way to preserve your vehicle in the Index.) 6-56 Don't use cleaning agents that are petroleum based, or that look worn. Be sure to rinse the vehicle well, removing all -cotton towel to keep it clean by wiping vigorously with a cloth soaked...

Owner's Manual
Page 315
...dust control can be loosened before being flushed. Clean any overspray or splash from your dealer's body and paint shop. 6-58 Petroleum-based products may develop into the paint surface. Sheet Metal Damage If your vehicle is damaged and requires sheet metal repair or replacement, ...areas of finish damage can take care to restore corrosion protection. Your dealer or an underbody car washing system can do this , Chevrolet will corrode quickly and may damage the paint finish and tires. Underbody Maintenance Chemicals used for you. If these materials from the ...
...dust control can be loosened before being flushed. Clean any overspray or splash from your dealer's body and paint shop. 6-58 Petroleum-based products may develop into the paint surface. Sheet Metal Damage If your vehicle is damaged and requires sheet metal repair or replacement, ...areas of finish damage can take care to restore corrosion protection. Your dealer or an underbody car washing system can do this , Chevrolet will corrode quickly and may damage the paint finish and tires. Underbody Maintenance Chemicals used for you. If these materials from the ...