
Owner's Manual
Page 10
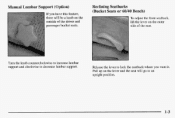
Pull up on the lever and the seat will be a knob on the outer side of the seat. Reclining Seatbacks (Bucket Seats or 60/40 Bench) To adjust the front seatback, lift the lever on the outside bf the driver and passenger bucket seats. I I I I I i I I Turn the knob counterclockwise to increase lumbar support and clockwise to decrease lumbar support. Manual Lumbar Support (Option) If you have this feature, there will go to lock the seatback where you want it. Release the lever to an upright position.
Pull up on the lever and the seat will be a knob on the outer side of the seat. Reclining Seatbacks (Bucket Seats or 60/40 Bench) To adjust the front seatback, lift the lever on the outside bf the driver and passenger bucket seats. I I I I I i I I Turn the knob counterclockwise to increase lumbar support and clockwise to decrease lumbar support. Manual Lumbar Support (Option) If you have this feature, there will go to lock the seatback where you want it. Release the lever to an upright position.
Owner's Manual
Page 12
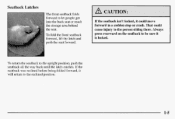
... the latch catches. That could. Seaiback Latches, The frontseatback folds forward to the reclined positiori. 1-5 cause injuryto the personsitting there. To fold the frontseatback forward, lift the latch and push the scat forward.
... the latch catches. That could. Seaiback Latches, The frontseatback folds forward to the reclined positiori. 1-5 cause injuryto the personsitting there. To fold the frontseatback forward, lift the latch and push the scat forward.

Owner's Manual
Page 95
Front Storage Area If your vehicle has the center armrestcompartment, lift the cover.to :open It. Some vehicles may have a compact disc player, you may store compact discs inside the console. You can store cassettes in the slQts in the front of the compartment: If you have a storage pocket on each door. If yaur vehcle has this-c.ons.ole compartment,squeeze the frontlever while lifting the top to expose the storage area which inc1u.de.s slots f6r cassettes and a coinholder. Door Storage You will find a storage compartment on the-back of the bucket or 60/40 bench seats.
Front Storage Area If your vehicle has the center armrestcompartment, lift the cover.to :open It. Some vehicles may have a compact disc player, you may store compact discs inside the console. You can store cassettes in the slQts in the front of the compartment: If you have a storage pocket on each door. If yaur vehcle has this-c.ons.ole compartment,squeeze the frontlever while lifting the top to expose the storage area which inc1u.de.s slots f6r cassettes and a coinholder. Door Storage You will find a storage compartment on the-back of the bucket or 60/40 bench seats.

Owner's Manual
Page 96
... before the ashtr-aycover 0pen.s and smoking.material can be pulled our for additional glare protection and a strap for holding. I I ' I I I T remove the front ashtray, lift the release tab as high O as 'maps. TOblock out gl.are,you can be deposited. Your vis'ors may have an extensimthat can swing down... and lift the. If you do , it is heating. NOTICE: Don't hold a cigarette lighter with your ashtray.If you do , cigarettes or other things that burn...
... before the ashtr-aycover 0pen.s and smoking.material can be pulled our for additional glare protection and a strap for holding. I I ' I I I T remove the front ashtray, lift the release tab as high O as 'maps. TOblock out gl.are,you can be deposited. Your vis'ors may have an extensimthat can swing down... and lift the. If you do , it is heating. NOTICE: Don't hold a cigarette lighter with your ashtray.If you do , cigarettes or other things that burn...
Owner's Manual
Page 97
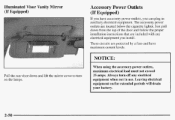
The acc'essary power outlets are protected by a fBSe and.have accessory power outlets, you can plug-in use. Just pull down and lift the mirrorcover to turn off any e1ectric.al equipmentyou install...These circuits are located below the cigarette lighter. NOTICE: When using the accessory power outlets, ...
The acc'essary power outlets are protected by a fBSe and.have accessory power outlets, you can plug-in use. Just pull down and lift the mirrorcover to turn off any e1ectric.al equipmentyou install...These circuits are located below the cigarette lighter. NOTICE: When using the accessory power outlets, ...

Owner's Manual
Page 207
... occur from the fipnt. Do not attach winch cablesor J-haoks to wheel-lift equipment. To help avoid damage,instan a towing doIlyand raise the vehicle until adequate clearance is obtained between the-ground and/or wheel-lift equipment. lrehicles with fuur-whesl-drive with sling-type equipment or fascia/fog... lamp damage will occur.Use wheel-lift or car-carrier equipment. when using;car-carrier eq-uipment. fequiped car-earrierequipment. Additionalramping may be. Tow.Limits.-- 35 rnph (56 k m h ) , 50 miles ...
... occur from the fipnt. Do not attach winch cablesor J-haoks to wheel-lift equipment. To help avoid damage,instan a towing doIlyand raise the vehicle until adequate clearance is obtained between the-ground and/or wheel-lift equipment. lrehicles with fuur-whesl-drive with sling-type equipment or fascia/fog... lamp damage will occur.Use wheel-lift or car-carrier equipment. when using;car-carrier eq-uipment. fequiped car-earrierequipment. Additionalramping may be. Tow.Limits.-- 35 rnph (56 k m h ) , 50 miles ...

Owner's Manual
Page 208
... the reaz 5-11 Towing a vehicle overrough Surfaces could damage a vehicle. Damage can occur from vehicle to .ground or vehicle to wheel-lift eq-uipment.Ta help avoid darnage,install a towing dally and raise the vehicle until adequate clearance is obtained between the ground and/or wheel...-lift equipment. Use wheel-lift or car-carrier equipment. Additional rainping may be required for car carrier equipment. Do not ,attach winch cables or J-hooks ta...
... the reaz 5-11 Towing a vehicle overrough Surfaces could damage a vehicle. Damage can occur from vehicle to .ground or vehicle to wheel-lift eq-uipment.Ta help avoid darnage,install a towing dally and raise the vehicle until adequate clearance is obtained between the ground and/or wheel...-lift equipment. Use wheel-lift or car-carrier equipment. Additional rainping may be required for car carrier equipment. Do not ,attach winch cables or J-hooks ta...
Owner's Manual
Page 211
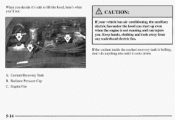
engine is boiling, don't do anything else u,ntil it 's m€e to lift the,hood, here's what you . Engine .Fan 5-14 and can start up .even when the. Keep hands, clothing and tools from any underhood .electric fan. When you decide it cools down. has air conditioning, the auxiliary If electric fan under the hood can injure away you 'll see: I P-your vehicle. If the coolant inside the coolant recovery tank is not running. CAUTION: A, Ccrolant R-ecovery Tank B. .RadiatorPrmsure Cap C.
engine is boiling, don't do anything else u,ntil it 's m€e to lift the,hood, here's what you . Engine .Fan 5-14 and can start up .even when the. Keep hands, clothing and tools from any underhood .electric fan. When you decide it cools down. has air conditioning, the auxiliary If electric fan under the hood can injure away you 'll see: I P-your vehicle. If the coolant inside the coolant recovery tank is not running. CAUTION: A, Ccrolant R-ecovery Tank B. .RadiatorPrmsure Cap C.
Owner's Manual
Page 225
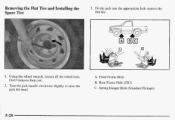
Fit the jack into the appropriate ho1.e nearest the flat tire. 1. Rear Frame Hole (ZR2) C. Using the wheel wrench, lomen all the wheel nuts. Front Frame Hole. Turn the jack handle clockwise slightly to raise the jack lift head. A. B. Spring Hanger Hole (Standard Pickups) 5-28 Don't remove them yet. 2. 3.
Fit the jack into the appropriate ho1.e nearest the flat tire. 1. Rear Frame Hole (ZR2) C. Using the wheel wrench, lomen all the wheel nuts. Front Frame Hole. Turn the jack handle clockwise slightly to raise the jack lift head. A. B. Spring Hanger Hole (Standard Pickups) 5-28 Don't remove them yet. 2. 3.
Owner's Manual
Page 244
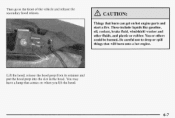
You may have a lamp that burn can-geton hot engine partsand start a fire. Yau or others or could be burned. Be carefuL not to the front o f the vehicle and release the secondary hood-release. Things that comes on when you lift the hood. 6-7 These include liquids like gasoline, oil, coolant, brakefluid,.windshield washer and other fluids,-.and plastic rubber. Lift the hood, release the hood prop from its retainer .and put.the hood prop into the slot in the hood. Then go to drop or spill things thatwill burn ontoa hot engine.
You may have a lamp that burn can-geton hot engine partsand start a fire. Yau or others or could be burned. Be carefuL not to the front o f the vehicle and release the secondary hood-release. Things that comes on when you lift the hood. 6-7 These include liquids like gasoline, oil, coolant, brakefluid,.windshield washer and other fluids,-.and plastic rubber. Lift the hood, release the hood prop from its retainer .and put.the hood prop into the slot in the hood. Then go to drop or spill things thatwill burn ontoa hot engine.
Owner's Manual
Page 245
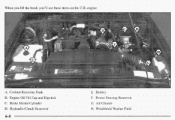
When you.lift the hood, you'll seethese items on the 2.2L engine: A. Brake Master Cylinder E. WindshieId Washer Fluid 6-8 Coolant Recovery Tank B. Air Cleaner D. Hydraulic Clutch Reservoi.r H. Engine 011 Fill Cap and Dipstick C. Battery E Power Steering Reservoir G.
When you.lift the hood, you'll seethese items on the 2.2L engine: A. Brake Master Cylinder E. WindshieId Washer Fluid 6-8 Coolant Recovery Tank B. Air Cleaner D. Hydraulic Clutch Reservoi.r H. Engine 011 Fill Cap and Dipstick C. Battery E Power Steering Reservoir G.
Owner's Manual
Page 246
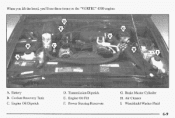
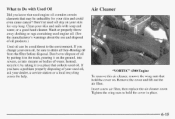
Coolant Recovery Tank C. Power Steering Reservoir G. Engine Oil Dipstick D. Transmission Dipstick E. Brake Master Cylinder H. When you lift the hood, you'll see these items on the "VORTEC" 4300 engine: A. Windshield Washer Fluid Air Cleaner I. Battery E. Engine Oil Fill F.
Coolant Recovery Tank C. Power Steering Reservoir G. Engine Oil Dipstick D. Transmission Dipstick E. Brake Master Cylinder H. When you lift the hood, you'll see these items on the "VORTEC" 4300 engine: A. Windshield Washer Fluid Air Cleaner I. Battery E. Engine Oil Fill F.

Owner's Manual
Page 247
relieve pressure !on all properly. Thin lift the hood to close. t s Then pull the hood down firmly to . It wdl Iatch when dropped from the slot in thehood and return the prop to 1. the filler caps are on the hood prop. Remove:the hood prop:from 10 to Z reta.iner. Before cJosing the hood, he .sure-
relieve pressure !on all properly. Thin lift the hood to close. t s Then pull the hood down firmly to . It wdl Iatch when dropped from the slot in thehood and return the prop to 1. the filler caps are on the hood prop. Remove:the hood prop:from 10 to Z reta.iner. Before cJosing the hood, he .sure-
Owner's Manual
Page 252
..., remove the wing nut$ that hold the cover in the trash, pouring it . Instead, ,recycle it by p.ut.ting it on , Remove the cover and lift out the air filter. Insert a new air filter, then replace the air cleaner-cover. If you change ydur owri oil, be .unhealthy for help. Don...
..., remove the wing nut$ that hold the cover in the trash, pouring it . Instead, ,recycle it by p.ut.ting it on , Remove the cover and lift out the air filter. Insert a new air filter, then replace the air cleaner-cover. If you change ydur owri oil, be .unhealthy for help. Don...

Owner's Manual
Page 278
..., 7. tabs of the lens.mid& .the side ;of a small screwdrivef-iizto the ceI1-ler slo-ta,t the bottom ofthe lens. 2.. Gonnixt the electrical connectbr to lift out in t k lens; 3.. Connea the graun-dwire. -8. Snap the lens into place. 5 , Sli&.=the. Rembvei th.e lamp assembly fforn the hood. 5. Re~~iove screws. Gently...
..., 7. tabs of the lens.mid& .the side ;of a small screwdrivef-iizto the ceI1-ler slo-ta,t the bottom ofthe lens. 2.. Gonnixt the electrical connectbr to lift out in t k lens; 3.. Connea the graun-dwire. -8. Snap the lens into place. 5 , Sli&.=the. Rembvei th.e lamp assembly fforn the hood. 5. Re~~iove screws. Gently...
Owner's Manual
Page 279
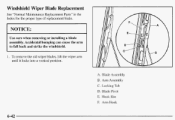
Bl.ad-eAsse.mbly B. Locking Tab D. I NOTICE: Use care when -removing-or installing a blade assernb-ly.,Accidentalbumping can cause the arm to fall back and strike the windshield. 1.. Arm Assembly C. Hook S.10t E Arm Hook 6-42 A. To remove the old wiper blades;, lift the wiper arm until it 1o.ck.sinto a vertical position. Blade Pivot E. -WindshieldWiper Blade .Replacement See "Normal Maintenance Replacement Pqrt.s" in the Inde-xfor the proper type of replacement blade.
Bl.ad-eAsse.mbly B. Locking Tab D. I NOTICE: Use care when -removing-or installing a blade assernb-ly.,Accidentalbumping can cause the arm to fall back and strike the windshield. 1.. Arm Assembly C. Hook S.10t E Arm Hook 6-42 A. To remove the old wiper blades;, lift the wiper arm until it 1o.ck.sinto a vertical position. Blade Pivot E. -WindshieldWiper Blade .Replacement See "Normal Maintenance Replacement Pqrt.s" in the Inde-xfor the proper type of replacement blade.


