Owner's Manual
Page 68
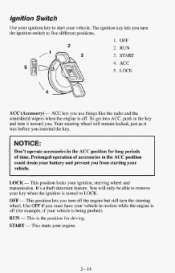
...remove your key when the ignition is off . LOCK -This position locks your vehicle. Use OFF if you . RUN 3. ACC 5. This is the position for example, if your vehicle in the key and turn the steering wheel. START 5 4. To get intoACC, push in motion while the engine... OFF 2 2. Prolonged operation accessories in the ACC position for long periods of ACC position could drain your vehicle. RUN - START -This startsyour engine. 2- 14 You will remain locked, justas it toward you must have your vehicle is off (for driving. NOTICE: Don't operate accessories in ...
...remove your key when the ignition is off . LOCK -This position locks your vehicle. Use OFF if you . RUN 3. ACC 5. This is the position for example, if your vehicle in the key and turn the steering wheel. START 5 4. To get intoACC, push in motion while the engine... OFF 2 2. Prolonged operation accessories in the ACC position for long periods of ACC position could drain your vehicle. RUN - START -This startsyour engine. 2- 14 You will remain locked, justas it toward you must have your vehicle is off (for driving. NOTICE: Don't operate accessories in ...

Owner's Manual
Page 100
When it's ready, it is on the left of the engine cover console. Don't put papers and other smoking materials could set them on the tabs inside and pull out. Don't hold a cigarette lighter in all ... it in with your ashtrays. If you do , cigarettes or other things that burn into your hand while it will pop back by itself. To remove the smaller ashtrays on each sidewall, press down on fire, causing damage. 2-46 Cigarette LighterIAshtrays The cigarette lighter is heating.
When it's ready, it is on the left of the engine cover console. Don't put papers and other smoking materials could set them on the tabs inside and pull out. Don't hold a cigarette lighter in all ... it in with your ashtrays. If you do , cigarettes or other things that burn into your hand while it will pop back by itself. To remove the smaller ashtrays on each sidewall, press down on fire, causing damage. 2-46 Cigarette LighterIAshtrays The cigarette lighter is heating.

Owner's Manual
Page 178
If it won't start the vehicle with the dead battery. Remove the cables i n reverse order to start the vehicle with the good battery and r ~ the n ~ engine for a while. 11. Take care that move. Good Battery (+) 4. Try to prevent electrical shorting. Good Battery (-) 3. Dead Battery (+) The electrical ...away from the dead battery, but the chance of sparks getting back to the battery is much less. 10. Heavy Metal Engine Part 2. Good Battery (-) Heavy Metal Engine Part 9. Now start after a few tries, it probably needs service. 12. Remove Cables In This Order: I .
If it won't start the vehicle with the dead battery. Remove the cables i n reverse order to start the vehicle with the good battery and r ~ the n ~ engine for a while. 11. Take care that move. Good Battery (+) 4. Try to prevent electrical shorting. Good Battery (-) 3. Dead Battery (+) The electrical ...away from the dead battery, but the chance of sparks getting back to the battery is much less. 10. Heavy Metal Engine Part 2. Good Battery (-) Heavy Metal Engine Part 9. Now start after a few tries, it probably needs service. 12. Remove Cables In This Order: I .
Owner's Manual
Page 217
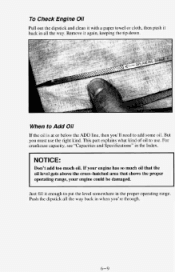
Remove it again, keeping the tip down. For part crankcase capacity, see "Capacities and Specifications" in when you're through. 6-9 NOTICE: Don't addtoo much oil.If your engine has much oil that the so oil level gets above the cross-hatched area that shows the proper operating range, your engine could damaged. Push the... If the oil isat or below the ADD line, then you must use . This explains what kind of oil to add some oil. To Check Engine Oil Pull out the dipstick and clean itwith a paper towel or cloth,then push it back in the proper operating level range.
Remove it again, keeping the tip down. For part crankcase capacity, see "Capacities and Specifications" in when you're through. 6-9 NOTICE: Don't addtoo much oil.If your engine has much oil that the so oil level gets above the cross-hatched area that shows the proper operating range, your engine could damaged. Push the... If the oil isat or below the ADD line, then you must use . This explains what kind of oil to add some oil. To Check Engine Oil Pull out the dipstick and clean itwith a paper towel or cloth,then push it back in the proper operating level range.

Owner's Manual
Page 221
...The nuts are on each side at the top of water. If you change your dealer, a servicestation or a local recycling center for help. Engine Cover To Remove the Engine Cover: 1. Move both front seats as farback as they will go. The screws are on the ground, into sewers, or into streams orbodies... of the extension. Don't ever dispose of the extension. 6-1 3 Instead, recycle it by taking it on the bottom of oil by removing the ...
...The nuts are on each side at the top of water. If you change your dealer, a servicestation or a local recycling center for help. Engine Cover To Remove the Engine Cover: 1. Move both front seats as farback as they will go. The screws are on the ground, into sewers, or into streams orbodies... of the extension. Don't ever dispose of the extension. 6-1 3 Instead, recycle it by taking it on the bottom of oil by removing the ...

Owner's Manual
Page 222
Disconnect the electrical connector for the cigarette lighter. Set the extension aside. If it out. 4. Lift it up and then pull it does, remove the screw. Your vehicle may have a screw that are located to the right and left of the heater duct. 6. Grasp the bottom of the heater duct pull and down gently to the engine cover. I 5. 3. Grasp the top of the extension. Remove the engine cover braces that attaches the heater duct to remove it. 6-14
Disconnect the electrical connector for the cigarette lighter. Set the extension aside. If it out. 4. Lift it up and then pull it does, remove the screw. Your vehicle may have a screw that are located to the right and left of the heater duct. 6. Grasp the bottom of the heater duct pull and down gently to the engine cover. I 5. 3. Grasp the top of the extension. Remove the engine cover braces that attaches the heater duct to remove it. 6-14
Owner's Manual
Page 223
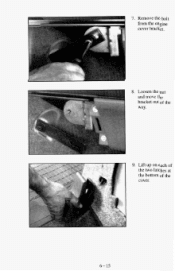
7. Remove the bolt from the engine cover bracket. 8. Lift up on each of the two latches at the bottom of the cover. 6- 15 Loosen the nut and move the bracket outof the way. 9.
7. Remove the bolt from the engine cover bracket. 8. Lift up on each of the two latches at the bottom of the cover. 6- 15 Loosen the nut and move the bracket outof the way. 9.
Owner's Manual
Page 224
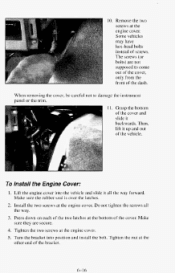
...-head bolts instead of the cover. The screws (or bolts) are secure. 4. Turn the bracket into the vehicle and slide it all the way. 3. When removing the cover, be careful not to come out of the cover, only from the front of the dash. Do not tighten the screws all the... sure they are not supposed to damage the instrument panel or the trim. Tighten the two screws at the engine cover. Install the two screws at the engine cover. 5. 10. Then, lift it backwards. Remove the two screws at the other end of the vehicle. Grasp the bottom of the cover and slide...
...-head bolts instead of the cover. The screws (or bolts) are secure. 4. Turn the bracket into the vehicle and slide it all the way. 3. When removing the cover, be careful not to come out of the cover, only from the front of the dash. Do not tighten the screws all the... sure they are not supposed to damage the instrument panel or the trim. Tighten the two screws at the engine cover. Install the two screws at the engine cover. 5. 10. Then, lift it backwards. Remove the two screws at the other end of the vehicle. Grasp the bottom of the cover and slide...

Owner's Manual
Page 225
...air cleanerlid is changed. See "Scheduled Maintenance Services" in the Index. 6-17 After changing the filter, snapboth clips to your engine. Refer to the Maintenance Schedule to determine when to replacethe air filter. Then,push the bottom of the instrument panel extension and...the air cleaner. Air Cleaner If you have the 4.3L engine (VIN Code W) with the rectangular air cleaner, you can change the air cleaner filterwithout removing the engine cover. Just lift the hood, unsnap both clips and remove the top. Reconnect the electrical connector for the cigarette lighter. ...
...air cleanerlid is changed. See "Scheduled Maintenance Services" in the Index. 6-17 After changing the filter, snapboth clips to your engine. Refer to the Maintenance Schedule to determine when to replacethe air filter. Then,push the bottom of the instrument panel extension and...the air cleaner. Air Cleaner If you have the 4.3L engine (VIN Code W) with the rectangular air cleaner, you can change the air cleaner filterwithout removing the engine cover. Just lift the hood, unsnap both clips and remove the top. Reconnect the electrical connector for the cigarette lighter. ...
Owner's Manual
Page 235
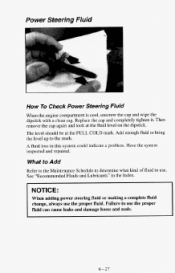
... at the fluid level on the dipstick. What to Add Refer to the Maintenance Schedule to determine what kind of fluid to the mark. Then remove the cap again and look at the FULL COLD mark. A fluid loss in the Index. Power Steering Fluid How To Check Power Steering Fluid When... the engine compartment is cool, unscrew the cap and wipe the dipstick with a clean rag. NOTICE: When adding power steering fluid or making a complete fluid change, always...
... at the fluid level on the dipstick. What to Add Refer to the Maintenance Schedule to determine what kind of fluid to the mark. Then remove the cap again and look at the FULL COLD mark. A fluid loss in the Index. Power Steering Fluid How To Check Power Steering Fluid When... the engine compartment is cool, unscrew the cap and wipe the dipstick with a clean rag. NOTICE: When adding power steering fluid or making a complete fluid change, always...
Owner's Manual
Page 237
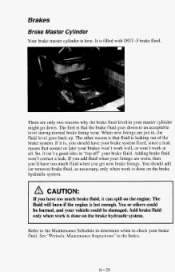
... Brakes Brake Master Cylinder Your brake master cylinder is leaking out of the brake system. Adding brake fluid won 't work is , you should add (or remove) brake fluid, asnecessary, only when work at all. A CAUTION: If you get new brake linings. See "PeriodicMaintenance Inspections" in , the fluid level ...or won 't correct a leak.If you add fluid when your linings areworn, then you'll have too much brake fluid, it can spill engine. The firstis that sooner or later your brake fluid. The on the brake hydraulicsystem. There are only two reasons the brake fluid level in ...
... Brakes Brake Master Cylinder Your brake master cylinder is leaking out of the brake system. Adding brake fluid won 't work is , you should add (or remove) brake fluid, asnecessary, only when work at all. A CAUTION: If you get new brake linings. See "PeriodicMaintenance Inspections" in , the fluid level ...or won 't correct a leak.If you add fluid when your linings areworn, then you'll have too much brake fluid, it can spill engine. The firstis that sooner or later your brake fluid. The on the brake hydraulicsystem. There are only two reasons the brake fluid level in ...
Owner's Manual
Page 238
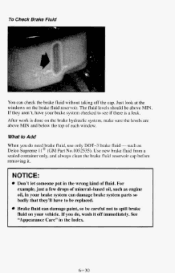
... to spill brake so fluid on your vehicle. Use new brake fluid from a sealed container only, and always clean the brake fluid reservoir cap before removing it off the cap. For of example, justa few drops of each window. Brake fluid can damage brake system parts badly thatthey'll have your... 11 (GM Part No. 1052535). What to see if there is done on the brake fluid reservoir. The fluid levels should be replaced. such as engine so oil, in your brake system checked to Add When you do need brake fluid, use only DOT-3 brake fluid - If you do , wash it...
... to spill brake so fluid on your vehicle. Use new brake fluid from a sealed container only, and always clean the brake fluid reservoir cap before removing it off the cap. For of example, justa few drops of each window. Brake fluid can damage brake system parts badly thatthey'll have your... 11 (GM Part No. 1052535). What to see if there is done on the brake fluid reservoir. The fluid levels should be replaced. such as engine so oil, in your brake system checked to Add When you do need brake fluid, use only DOT-3 brake fluid - If you do , wash it...

Owner's Manual
Page 277
Scheduled Maintenance Services Section IMPORTANT: KEEP ENGINE OIL AT THE PROPER LEVEL AND CHANGE AS RECOMMENDED This section covers the maintenance required foryour vehicle. The Plan supplements your vehicle in good condition...we breathe. To help protect our of important components can increase the level emissions fromyour vehicle. See your vehicle properly. 7-1 Improper vehicle maintenance or the removal of environment, and to retain its safety, dependability and emission control performance. Your vehicle needs these services to help keep your vehicle in good working...
Scheduled Maintenance Services Section IMPORTANT: KEEP ENGINE OIL AT THE PROPER LEVEL AND CHANGE AS RECOMMENDED This section covers the maintenance required foryour vehicle. The Plan supplements your vehicle in good condition...we breathe. To help protect our of important components can increase the level emissions fromyour vehicle. See your vehicle properly. 7-1 Improper vehicle maintenance or the removal of environment, and to retain its safety, dependability and emission control performance. Your vehicle needs these services to help keep your vehicle in good working...
Owner's Manual
Page 314
Parking Brake and Automatic Transmission PARK (P) Mechanism Check I To check the parking brake: With the engine running and transmission in NEUTRAL (N), slowly remove foot pressurefrom the regular brake pedal. M k sure thereis room in each shift lever position. Do this your could be damaged. To check the PARK (P) mechanism's ...
Parking Brake and Automatic Transmission PARK (P) Mechanism Check I To check the parking brake: With the engine running and transmission in NEUTRAL (N), slowly remove foot pressurefrom the regular brake pedal. M k sure thereis room in each shift lever position. Do this your could be damaged. To check the PARK (P) mechanism's ...

Owner's Manual
Page 315
... for leaking. Look for kinks and proper installation. 7-39 Remove all exposed control linkage. Oil the control lever pivotpoint and all external deposits from pulley. Accelerator Control System Lubricate all pivot points with engine oil, except the TBI throttle shaft. Transfer Case(AI/- ...Exhaust System Inspection Inspect the complete exhaust system. Inspect the body near the exhaust system. See "Engine Exhaust" the Index. Wheel Drive) Inspection Every 12 months or at transfer case for broken, damaged, missing or out-of lubrication...
... for leaking. Look for kinks and proper installation. 7-39 Remove all exposed control linkage. Oil the control lever pivotpoint and all external deposits from pulley. Accelerator Control System Lubricate all pivot points with engine oil, except the TBI throttle shaft. Transfer Case(AI/- ...Exhaust System Inspection Inspect the complete exhaust system. Inspect the body near the exhaust system. See "Engine Exhaust" the Index. Wheel Drive) Inspection Every 12 months or at transfer case for broken, damaged, missing or out-of lubrication...

Owner's Manual
Page 340
...Child Restraints") Torque Lock (See "Transmission-Torque Lock") 8 Seats (continued) Power Driver'sSeat ...1-2 Rearseats ...1-4 Reclining Bucket Seats ...1-3 Removable Seats (Touring and Non-Touring Bench Seats) ...1-7 Seatback Latches (Non-Touring Bench Seats) ...1-6 Service Doing Your Own Service Work ......6-1 PartsIdentificationLabel ...6-59 Publications ...8-8 Replacement Parts and Filter Recommendations ...6-68 Service Engine Soon Light (See "Lights") Shift Indicator Light (See "Lights") Shifting Into Park (P) ...2-22 Shifting Out of Park (P) ...2-24...
...Child Restraints") Torque Lock (See "Transmission-Torque Lock") 8 Seats (continued) Power Driver'sSeat ...1-2 Rearseats ...1-4 Reclining Bucket Seats ...1-3 Removable Seats (Touring and Non-Touring Bench Seats) ...1-7 Seatback Latches (Non-Touring Bench Seats) ...1-6 Service Doing Your Own Service Work ......6-1 PartsIdentificationLabel ...6-59 Publications ...8-8 Replacement Parts and Filter Recommendations ...6-68 Service Engine Soon Light (See "Lights") Shift Indicator Light (See "Lights") Shifting Into Park (P) ...2-22 Shifting Out of Park (P) ...2-24...


