
Owner's Manual
Page 26
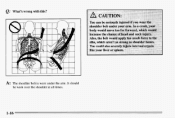
It should be worn over the shoulder at all times. 1-16 A: The shoulder belt is worn under the arm. What's wrong with this?
It should be worn over the shoulder at all times. 1-16 A: The shoulder belt is worn under the arm. What's wrong with this?
Owner's Manual
Page 204
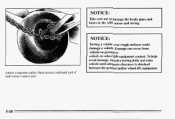
NOTICE: Take care not to -wheel-lift-equipment contact.To help avoid damage, install towing dollyand raise a vehicle until adequate clearance obtained is between the ground and/orwheel-lift equipment. NOTICE: Towing a vehicle over rough surfaces could damage a vehicle. Attach a separate safety chain around outboard end of each lower control arm. 5-10 Damage can occur from vehicle-to-ground or vehicle-to damage the brake pipes and hoses or the ABS sensor and wiring.
NOTICE: Take care not to -wheel-lift-equipment contact.To help avoid damage, install towing dollyand raise a vehicle until adequate clearance obtained is between the ground and/orwheel-lift equipment. NOTICE: Towing a vehicle over rough surfaces could damage a vehicle. Attach a separate safety chain around outboard end of each lower control arm. 5-10 Damage can occur from vehicle-to-ground or vehicle-to damage the brake pipes and hoses or the ABS sensor and wiring.

Owner's Manual
Page 279
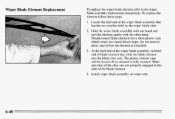
To remove the wiper blade assembly: 1. Lift the wiper arm until it locks into an upright position. 2. Reverse the steps with a new bulb. Turn counterclockwise and pull out the socket and the bulb. 4. Pull out the bulb. Wiper Blade Assembly Replacement 3. Replacement blades come in different types and are removed in different ways. 5. Press the locking tab down while sliding the blade assembly down.
To remove the wiper blade assembly: 1. Lift the wiper arm until it locks into an upright position. 2. Reverse the steps with a new bulb. Turn counterclockwise and pull out the socket and the bulb. 4. Pull out the bulb. Wiper Blade Assembly Replacement 3. Replacement blades come in different types and are removed in different ways. 5. Press the locking tab down while sliding the blade assembly down.
Owner's Manual
Page 280
Do not remove these steps: 1. Install wiper blade assembly on wiper arm. 6-48 Hold the wiper blade assembly withone hand and pull the element gently with theother hand. (Replacement blade elements have three plastic caps which retain ...
Do not remove these steps: 1. Install wiper blade assembly on wiper arm. 6-48 Hold the wiper blade assembly withone hand and pull the element gently with theother hand. (Replacement blade elements have three plastic caps which retain ...

