Owner's Manual
Page 5
With .o two-speed Powerglide automatic. transmiision, Blue Flame-six-cylinder engine, and gleaming Pola.White exterior, -I .ls*-' 8 P I . Corvelte began 'its drive into the, heart of movie--stars and celebrities. A handful went 'io project engineers, General Motors-managers, and a select group of America:. Designers freshened up the 'Velte in 1956by adding a r6movubte hardtop and the famous ~o?veth? In 1953, Chevrolel produmd 300 new lightweight fiberglass; . roadsters.
With .o two-speed Powerglide automatic. transmiision, Blue Flame-six-cylinder engine, and gleaming Pola.White exterior, -I .ls*-' 8 P I . Corvelte began 'its drive into the, heart of movie--stars and celebrities. A handful went 'io project engineers, General Motors-managers, and a select group of America:. Designers freshened up the 'Velte in 1956by adding a r6movubte hardtop and the famous ~o?veth? In 1953, Chevrolel produmd 300 new lightweight fiberglass; . roadsters.
Owner's Manual
Page 42
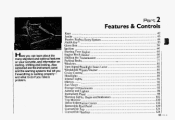
... and the warning systems that tellyou if everything is working properlyand what to do if you can learn aboutthe many standardand optional features on your Corvette.and information on starting. Turn SignaVHeadlight Beam Lever ...82 Windshield W i p e r s ~ a s h e...83 r Cruise Control ...84 ...Warning Lights, Gages and Indicators ...102 Trip Monitor...1IO Driver Information Center ...112 : Removable Roof Panel ...120 Convertible Top ...124 Convertible Hardtop ...128 41 - Part 2 Features & Controls Keys ...42 Locks ...43 Passive Keyless Entry System ...44 PASS-Key'" ...55 Glove Box...
... and the warning systems that tellyou if everything is working properlyand what to do if you can learn aboutthe many standardand optional features on your Corvette.and information on starting. Turn SignaVHeadlight Beam Lever ...82 Windshield W i p e r s ~ a s h e...83 r Cruise Control ...84 ...Warning Lights, Gages and Indicators ...102 Trip Monitor...1IO Driver Information Center ...112 : Removable Roof Panel ...120 Convertible Top ...124 Convertible Hardtop ...128 41 - Part 2 Features & Controls Keys ...42 Locks ...43 Passive Keyless Entry System ...44 PASS-Key'" ...55 Glove Box...
Owner's Manual
Page 94
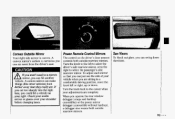
... select the driver's side rearview mirror, .or to the right to the center when your vehicle when you operate the rear window defogger-(c0up.eand hardtop convertible) or the power mirror defogger (convertible withouthardtop), a defogger-also warms both outside rearview mirrors. Turn-the.knob back to select the passenger's side marview...
... select the driver's side rearview mirror, .or to the right to the center when your vehicle when you operate the rear window defogger-(c0up.eand hardtop convertible) or the power mirror defogger (convertible withouthardtop), a defogger-also warms both outside rearview mirrors. Turn-the.knob back to select the passenger's side marview...
Owner's Manual
Page 96
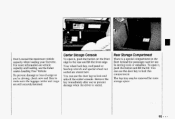
... driver-isseated. open it , push the button on vehicle capacity and loading, .see the Index under Loadhtg Your Vehicle. Your whed lock key, roofpanel or hardtop wrench and special wheelnut socket -arestored here. For more storage spa-ce. Removethe ley immediately afteruse to the rear and lift the.front edge. You... in-storingtools or valuables. 'To open it , push the.button -andlift the lid. Cenfer Storage Console Don't exceed the maximum vehicle capacity when loading your Corvette.
... driver-isseated. open it , push the button on vehicle capacity and loading, .see the Index under Loadhtg Your Vehicle. Your whed lock key, roofpanel or hardtop wrench and special wheelnut socket -arestored here. For more storage spa-ce. Removethe ley immediately afteruse to the rear and lift the.front edge. You... in-storingtools or valuables. 'To open it , push the.button -andlift the lid. Cenfer Storage Console Don't exceed the maximum vehicle capacity when loading your Corvette.
Owner's Manual
Page 129
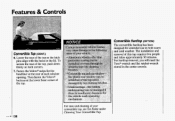
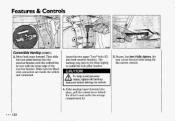
...corners: 7. Lower the rear of the top. To secure the rear of this top requires two people and takes approximately 30 minutes. For hardtop removal, you will need the Tom@ wrench and flat ratchet wrench stored'in the lid. Fasten the Velcro@ strips for extended use inboth warm... and cold weather. Features & Controls Converfible Hardtop (OPTION) Convertible Top (CONT.) 6. The convertible hardtop,has.:been designed:for the headliner at the lower kont corner of the top so the latch pins align with the holes...
...corners: 7. Lower the rear of the top. To secure the rear of this top requires two people and takes approximately 30 minutes. For hardtop removal, you will need the Tom@ wrench and flat ratchet wrench stored'in the lid. Fasten the Velcro@ strips for extended use inboth warm... and cold weather. Features & Controls Converfible Hardtop (OPTION) Convertible Top (CONT.) 6. The convertible hardtop,has.:been designed:for the headliner at the lower kont corner of the top so the latch pins align with the holes...
Owner's Manual
Page 131
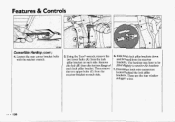
... pillar brackets down * with the ratchet wrench. and forward from the bottom flange of each side. Using the Torx@ wrench, remove the 6. Features & Controls Convertiible Hardtop (CONT.) 4.
... pillar brackets down * with the ratchet wrench. and forward from the bottom flange of each side. Using the Torx@ wrench, remove the 6. Features & Controls Convertiible Hardtop (CONT.) 4.
Owner's Manual
Page 132
... transmission into the normal st.orage-position.. the Index under See Lowering Your Cowertib1.eTop. Laww the-convertible top into (Reverse), R Realign the hardtop, if necessary. Shift a nuts into the tapered receivers. . T&h one. Then lower both windows.Turn off the.radio to lower the power ...antenna and then turn off the engine. Park on To Install Your Convertible Hardtop: 2. Lower, hardtop the parking brake fimily, shift an slowly, aligning the rear bolt spacers automatic transmissioninto P (Park), onto the bezels,and front ....
... transmission into the normal st.orage-position.. the Index under See Lowering Your Cowertib1.eTop. Laww the-convertible top into (Reverse), R Realign the hardtop, if necessary. Shift a nuts into the tapered receivers. . T&h one. Then lower both windows.Turn off the.radio to lower the power ...antenna and then turn off the engine. Park on To Install Your Convertible Hardtop: 2. Lower, hardtop the parking brake fimily, shift an slowly, aligning the rear bolt spacers automatic transmissioninto P (Park), onto the bezels,and front ....
Owner's Manual
Page 133
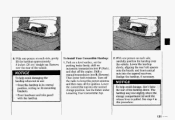
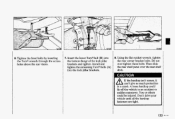
...but don't fully tighten, the rear corner bracket bdts using the flat ratchet wrench. A' To help,avbid.p&oial . ,injury,,tighten hardtop all .fastenersbefore driving the vehicle. Then slide the lock pillar bracketinto the receiver bracket untilthe scribed line is even with the lower ... the receiver bracket. Insert thetwo upper Tarx@ bolts (C) into the driver3 seat.under the storage compartment lid. . . Move both receiver brackets:.The hardtop may have-to be lifted slightly to install the lock pillar bracket. 5. I I 32 place, pull the release lever -behind ,. 4. Make-...
...but don't fully tighten, the rear corner bracket bdts using the flat ratchet wrench. A' To help,avbid.p&oial . ,injury,,tighten hardtop all .fastenersbefore driving the vehicle. Then slide the lock pillar bracketinto the receiver bracket untilthe scribed line is even with the lower ... the receiver bracket. Insert thetwo upper Tarx@ bolts (C) into the driver3 seat.under the storage compartment lid. . . Move both receiver brackets:.The hardtop may have-to be lifted slightly to install the lock pillar bracket. 5. I I 32 place, pull the release lever -behind ,. 4. Make-...
Owner's Manual
Page 134
... deck.. A loose hardt0.p co.uld fly .offthe;vehicle accident or sudden maneuver. You or others could be injured. Don't :&tie your vehicle until all the hardtop hsteners .aretight.. d 6. :Tighten the front boltsby inserting the Torx@wrench, through the access holes above the sun visors. 7.
... deck.. A loose hardt0.p co.uld fly .offthe;vehicle accident or sudden maneuver. You or others could be injured. Don't :&tie your vehicle until all the hardtop hsteners .aretight.. d 6. :Tighten the front boltsby inserting the Torx@wrench, through the access holes above the sun visors. 7.
Owner's Manual
Page 139
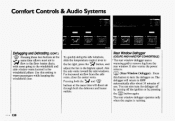
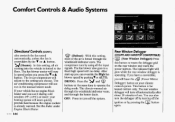
... Comfort Controls & Audio Systems Defogging and Defrosting ( c o w Pressing these two buttons at thesame time willdirect air through both the defroster and heater outlets. (COUPE AND HARDTOP CONVERTIBLE) -2. 2 *A The rear window defogger uses a warming grid to remove fog from the side vents, close the center vents. For increased air flow from the...
... Comfort Controls & Audio Systems Defogging and Defrosting ( c o w Pressing these two buttons at thesame time willdirect air through both the defroster and heater outlets. (COUPE AND HARDTOP CONVERTIBLE) -2. 2 *A The rear window defogger uses a warming grid to remove fog from the side vents, close the center vents. For increased air flow from the...
Owner's Manual
Page 140
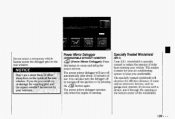
... for your vehicle. The power mirror defugger willturn off automatically afterabout 10 minutes .of some add-on the rear window. (COW€RT/BLE WITHOUT HARDTOP) SpecMy Tieated Windshield (ZR-7) 4 (Power,MirrorDefogger): Press this buttqn to keep you use such a device, aimit through the opening at the bottom center of the...
... for your vehicle. The power mirror defugger willturn off automatically afterabout 10 minutes .of some add-on the rear window. (COW€RT/BLE WITHOUT HARDTOP) SpecMy Tieated Windshield (ZR-7) 4 (Power,MirrorDefogger): Press this buttqn to keep you use such a device, aimit through the opening at the bottom center of the...
Owner's Manual
Page 145
... motor will not. run in speed unless yowpress the Vur A button. about 10 minutes.of the air is defog mode. Rear Window Defogger (COUPE AND HARDTOP CONVERTlBLE) (Defrost): With this setting, all the input on your climate buttons at the same time to operate the control system. Comfort Controls & Audio Systems...
... motor will not. run in speed unless yowpress the Vur A button. about 10 minutes.of the air is defog mode. Rear Window Defogger (COUPE AND HARDTOP CONVERTlBLE) (Defrost): With this setting, all the input on your climate buttons at the same time to operate the control system. Comfort Controls & Audio Systems...
Owner's Manual
Page 301
.... Service & Appearance Care Hardtop Care Your optional hardtop has the same durable finish as the painted surfaces of your hardtop is stored for an extended period, keep it covered in a dry place. Apply silicone grease or ArmorAll@to the colored basecoat. Your hardtop may be necessary to remove residue from your Corvette may be cleaned...
.... Service & Appearance Care Hardtop Care Your optional hardtop has the same durable finish as the painted surfaces of your hardtop is stored for an extended period, keep it covered in a dry place. Apply silicone grease or ArmorAll@to the colored basecoat. Your hardtop may be necessary to remove residue from your Corvette may be cleaned...
Owner's Manual
Page 359
...in Exhaust ...59, 79, 80, 2 158 Cleaner. Safety Belt Systems ...37 Glass ...295Transmission Fluids ...257,258, 259 .Hardtop ...300 Checking Things Under the Hood ...245 h i d e of Your Corvette ...21 50 C h ~ d Spotting ...Paint 303 Instrument Panel ...294 CMd Restraints ...33 Leather or Vinyl ...293 C... W h n and Safety Belts...32, 36 Outside of Your Corvette ...296. Power Antenna ...161 Cigarette Lighter...96 Cinch F a w e ...24 Removable Roof Panels ...297 Circuit Breakers & Fuses ...305 Safety Belts...
...in Exhaust ...59, 79, 80, 2 158 Cleaner. Safety Belt Systems ...37 Glass ...295Transmission Fluids ...257,258, 259 .Hardtop ...300 Checking Things Under the Hood ...245 h i d e of Your Corvette ...21 50 C h ~ d Spotting ...Paint 303 Instrument Panel ...294 CMd Restraints ...33 Leather or Vinyl ...293 C... W h n and Safety Belts...32, 36 Outside of Your Corvette ...296. Power Antenna ...161 Cigarette Lighter...96 Cinch F a w e ...24 Removable Roof Panels ...297 Circuit Breakers & Fuses ...305 Safety Belts...
Owner's Manual
Page 360
...195 In a Foreign Country...243 In Fog, Mist and Haze ...189 In the Rain...186 Long Distance ...193 Loss of a Vehicle ...171 Convertible Hardtop ...128 Convertible Top ...124 Convex Outside Mirror ...93 Coolant ...216, 262, 263,311, 317 Checking & Adding .. 216,218,222,262,263...268 Low Coolant Light ...112 Proper Mixtureto Use ...217. 262 S.a€ety Warnings ...106, 217.263.264. 267 . Temperature Gage ...106 Corvette Action Center ...343 Cruise Control ...-84 Cup Holder ...96 Curves, Driving on ...179 Customer AssistanceInfomation ...341 DB (Delayed AccessoryBus)...57 A Daytime Running Lights...
...195 In a Foreign Country...243 In Fog, Mist and Haze ...189 In the Rain...186 Long Distance ...193 Loss of a Vehicle ...171 Convertible Hardtop ...128 Convertible Top ...124 Convex Outside Mirror ...93 Coolant ...216, 262, 263,311, 317 Checking & Adding .. 216,218,222,262,263...268 Low Coolant Light ...112 Proper Mixtureto Use ...217. 262 S.a€ety Warnings ...106, 217.263.264. 267 . Temperature Gage ...106 Corvette Action Center ...343 Cruise Control ...-84 Cup Holder ...96 Curves, Driving on ...179 Customer AssistanceInfomation ...341 DB (Delayed AccessoryBus)...57 A Daytime Running Lights...