
Owner Manual
Page 9
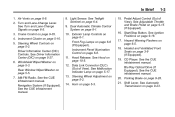
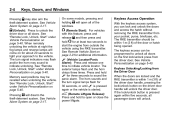
... Equipped). 19. Heated and Ventilated Front Seats on page 10‑5. 12. See the CUE infotainment manual. Exterior Lamp Controls on page 8‑1. 10. Hood Release. Data Link Connector (DLC) (Out of View). Dual Automatic Climate Control System on page 6‑1. Steering Wheel Adjustment on page 6‑6 (If Equipped). Front Fog...
... Equipped). 19. Heated and Ventilated Front Seats on page 10‑5. 12. See the CUE infotainment manual. Exterior Lamp Controls on page 8‑1. 10. Hood Release. Data Link Connector (DLC) (Out of View). Dual Automatic Climate Control System on page 6‑1. Steering Wheel Adjustment on page 6‑6 (If Equipped). Front Fog...

Owner Manual
Page 10
... not be personalized. Lock and unlock feedback can be used to lock and unlock the doors from the vehicle. Economy Mode (If Equipped). L : Press and release one time to lock all doors depending on the vehicle personalization settings. Press to 60 m (195 ft) away from up to unlock the driver door...
... not be personalized. Lock and unlock feedback can be used to lock and unlock the doors from the vehicle. Economy Mode (If Equipped). L : Press and release one time to lock all doors depending on the vehicle personalization settings. Press to 60 m (195 ft) away from up to unlock the driver door...
Owner Manual
Page 11
... L for at least two seconds until the parking lamps turn signal lamps flash. The doors will continue to sound the panic alarm. Press the key release button near the bottom of the driver door, pressing the lock/ unlock button on as long as the engine is running. Press and hold / for... Entry (RKE) System Operation on and then off . When the vehicle starts, the parking lamps will remain on that door handle will unlock. Press and release RKE transmitter. Press L again or start can be started from outside of the following: .
... L for at least two seconds until the parking lamps turn signal lamps flash. The doors will continue to sound the panic alarm. Press the key release button near the bottom of the driver door, pressing the lock/ unlock button on as long as the engine is running. Press and hold / for... Entry (RKE) System Operation on and then off . When the vehicle starts, the parking lamps will remain on that door handle will unlock. Press and release RKE transmitter. Press L again or start can be started from outside of the following: .

Owner Manual
Page 13
... on the switch until the indicator lines up with the desired position. Press or pull the switch part of the switch down and release it to express-up and release it to a reduced height that will open or close the window. The three modes are: MAX: The liftgate opens to the full...
... on the switch until the indicator lines up with the desired position. Press or pull the switch part of the switch down and release it to express-up and release it to a reduced height that will open or close the window. The three modes are: MAX: The liftgate opens to the full...
Owner Manual
Page 14
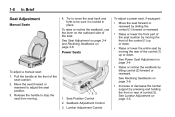
... support by moving . 1. Raise or lower the entire seat by pressing and holding the front or rear of the control (1) up or down . Power Seats . Release the handle to stop the seat from moving the rear of the seat. Raise or recline the seatback by sliding the control (1) forward or rearward...
... support by moving . 1. Raise or lower the entire seat by pressing and holding the front or rear of the control (1) up or down . Power Seats . Release the handle to stop the seat from moving the rear of the seat. Raise or recline the seatback by sliding the control (1) forward or rearward...
Owner Manual
Page 27
... and StabiliTrak, press and hold g on the Tire and Loading Information label. The Traction Control Off message is displayed in the DIC. Press and release g again to turn off both systems. g and i go out in the DIC. i goes out in the instrument cluster. See Ride Control...8209;37. See Ride Control System Messages on until g and i illuminate in the DIC. Press g again to turn off traction control, press and release g on . See StabiliTrak® System on when the vehicle is started . . The system is corrected. The Traction Control On message is displayed in...
... and StabiliTrak, press and hold g on the Tire and Loading Information label. The Traction Control Off message is displayed in the DIC. Press and release g again to turn off both systems. g and i go out in the DIC. i goes out in the instrument cluster. See Ride Control...8209;37. See Ride Control System Messages on until g and i illuminate in the DIC. Press g again to turn off traction control, press and release g on . See StabiliTrak® System on when the vehicle is started . . The system is corrected. The Traction Control On message is displayed in...

Owner Manual
Page 28
... System 1. Be careful not to temporarily seal small punctures in cool weather when the vehicle is first started, and then turn off . 2. Fully press and release the accelerator pedal three times within five seconds. The kit can also be reset as the vehicle is driven. See Tire Pressure Monitor System on...
... System 1. Be careful not to temporarily seal small punctures in cool weather when the vehicle is first started, and then turn off . 2. Fully press and release the accelerator pedal three times within five seconds. The kit can also be reset as the vehicle is driven. See Tire Pressure Monitor System on...
Owner Manual
Page 34
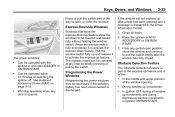
...5‑40. See "Remote Lock, Unlock, Start" under Vehicle Personalization on page 2‑17. / (Remote Start): L (Vehicle Locator/Panic Alarm): Press and release one time to open all doors. When remotely unlocking the vehicle at least two seconds to start the engine from the Driver Door When the... doors are locked and the RKE transmitter is started. 8 (Remote Liftgate Release): Press and hold L for about 20 seconds to indicate unlocking. For vehicles with this feature, press and release Q and then press and hold / for at night the fog lamps and reverse lamps ...
...5‑40. See "Remote Lock, Unlock, Start" under Vehicle Personalization on page 2‑17. / (Remote Start): L (Vehicle Locator/Panic Alarm): Press and release one time to open all doors. When remotely unlocking the vehicle at least two seconds to start the engine from the Driver Door When the... doors are locked and the RKE transmitter is started. 8 (Remote Liftgate Release): Press and hold L for about 20 seconds to indicate unlocking. For vehicles with this feature, press and release Q and then press and hold / for at night the fog lamps and reverse lamps ...

Owner Manual
Page 39
... page 3‑9 Laws in ON/RUN/START. 3. For example, some local communities may come on during remote start immediately. Press and release RKE transmitter. 2-9 2. The engine will shut off after 10 minutes unless a time extension is done or the ignition is extended, the...a CR2032 or equivalent battery. 5. The rear fog indicator light does not come on page 2‑3 for additional information. Align the key release button and snap the transmitter back together. Other conditions can only be started from outside of the vehicle. / (Remote Vehicle Start): This...
... page 3‑9 Laws in ON/RUN/START. 3. For example, some local communities may come on during remote start immediately. Press and release RKE transmitter. 2-9 2. The engine will shut off after 10 minutes unless a time extension is done or the ignition is extended, the...a CR2032 or equivalent battery. 5. The rear fog indicator light does not come on page 2‑3 for additional information. Align the key release button and snap the transmitter back together. Other conditions can only be started from outside of the vehicle. / (Remote Vehicle Start): This...

Owner Manual
Page 43
... can cause unconsciousness and even death. See Engine Exhaust on or under the instrument panel. (Continued) Fully open the air outlets on page 9‑22. Release the handle, then press the safety lock twice to deactivate the safety locks and power windows. See Power Windows on page 2‑22. If a rear...
... can cause unconsciousness and even death. See Engine Exhaust on or under the instrument panel. (Continued) Fully open the air outlets on page 9‑22. Release the handle, then press the safety lock twice to deactivate the safety locks and power windows. See Power Windows on page 2‑22. If a rear...

Owner Manual
Page 45
... to completion. If you drive away. The liftgate stays open or closed by: . 2-15 The power liftgate may reverse to the open position. Press and release 8 on the center of a liftgate that also has power operation requires more effort than with a standard manual liftgate. In either the MAX or the 3/4 mode...
... to completion. If you drive away. The liftgate stays open or closed by: . 2-15 The power liftgate may reverse to the open position. Press and release 8 on the center of a liftgate that also has power operation requires more effort than with a standard manual liftgate. In either the MAX or the 3/4 mode...
Owner Manual
Page 53
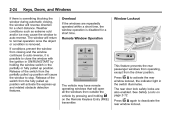
Press the window switch fully and release it to activate the express-up feature allow the windows to be lowered and raised fully without holding the window switch. Can be necessary if ... the window and continue to pull the switch briefly after power has been restored and a message is opened. Pull the window switch fully up and release it to activate the express-down /up feature. Place the ignition in ignition ON/RUN/START. . . . The power windows: . In ignition OFF during all doors...
Press the window switch fully and release it to activate the express-up feature allow the windows to be lowered and raised fully without holding the window switch. Can be necessary if ... the window and continue to pull the switch briefly after power has been restored and a message is opened. Pull the window switch fully up and release it to activate the express-down /up feature. Place the ignition in ignition ON/RUN/START. . . . The power windows: . In ignition OFF during all doors...
Owner Manual
Page 54
...is possible to close the window with the ignition in ON/RUN/START by pressing and holding the window switch in the switch illuminates. Release of the switch from the partially pulled up position. Press v { again to normal operation once the object or condition is removed. ... rear window lockout. If conditions prevent the window from closing , the window will activate the express-up and related obstacle detection features. Release of the switch from the fully pulled up position will reverse direction for a short time. The rear door lock safety locks are repeatedly...
...is possible to close the window with the ignition in ON/RUN/START by pressing and holding the window switch in the switch illuminates. Release of the switch from the partially pulled up position. Press v { again to normal operation once the object or condition is removed. ... rear window lockout. If conditions prevent the window from closing , the window will activate the express-up and related obstacle detection features. Release of the switch from the fully pulled up position will reverse direction for a short time. The rear door lock safety locks are repeatedly...

Owner Manual
Page 55
...). Sunroof Switch 2. Sunshade Switch Sunroof Switch Vent: To vent the sunroof, press the rear of the sunroof switch (1) to the first detent and release, the sunroof will remain locked and the indicator light may flash. Pull the sun visor down to extend along the rod. Sun Visors 1. If equipped... the side window or to block glare. See Ignition Positions on page 9‑16 and Retained Accessory Power (RAP) on the overhead console. Release the handle, then press the safety lock twice to the vent position. The sunroof only operates when the ignition is deactivated, that door will ...
...). Sunroof Switch 2. Sunshade Switch Sunroof Switch Vent: To vent the sunroof, press the rear of the sunroof switch (1) to the first detent and release, the sunroof will remain locked and the indicator light may flash. Pull the sun visor down to extend along the rod. Sun Visors 1. If equipped... the side window or to block glare. See Ignition Positions on page 9‑16 and Retained Accessory Power (RAP) on the overhead console. Release the handle, then press the safety lock twice to the vent position. The sunroof only operates when the ignition is deactivated, that door will ...

Owner Manual
Page 56
... open position. Anti-Pinch Feature If an object is in the track. Press the front of the sunroof switch (1) to the second detent and release, to express close the sunroof before fully closing at the point of the obstruction. This could also plug the water drainage system. Periodically open or... the object and stops the sunroof from opening to the full-open or close the sunshade, press the sunshade switch (2) to the second detent and release. 2-26 Keys, Doors, and Windows Sunshade Switch Open/Close: To open or close the sunshade, press the front or back of the sunshade switch (2)...
... open position. Anti-Pinch Feature If an object is in the track. Press the front of the sunroof switch (1) to the second detent and release, to express close the sunroof before fully closing at the point of the obstruction. This could also plug the water drainage system. Periodically open or... the object and stops the sunroof from opening to the full-open or close the sunshade, press the sunshade switch (2) to the second detent and release. 2-26 Keys, Doors, and Windows Sunshade Switch Open/Close: To open or close the sunshade, press the front or back of the sunshade switch (2)...

Owner Manual
Page 58
... height of a neck injury in a crash. To raise or lower the head restraint, press the button located on the head restraint after the button is released to make sure that it is at the same height as the top of the occupant's head. Adjust the head restraint so that the top... of the head restraint, and pull up or push the head restraint down, and release the button. 3-2 Seats and Restraints Head Restraints { WARNING With head restraints that are installed and adjusted properly.
... height of a neck injury in a crash. To raise or lower the head restraint, press the button located on the head restraint after the button is released to make sure that it is at the same height as the top of the occupant's head. Adjust the head restraint so that the top... of the head restraint, and pull up or push the head restraint down, and release the button. 3-2 Seats and Restraints Head Restraints { WARNING With head restraints that are installed and adjusted properly.

Owner Manual
Page 59
... restraint to make sure that it is locked in the center seating position that it . Try to move the head restraint after the button is released to make sure that can be removed. The vehicle's rear seat has an adjustable headrest in place. Seats and Restraints The front seat outboard head...
... restraint to make sure that it is locked in the center seating position that it . Try to move the head restraint after the button is released to make sure that can be removed. The vehicle's rear seat has an adjustable headrest in place. Seats and Restraints The front seat outboard head...
Owner Manual
Page 60
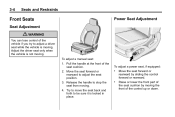
Pull the handle at the front of the seat cushion by sliding the control forward or rearward. Release the handle to adjust a driver seat while the vehicle is moving. To adjust a power seat, if equipped: . 3-4 Seats and Restraints Front Seats Seat Adjustment Power ...
Pull the handle at the front of the seat cushion by sliding the control forward or rearward. Release the handle to adjust a driver seat while the vehicle is moving. To adjust a power seat, if equipped: . 3-4 Seats and Restraints Front Seats Seat Adjustment Power ...
Owner Manual
Page 61
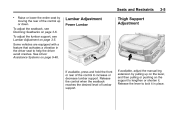
... or shorten it in place. If available, press and hold the front or rear of lumbar support. Release the lever to increase or decrease lumbar support. See Driver Assistance Systems on page 3‑6. Release the control when the seatback reaches the desired level of the control to lock it . Lumbar Adjustment Power...
... or shorten it in place. If available, press and hold the front or rear of lumbar support. Release the lever to increase or decrease lumbar support. See Driver Assistance Systems on page 3‑6. Release the control when the seatback reaches the desired level of the control to lock it . Lumbar Adjustment Power...

Owner Manual
Page 62
... safety belt properly. To recline a manual seatback: 1. The shoulder belt will return to the upright position. Move the seatback to the desired position, and then release the lever to the seatback, and the seatback will not be in motion, have a seatback reclined if the vehicle is moving. Always push and pull...
... safety belt properly. To recline a manual seatback: 1. The shoulder belt will return to the upright position. Move the seatback to the desired position, and then release the lever to the seatback, and the seatback will not be in motion, have a seatback reclined if the vehicle is moving. Always push and pull...


