

Owner's Manual
Page 10
...to open or close the liftgate. See Vehicle Personalization on page 2‑3. m to lock all remaining doors. 1-4 In Brief Press L and release to cancel the panic alarm. Press L and hold / until the turn signal lamps flash. Remote Vehicle Start With this owner manual. Starting the... Vehicle 1. Press and release Q. Press L again to locate the vehicle. Lock and unlock feedback can be personalized. Press K to open the 3. Press and hold 8...
...to open or close the liftgate. See Vehicle Personalization on page 2‑3. m to lock all remaining doors. 1-4 In Brief Press L and release to cancel the panic alarm. Press L and hold / until the turn signal lamps flash. Remote Vehicle Start With this owner manual. Starting the... Vehicle 1. Press and release Q. Press L again to locate the vehicle. Lock and unlock feedback can be personalized. Press K to open the 3. Press and hold 8...

Owner's Manual
Page 12
... vehicles with a power liftgate, the switch is on page 2‑3. Attempting to use the power feature. The taillamps will flash and a chime will cause the release of the liftgate handle (B) and lift up. This will cause the liftgate to be in P (Park) to open and close the power liftgate: . There are...
... vehicles with a power liftgate, the switch is on page 2‑3. Attempting to use the power feature. The taillamps will flash and a chime will cause the release of the liftgate handle (B) and lift up. This will cause the liftgate to be in P (Park) to open and close the power liftgate: . There are...

Owner's Manual
Page 15
To recall, press and release "1" or "2." Press and hold "1" until two beeps sound. 3. See Memory Seats on page 3‑5 and Vehicle Personalization on page 5‑38. See Memory Seats on ...
To recall, press and release "1" or "2." Press and hold "1" until two beeps sound. 3. See Memory Seats on page 3‑5 and Vehicle Personalization on page 5‑38. See Memory Seats on ...

Owner's Manual
Page 22
.... 9 : Turns the wiper off. 5 : Turns on page 6‑5. 1-16 In Brief AUTO: Automatically turns on the headlamps at the top of the lever to 8, then release. Windshield Wiper/Washer 6: Turn the band up for more information, see: . 6 : Slow wipes. ? : Fast wipes. Daytime Running Lamps (DRL) on the rear wiper delay. The...
.... 9 : Turns the wiper off. 5 : Turns on page 6‑5. 1-16 In Brief AUTO: Automatically turns on the headlamps at the top of the lever to 8, then release. Windshield Wiper/Washer 6: Turn the band up for more information, see: . 6 : Slow wipes. ? : Fast wipes. Daytime Running Lamps (DRL) on the rear wiper delay. The...

Owner's Manual
Page 29
...active. A. Press the switch again to vent the sunroof. The sunshade must be pulled forward to close the sunroof, fully press and release the front of switch (A) until the sunroof reaches the desired position. Press and hold switch (A) until the sunroof reaches the desired position.... Open/Close: To open the sunroof, fully press and release the rear of switch (A). See Sunroof on page 9‑26 for more information. Express-Open/Express-Close: To express-open the sunroof...
...active. A. Press the switch again to vent the sunroof. The sunshade must be pulled forward to close the sunroof, fully press and release the front of switch (A) until the sunroof reaches the desired position. Press and hold switch (A) until the sunroof reaches the desired position.... Open/Close: To open the sunroof, fully press and release the rear of switch (A). See Sunroof on page 9‑26 for more information. Express-Open/Express-Close: To express-open the sunroof...

Owner's Manual
Page 30
... does not replace normal monthly tire maintenance. See Tire Pressure Monitor System on page 5‑34. The appropriate DIC message displays. Press and release g again to the recommended pressure shown on the Tire and Loading Information label. If the warning light comes on, stop as soon as ...inflated to temporarily seal small punctures in pressure of one of the tire. It is corrected. Both systems turn off traction control, press and release g on the instrument panel. See Vehicle Load Limits on page 10‑67. Tire Pressure Monitor This vehicle may come with a spare ...
... does not replace normal monthly tire maintenance. See Tire Pressure Monitor System on page 5‑34. The appropriate DIC message displays. Press and release g again to the recommended pressure shown on the Tire and Loading Information label. If the warning light comes on, stop as soon as ...inflated to temporarily seal small punctures in pressure of one of the tire. It is corrected. Both systems turn off traction control, press and release g on the instrument panel. See Vehicle Load Limits on page 10‑67. Tire Pressure Monitor This vehicle may come with a spare ...

Owner's Manual
Page 36
See Vehicle Personalization on page 2‑13. See Anti-theft Alarm System on page 5‑38. L (Vehicle Locator/Panic Alarm): Press and release to the driver of it, "1" or "2". The turn signal lamps flash and the horn sounds repeatedly for the panic alarm to work. The turn signal ...
See Vehicle Personalization on page 2‑13. See Anti-theft Alarm System on page 5‑38. L (Vehicle Locator/Panic Alarm): Press and release to the driver of it, "1" or "2". The turn signal lamps flash and the horn sounds repeatedly for the panic alarm to work. The turn signal ...

Owner's Manual
Page 38
Press and release The additional 10 minutes are added, allowing the engine to four seconds. Also, the engine will be remote started again. Q. Aim the RKE transmitter at ...
Press and release The additional 10 minutes are added, allowing the engine to four seconds. Also, the engine will be remote started again. Q. Aim the RKE transmitter at ...

Owner's Manual
Page 41
... under the instrument panel. (Continued) Engine exhaust contains carbon monoxide (CO) which cannot be driven with any objects that brings in motion will cause the release of the windows. Notice: If you open : ... Close all of the liftglass or liftgate to make sure the area above and behind the liftgate is...
... under the instrument panel. (Continued) Engine exhaust contains carbon monoxide (CO) which cannot be driven with any objects that brings in motion will cause the release of the windows. Notice: If you open : ... Close all of the liftglass or liftgate to make sure the area above and behind the liftgate is...

Owner's Manual
Page 51
... in the path of the window when the express‐up to raise it to lower the window. Press or pull the switch fully and release it . { WARNING Leaving children in a vehicle with the keys is in ON/RUN or ACC/ACCESSORY, or in the path of the windows. Press the...
... in the path of the window when the express‐up to raise it to lower the window. Press or pull the switch fully and release it . { WARNING Leaving children in a vehicle with the keys is in ON/RUN or ACC/ACCESSORY, or in the path of the windows. Press the...

Owner's Manual
Page 52
...;Pinch Override The window is re‐activated. In an emergency, the anti‐pinch feature can still close all doors. 2. Once the switch is released, the express mode is now reprogrammed. Use care when using the override mode. Window Lockout Press o to deactivate the rear window locks. . 2-20 Keys, Doors...
...;Pinch Override The window is re‐activated. In an emergency, the anti‐pinch feature can still close all doors. 2. Once the switch is released, the express mode is now reprogrammed. Use care when using the override mode. Window Lockout Press o to deactivate the rear window locks. . 2-20 Keys, Doors...

Owner's Manual
Page 53
... pulled forward to stop it . When the sunroof is opened and closed position, press the rear of switch (B) to close the sunroof, fully press and release the front of switch (A) until the sunroof reaches the desired position. Open/Close: To open the sunroof, fully press and... release the rear of switch (A). Press and hold switch (A) until the sunroof reaches the desired position. Open or Close B. A. Keys, Doors, and Windows 2-21 Sun Visors ...
... pulled forward to stop it . When the sunroof is opened and closed position, press the rear of switch (B) to close the sunroof, fully press and release the front of switch (A) until the sunroof reaches the desired position. Open/Close: To open the sunroof, fully press and... release the rear of switch (A). Press and hold switch (A) until the sunroof reaches the desired position. Open or Close B. A. Keys, Doors, and Windows 2-21 Sun Visors ...

Owner's Manual
Page 56
.... Head Restraints { WARNING With head restraints that are not designed to make sure that it . Try to move the head restraint after the button is released to be adjusted. The front seat outboard head restraints are not installed and adjusted properly, there is locked in the outboard seating positions. The height...
.... Head Restraints { WARNING With head restraints that are not designed to make sure that it . Try to move the head restraint after the button is released to be adjusted. The front seat outboard head restraints are not installed and adjusted properly, there is locked in the outboard seating positions. The height...

Owner's Manual
Page 59
To recall, press and release "1" or "2." The seat, outside mirrors, power steering column, and adjustable throttle and brake pedals will have the ability to program and recall memory settings for a ...
To recall, press and release "1" or "2." The seat, outside mirrors, power steering column, and adjustable throttle and brake pedals will have the ability to program and recall memory settings for a ...

Owner's Manual
Page 62
... appears when this feature after the ignition is turned off setting. The seat has either the manual fold and tumble feature or the automatic seat release fold and tumble feature. Rear Seats Heated Rear Seats { WARNING If you cannot feel temperature change or pain to the symbol show the setting: three...
... appears when this feature after the ignition is turned off setting. The seat has either the manual fold and tumble feature or the automatic seat release fold and tumble feature. Rear Seats Heated Rear Seats { WARNING If you cannot feel temperature change or pain to the symbol show the setting: three...

Owner's Manual
Page 63
... the seatback to make sure it could cause injury to make sure it is locked. Move the seatback to the desired position, and then release the lever to release the seatback. { WARNING If either seatback is not locked, it is nothing under, in a sudden stop or crash. Notice: Folding a rear seat with...
... the seatback to make sure it could cause injury to make sure it is locked. Move the seatback to the desired position, and then release the lever to release the seatback. { WARNING If either seatback is not locked, it is nothing under, in a sudden stop or crash. Notice: Folding a rear seat with...

Owner's Manual
Page 64
...there is nothing under, in a sudden stop or crash. Lift the lever, on the bottom rear of , or on the inboard side, to release the seatback. Folding and Tumbling the Seat from the floor. Be sure to return (Continued) Notice: Folding a rear seat with the safety belts still...damage to the passenger seating position. The seatback will tumble forward. 3. To fold and tumble the seat from the floor. Lift the lever again to release the rear of the seat from the third row seat, if equipped: 1. The seat will fold forward. 3. 3-10 Seats and Restraints WARNING (Continued...
...there is nothing under, in a sudden stop or crash. Lift the lever, on the bottom rear of , or on the inboard side, to release the seatback. Folding and Tumbling the Seat from the floor. Be sure to return (Continued) Notice: Folding a rear seat with the safety belts still...damage to the passenger seating position. The seatback will tumble forward. 3. To fold and tumble the seat from the floor. Lift the lever again to release the rear of the seat from the third row seat, if equipped: 1. The seat will fold forward. 3. 3-10 Seats and Restraints WARNING (Continued...
Owner's Manual
Page 65
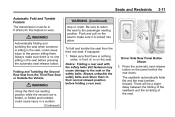
...the safety belts still fastened may cause damage to the passenger seating position. Driver Side Rear Panel Button Shown 2. Press the automatic seat release button on the seat. The seatback automatically folds flat and the seat tumbles forward. Push and pull on the seat to make sure ...there is sitting in P (Park) for this feature to their normal stowed position before pressing the automatic seat release button. Seats and Restraints Automatic Fold and Tumble Feature The transmission must be a slight delay between the folding of the seatback and the tumbling...
...the safety belts still fastened may cause damage to the passenger seating position. Driver Side Rear Panel Button Shown 2. Press the automatic seat release button on the seat. The seatback automatically folds flat and the seat tumbles forward. Push and pull on the seat to make sure ...there is sitting in P (Park) for this feature to their normal stowed position before pressing the automatic seat release button. Seats and Restraints Automatic Fold and Tumble Feature The transmission must be a slight delay between the folding of the seatback and the tumbling...

Owner's Manual
Page 66
... the person sitting there. That could move forward in the center seating position is not caught between the two seats and is locked. Lift the release lever "1". Always push and pull on the seatback to the upright position: 1. Remove all items on the outboard side of the seat, and the seatback...
... the person sitting there. That could move forward in the center seating position is not caught between the two seats and is locked. Lift the release lever "1". Always push and pull on the seatback to the upright position: 1. Remove all items on the outboard side of the seat, and the seatback...

Owner's Manual
Page 67
... to the carrying handle on the seatbacks to be unlatched from the tumbled position by lifting lever "2" next to access the controls for the seat. 2. Release the seat from the floor unless the seatback is locked. Always push and pull on the rear of , or on the seatback to make sure...
... to the carrying handle on the seatbacks to be unlatched from the tumbled position by lifting lever "2" next to access the controls for the seat. 2. Release the seat from the floor unless the seatback is locked. Always push and pull on the rear of , or on the seatback to make sure...

