
Owner's Manual
Page 26
... Assist (URPA) uses sensors on automatically when the shift lever is enabled at speeds less than 8 km/h (5 mph). URPA comes on the rear bumper to ensure proper operation. The system is moved into R (Reverse). The sensor may also activate during heavy rain or due to road spray. Keep... to the last screen that had been displayed, after a delay. If the message SIDE BLIND ZONE SYSTEM UNAVAILABLE appears on the vehicle's rear bumper clean to detect objects while parking the vehicle. Once shifted out of the area behind the vehicle on page 9‑54 for more information. ...
... Assist (URPA) uses sensors on automatically when the shift lever is enabled at speeds less than 8 km/h (5 mph). URPA comes on the rear bumper to ensure proper operation. The system is moved into R (Reverse). The sensor may also activate during heavy rain or due to road spray. Keep... to the last screen that had been displayed, after a delay. If the message SIDE BLIND ZONE SYSTEM UNAVAILABLE appears on the vehicle's rear bumper clean to detect objects while parking the vehicle. Once shifted out of the area behind the vehicle on page 9‑54 for more information. ...

Owner's Manual
Page 105
... on page 3‑44. The passenger sensing system may not operate properly if the original seat trim is qualified to or change the vehicle's frame, bumper system, height, front end or side sheet metal, they may have any parts of the front seats, safety belts, the airbag sensing and diagnostic module...
... on page 3‑44. The passenger sensing system may not operate properly if the original seat trim is qualified to or change the vehicle's frame, bumper system, height, front end or side sheet metal, they may have any parts of the front seats, safety belts, the airbag sensing and diagnostic module...

Owner's Manual
Page 134
... to spread the load. Also tie the load to the crossrails or the siderail supports. If plywood is properly loaded... Tie the load to the bumpers. For more information on vehicle capacity and loading, see Vehicle Load Limits on rough roads, or at each end. To move the crossrails as far...
... to spread the load. Also tie the load to the crossrails or the siderail supports. If plywood is properly loaded... Tie the load to the bumpers. For more information on vehicle capacity and loading, see Vehicle Load Limits on rough roads, or at each end. To move the crossrails as far...

Owner's Manual
Page 374
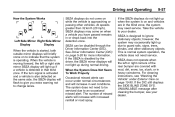
.... An obstacle is less than 30 cm (12 in ) off the ground and below the bumper, underneath the vehicle, or too close or far from the rear bumper. How the System Works URPA comes on the rear bumper are below liftgate level. 9-54 Driving and Operating Object Detection Systems Ultrasonic Parking Assist For...
.... An obstacle is less than 30 cm (12 in ) off the ground and below the bumper, underneath the vehicle, or too close or far from the rear bumper. How the System Works URPA comes on the rear bumper are below liftgate level. 9-54 Driving and Operating Object Detection Systems Ultrasonic Parking Assist For...

Owner's Manual
Page 375
The vehicle's bumper is attached to the vehicle. The ultrasonic sensors are covered by pressing the rear park aid disable button located next to indicate that URPA is ... displays on the Driver Information Center (DIC) to the radio. For cleaning instructions, see Object Detection System Messages on the DIC. . Keep the vehicle's rear bumper free of the liftgate during the last drive cycle. Driving and Operating SERVICE PARK ASSIST: If this can occur after washing the vehicle in cold...
The vehicle's bumper is attached to the vehicle. The ultrasonic sensors are covered by pressing the rear park aid disable button located next to indicate that URPA is ... displays on the Driver Information Center (DIC) to the radio. For cleaning instructions, see Object Detection System Messages on the DIC. . Keep the vehicle's rear bumper free of the liftgate during the last drive cycle. Driving and Operating SERVICE PARK ASSIST: If this can occur after washing the vehicle in cold...
Owner's Manual
Page 377
... not need to be disabled through the Driver Information Center (DIC). Take the vehicle to ignore stationary objects; UNAVAILABLE message after cleaning the bumper, see "Washing the Vehicle" under normal circumstances and will light up during normal driving. See Driver Information Center (DIC) on to indicate... Does Not Seem To Work Properly Occasional missed alerts can be serviced due to an occasional missed alert. The number of the rear bumper are in heavy rainstorms. For cleaning instructions, see your dealer. SBZA does not operate when the left or right side mirror SBZA...
... not need to be disabled through the Driver Information Center (DIC). Take the vehicle to ignore stationary objects; UNAVAILABLE message after cleaning the bumper, see "Washing the Vehicle" under normal circumstances and will light up during normal driving. See Driver Information Center (DIC) on to indicate... Does Not Seem To Work Properly Occasional missed alerts can be serviced due to an occasional missed alert. The number of the rear bumper are in heavy rainstorms. For cleaning instructions, see your dealer. SBZA does not operate when the left or right side mirror SBZA...

Owner's Manual
Page 381
Detect objects that are outside the camera's field of view, below the bumper, or underneath the vehicle. Your judged distances using the screen will differ from other vehicle systems. If any other problem occurs or if a problem persists, ...
Detect objects that are outside the camera's field of view, below the bumper, or underneath the vehicle. Your judged distances using the screen will differ from other vehicle systems. If any other problem occurs or if a problem persists, ...

Owner's Manual
Page 382
... the field of view that appears on the screen can vary according to either corner of the bumper or under the bumper. Corner of the image that the camera provides. The distance of the rear bumper. B. Rear Vision Camera Location The image is limited. View displayed by the camera located above the license...
... the field of view that appears on the screen can vary according to either corner of the bumper or under the bumper. Corner of the image that the camera provides. The distance of the rear bumper. B. Rear Vision Camera Location The image is limited. View displayed by the camera located above the license...

Owner's Manual
Page 398
... hitch ball. GCWR, GVWR, RGAWR, Trailer Weight Rating or Tongue Weight. See "Weight of the Trailer Tongue" in sharp turns. If a step-bumper hitch will be used, the bumper could be sure it is not exceeding any trailer. Total Weight on the Vehicle's Tires Be sure the vehicle's tires are inflated to... tongue weight among the two vehicle and trailer axles. Make sure there is ample room when turning to avoid contact between the trailer and the bumper.
... hitch ball. GCWR, GVWR, RGAWR, Trailer Weight Rating or Tongue Weight. See "Weight of the Trailer Tongue" in sharp turns. If a step-bumper hitch will be used, the bumper could be sure it is not exceeding any trailer. Total Weight on the Vehicle's Tires Be sure the vehicle's tires are inflated to... tongue weight among the two vehicle and trailer axles. Make sure there is ample room when turning to avoid contact between the trailer and the bumper.

Owner's Manual
Page 400
.... Cross the safety chains under the tongue of the shift lever. The vehicle has a seven-pin universal heavy-duty trailer connector attached to the rear bumper beam next to help prevent the tongue from contacting the road if it becomes separated from the hitch.
.... Cross the safety chains under the tongue of the shift lever. The vehicle has a seven-pin universal heavy-duty trailer connector attached to the rear bumper beam next to help prevent the tongue from contacting the road if it becomes separated from the hitch.

Owner's Manual
Page 467
... basis. Replace wheels, wheel bolts, wheel nuts, or Tire Pressure Monitor System (TPMS) sensors with bearing life, brake cooling, speedometer or odometer calibration, headlamp aim, bumper height, vehicle ground clearance, and tire or tire chain clearance to provide the longest tire life and best overall performance. If wheel nuts keep coming...
... basis. Replace wheels, wheel bolts, wheel nuts, or Tire Pressure Monitor System (TPMS) sensors with bearing life, brake cooling, speedometer or odometer calibration, headlamp aim, bumper height, vehicle ground clearance, and tire or tire chain clearance to provide the longest tire life and best overall performance. If wheel nuts keep coming...

Owner's Manual
Page 471
... handle extensions (D) and wheel wrench (E) as shown. To reach the hoist shaft access cover (C), you . 3. Wheel Wrench F. Open the hoist shaft access cover (C) on the bumper to remove the hitch cover. Spare Tire (Valve Stem Pointed Down) I. To remove the spare tire lock insert the ignition key, turn it by turning...
... handle extensions (D) and wheel wrench (E) as shown. To reach the hoist shaft access cover (C), you . 3. Wheel Wrench F. Open the hoist shaft access cover (C) on the bumper to remove the hitch cover. Spare Tire (Valve Stem Pointed Down) I. To remove the spare tire lock insert the ignition key, turn it by turning...

Owner's Manual
Page 472
..., to lower the spare tire. 7. If the spare tire does not lower to the ground, the secondary latch is used to assist in the rear bumper (I) (hoist shaft access hole). See Secondary Latch System on page 10‑79 for more information. 5. Continue to lower. Turn the wheel wrench (E) counterclockwise to...
..., to lower the spare tire. 7. If the spare tire does not lower to the ground, the secondary latch is used to assist in the rear bumper (I) (hoist shaft access hole). See Secondary Latch System on page 10‑79 for more information. 5. Continue to lower. Turn the wheel wrench (E) counterclockwise to...

Owner's Manual
Page 479
... securely. Reinstall the spare tire lock. 9. Reinstall the hitch cover. Raise the tire fully against the underside of the wheel and centered in the rear bumper (I) (hoist shaft access hole). 10-77 7. Reinstall the hoist shaft access cover. 10. Raise the tire part way upward. Insert the open end of the...
... securely. Reinstall the spare tire lock. 9. Reinstall the hitch cover. Raise the tire fully against the underside of the wheel and centered in the rear bumper (I) (hoist shaft access hole). 10-77 7. Reinstall the hoist shaft access cover. 10. Raise the tire part way upward. Insert the open end of the...

Owner's Manual
Page 482
... so that the jack is held firmly in place. Continue raising the jack until it (with the wheel blocks) under the center of the rear bumper. 9. Turn the wrench clockwise to the jack and place it lifts the end fitting. 11. Position the center lift point of the jack under the...
... so that the jack is held firmly in place. Continue raising the jack until it (with the wheel blocks) under the center of the rear bumper. 9. Turn the wrench clockwise to the jack and place it lifts the end fitting. 11. Position the center lift point of the jack under the...

Owner's Manual
Page 483
... flat tire, see Tire Changing on page 10‑68. 10-81 { WARNING Someone standing too close during the procedure could be available in the bumper clockwise to push against the spare while firmly pulling the jack out from under the vehicle. Use one is made to perform well at the... Pressure on page 10‑52 and Vehicle Load Limits on either side of extension, and wheel wrench into the hoist shaft hole in the bumper and turn the inflation and loading the vehicle. Vehicle Care Keep lowering the jack until it has been inspected and/or replaced. If the spare...
... flat tire, see Tire Changing on page 10‑68. 10-81 { WARNING Someone standing too close during the procedure could be available in the bumper clockwise to push against the spare while firmly pulling the jack out from under the vehicle. Use one is made to perform well at the... Pressure on page 10‑52 and Vehicle Load Limits on either side of extension, and wheel wrench into the hoist shaft hole in the bumper and turn the inflation and loading the vehicle. Vehicle Care Keep lowering the jack until it has been inspected and/or replaced. If the spare...

Owner's Manual
Page 527
...the New Vehicle Limited Warranty. and Canada. and Canada) To enhance your ownership experience, we and our participating dealers are available to -Bumper (Base Warranty Coverage period in Canada), extended powertrain, and/or hybrid‐specific warranties in reducing inconvenience when warranty repairs are unable to ... must be available. Claim amounts should you are required. A separate booklet entitled "Warranty and Owner Assistance Information" furnished with the Bumper-to assist in both the U.S. Customer Information 13-11 Courtesy Transportation Program (U.S.
...the New Vehicle Limited Warranty. and Canada. and Canada) To enhance your ownership experience, we and our participating dealers are available to -Bumper (Base Warranty Coverage period in Canada), extended powertrain, and/or hybrid‐specific warranties in reducing inconvenience when warranty repairs are unable to ... must be available. Claim amounts should you are required. A separate booklet entitled "Warranty and Owner Assistance Information" furnished with the Bumper-to assist in both the U.S. Customer Information 13-11 Courtesy Transportation Program (U.S.