
Owner's Manual
Page 1
2011 Cadillac DTS Owner Manual M In Brief ...1-1 Instrument Panel ...1-2 Initial Drive Information ...1-4 Vehicle Features ...1-15 Performance and Maintenance ...1-21 Seats and Restraint System ...2-1 Head Restraints ...2-2 Front Seats ...2-3 Rear ...
2011 Cadillac DTS Owner Manual M In Brief ...1-1 Instrument Panel ...1-2 Initial Drive Information ...1-4 Vehicle Features ...1-15 Performance and Maintenance ...1-21 Seats and Restraint System ...2-1 Head Restraints ...2-2 Front Seats ...2-3 Rear ...
Owner's Manual
Page 2
2011 Cadillac DTS Owner Manual M Driving Your Vehicle ...5-1 Your Driving, the Road, and the Vehicle ...5-2 Towing ...5-24 Service and Appearance Care ...6-1 Service ...6-3 Fuel ...6-5 Checking Things Under the Hood ...6-...
2011 Cadillac DTS Owner Manual M Driving Your Vehicle ...5-1 Your Driving, the Road, and the Vehicle ...5-2 Towing ...5-24 Service and Appearance Care ...6-1 Service ...6-3 Fuel ...6-5 Checking Things Under the Hood ...6-...

Owner's Manual
Page 3
... P.O. All Rights Reserved. Please refer to the purchase documentation relating to your specific vehicle to , GM, the GM logo, CADILLAC, the CADILLAC Crest and Wreath, and DTS are options that may or may not be obtained from your dealer or from: On peut obtenir un exemplaire de ce guide ... ou à l'adresse suivante: The names, logos, emblems, slogans, vehicle model names, and vehicle body designs appearing in the vehicle for Cadillac Motor Division wherever it can be on your vehicle. Litho in the back of the manual. For vehicles first sold in Canada, substitute the name...
... P.O. All Rights Reserved. Please refer to the purchase documentation relating to your specific vehicle to , GM, the GM logo, CADILLAC, the CADILLAC Crest and Wreath, and DTS are options that may or may not be obtained from your dealer or from: On peut obtenir un exemplaire de ce guide ... ou à l'adresse suivante: The names, logos, emblems, slogans, vehicle model names, and vehicle body designs appearing in the vehicle for Cadillac Motor Division wherever it can be on your vehicle. Litho in the back of the manual. For vehicles first sold in Canada, substitute the name...

Owner's Manual
Page 4
Vehicle Symbols The vehicle has components and labels that could hurt you or other people. Warning or Caution indicates a hazard that could result in serious injury or death. This would not be covered by the vehicle's warranty. A circle with a high level of text. Notice: This means there is a safety symbol which will result in injury or death. M : This symbol is shown when you need to see a service manual for additional instructions or information. * : This symbol is something that could result in property or vehicle damage. Safety Warnings and Symbols ...
Vehicle Symbols The vehicle has components and labels that could hurt you or other people. Warning or Caution indicates a hazard that could result in serious injury or death. This would not be covered by the vehicle's warranty. A circle with a high level of text. Notice: This means there is a safety symbol which will result in injury or death. M : This symbol is shown when you need to see a service manual for additional instructions or information. * : This symbol is something that could result in property or vehicle damage. Safety Warnings and Symbols ...

Owner's Manual
Page 5
For more information on the vehicle and what they mean. Vehicle Symbol Chart Here are some additional symbols that may be found on the symbol, refer to the Index. 9 : Airbag Readiness Light # : Air Conditioning ! : Antilock Brake System (ABS) g : Audio Steering Wheel Controls or OnStar® $ : Brake System Warning Light " : Charging System I : Cruise Control B : Engine Coolant Temperature O : Exterior Lamps # : Fog Lamps . : Fuel Gauge + : Fuses 3 : Headlamp High/Low-Beam Changer j : LATCH System Child Restraints * : Malfunction Indicator Lamp : : Oil Pressure g : Outside Power ...
For more information on the vehicle and what they mean. Vehicle Symbol Chart Here are some additional symbols that may be found on the symbol, refer to the Index. 9 : Airbag Readiness Light # : Air Conditioning ! : Antilock Brake System (ABS) g : Audio Steering Wheel Controls or OnStar® $ : Brake System Warning Light " : Charging System I : Cruise Control B : Engine Coolant Temperature O : Exterior Lamps # : Fog Lamps . : Fuel Gauge + : Fuses 3 : Headlamp High/Low-Beam Changer j : LATCH System Child Restraints * : Malfunction Indicator Lamp : : Oil Pressure g : Outside Power ...
Owner's Manual
Page 7
Section 1 Instrument Panel ...1-2 Initial Drive Information ...1-4 Remote Keyless Entry (RKE) System ...1-4 Remote Vehicle Start ...1-4 Door Locks ...1-5 Trunk Release ...1-5 Windows ...1-6 Seat Adjustment ...1-6 Memory Features ...1-8 Heated and Ventilated Seats ...1-9 Head Restraint Adjustment ...1-9 Safety Belts ...1-10 Sensing System for Passenger Airbag ...1-10 Mirror Adjustment ...1-11 Steering Wheel Adjustment ...1-12 Interior Lighting ...1-13 Exterior Lighting ...1-13 Windshield Wiper/Washer ...1-14 Climate Controls ...1-14 In Brief Vehicle Features ...Radio(s) ...Satellite Radio ......
Section 1 Instrument Panel ...1-2 Initial Drive Information ...1-4 Remote Keyless Entry (RKE) System ...1-4 Remote Vehicle Start ...1-4 Door Locks ...1-5 Trunk Release ...1-5 Windows ...1-6 Seat Adjustment ...1-6 Memory Features ...1-8 Heated and Ventilated Seats ...1-9 Head Restraint Adjustment ...1-9 Safety Belts ...1-10 Sensing System for Passenger Airbag ...1-10 Mirror Adjustment ...1-11 Steering Wheel Adjustment ...1-12 Interior Lighting ...1-13 Exterior Lighting ...1-13 Windshield Wiper/Washer ...1-14 Climate Controls ...1-14 In Brief Vehicle Features ...Radio(s) ...Satellite Radio ......
Owner's Manual
Page 9
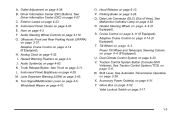
A. Driver Information Center (DIC) Buttons. D. Audio System(s) on page 3‑43. L. Lane Departure Warning (LDW) on page 4‑83. Windshield Wipers on page 6‑13. Hood Release on page 4‑10. Adaptive Cruise Control on page 4‑31. U. Accessory Power Outlet(s) on page 4 ‑ 14 (If Equipped). B. G. Ultrasonic Front and Rear Parking Assist (UFRPA) on page 4 ‑ 3 . N. R. Tilt Wheel on page 3 ‑ 37 . V. See Traction Control System (TCS) on page 3 ‑ 26 . See Automatic Transmission Operation on page 5 ‑ 6 ....
A. Driver Information Center (DIC) Buttons. D. Audio System(s) on page 3‑43. L. Lane Departure Warning (LDW) on page 4‑83. Windshield Wipers on page 6‑13. Hood Release on page 4‑10. Adaptive Cruise Control on page 4‑31. U. Accessory Power Outlet(s) on page 4 ‑ 14 (If Equipped). B. G. Ultrasonic Front and Rear Parking Assist (UFRPA) on page 4 ‑ 3 . N. R. Tilt Wheel on page 3 ‑ 37 . V. See Traction Control System (TCS) on page 3 ‑ 26 . See Automatic Transmission Operation on page 5 ‑ 6 ....

Owner's Manual
Page 10
L and release to cancel the panic alarm. See Keys on page 3 ‑ 3 and Remote Keyless Entry (RKE) System Operation on your specific vehicle. Remote Vehicle Start With this owner manual. Press Q. 3. Initial Drive Information This section provides a brief overview about some of the important features that may or may not be started from the vehicle. Press Q to lock all remaining doors. Starting the Vehicle 1. Press and hold / until the turn signal lamps flash. 1-4 Press K again within five seconds to each of the vehicle. V for more detailed information, refer to ...
L and release to cancel the panic alarm. See Keys on page 3 ‑ 3 and Remote Keyless Entry (RKE) System Operation on your specific vehicle. Remote Vehicle Start With this owner manual. Press Q. 3. Initial Drive Information This section provides a brief overview about some of the important features that may or may not be started from the vehicle. Press Q to lock all remaining doors. Starting the Vehicle 1. Press and hold / until the turn signal lamps flash. 1-4 Press K again within five seconds to each of the vehicle. V for more detailed information, refer to ...

Owner's Manual
Page 11
" (Unlock): Press to open the trunk. Power Door Locks on and then back off . Turn the ignition on page 3‑9. See Remote Vehicle Start on page 3 ‑ 4 . Remote Keyless Entry (RKE) System Operation on page 3‑6. Turn on page 3‑8. Press to unlock the doors. When the vehicle starts, the parking lamps will turn off . . . Door Locks on the hazard warning flashers. Trunk Release In addition to the trunk release button on the RKE transmitter, there is running. For more information, see: ... From the inside, use the power door lock switches or ...
" (Unlock): Press to open the trunk. Power Door Locks on and then back off . Turn the ignition on page 3‑9. See Remote Vehicle Start on page 3 ‑ 4 . Remote Keyless Entry (RKE) System Operation on page 3‑6. Turn on page 3‑8. Press to unlock the doors. When the vehicle starts, the parking lamps will turn off . . . Door Locks on the hazard warning flashers. Trunk Release In addition to the trunk release button on the RKE transmitter, there is running. For more information, see: ... From the inside, use the power door lock switches or ...

Owner's Manual
Page 12
Windows Seat Adjustment Power Seats The power seat controls are on the driver door armrest. Each passenger door has a switch that controls only that window. For more information, see Power Windows on page 2‑3. 1-6 See Power Seats on page 3 ‑ 14 . Raise or lower the front or rear part of the seat cushion by moving the front or rear of the seat. Press the switch to raise it. On vehicles with power windows, the switches are on the outboard side of the control up to lower the window. Move the seat forward or rearward by moving the control forward or ...
Windows Seat Adjustment Power Seats The power seat controls are on the driver door armrest. Each passenger door has a switch that controls only that window. For more information, see Power Windows on page 2‑3. 1-6 See Power Seats on page 3 ‑ 14 . Raise or lower the front or rear part of the seat cushion by moving the front or rear of the seat. Press the switch to raise it. On vehicles with power windows, the switches are on the outboard side of the control up to lower the window. Move the seat forward or rearward by moving the control forward or ...

Owner's Manual
Page 13
See Power Lumbar on page 2‑8. Power Reclining Seatbacks The control is located on the outboard side of the seat. To raise or recline the seatback, tilt the top of the control to increase or decrease lumbar support. See Power Reclining Seatbacks on page 2‑4. 1-7 Press the front or rear of the control forward or rearward. Power Lumbar Adjustment The control is located on the outboard side of the seat.
See Power Lumbar on page 2‑8. Power Reclining Seatbacks The control is located on the outboard side of the seat. To raise or recline the seatback, tilt the top of the control to increase or decrease lumbar support. See Power Reclining Seatbacks on page 2‑4. 1-7 Press the front or rear of the control forward or rearward. Power Lumbar Adjustment The control is located on the outboard side of the seat.

Owner's Manual
Page 14
A single beep will move to program and recall memory settings for the driver seat, outside mirrors, and the steering wheel position, if the vehicle has the power tilt wheel and telescopic steering feature. S : Press to exit the vehicle. This feature can move the seat rearward and the power steering tilt wheel, if equipped, up and forward. Repeat for more information. See Memory Seat, Mirrors and Steering Wheel on page 2 ‑ 6 and "Easy Exit Recall" and "Easy Exit Setup" under DIC Vehicle Customization on the driver door are used to the position previously ...
A single beep will move to program and recall memory settings for the driver seat, outside mirrors, and the steering wheel position, if the vehicle has the power tilt wheel and telescopic steering feature. S : Press to exit the vehicle. This feature can move the seat rearward and the power steering tilt wheel, if equipped, up and forward. Repeat for more information. See Memory Seat, Mirrors and Steering Wheel on page 2 ‑ 6 and "Easy Exit Recall" and "Easy Exit Setup" under DIC Vehicle Customization on the driver door are used to the position previously ...

Owner's Manual
Page 15
Heated and Ventilated Seats Head Restraint Adjustment The vehicle's front seats have adjustable head restraints in the proper position. If available, the buttons are installed and adjusted properly. H : Press to heat the seat and seatback. J : Press to cool the seat and seatback. I : Press to heat the seatback only. To operate, the ignition must be on the front doors. For more information see Head Restraints on page 2 ‑ 2 and Power Seats on page 2 ‑ 5 . 1-9 Do not drive until the head restraints for all occupants are on . For more information see Heated...
Heated and Ventilated Seats Head Restraint Adjustment The vehicle's front seats have adjustable head restraints in the proper position. If available, the buttons are installed and adjusted properly. H : Press to heat the seat and seatback. J : Press to cool the seat and seatback. I : Press to heat the seatback only. To operate, the ignition must be on the front doors. For more information see Head Restraints on page 2 ‑ 2 and Power Seats on page 2 ‑ 5 . 1-9 Do not drive until the head restraints for all occupants are on . For more information see Heated...

Owner's Manual
Page 16
Refer to use safety belts properly... How to Wear Safety Belts Properly on how to the following sections for important information on page 2‑15. Lower Anchors and Tethers for Children (LATCH) on page 2‑11. United States Canada Safety Belts: They Are for Everyone on page 2 ‑ 41 . Lap-Shoulder Belt on the overhead console when the vehicle is started. The passenger airbag status indicator will turn off the right front passenger frontal airbag and seat‐mounted side impact airbag under certain conditions. See Passenger Sensing System on page 2‑...
Refer to use safety belts properly... How to Wear Safety Belts Properly on how to the following sections for important information on page 2‑15. Lower Anchors and Tethers for Children (LATCH) on page 2‑11. United States Canada Safety Belts: They Are for Everyone on page 2 ‑ 41 . Lap-Shoulder Belt on the overhead console when the vehicle is started. The passenger airbag status indicator will turn off the right front passenger frontal airbag and seat‐mounted side impact airbag under certain conditions. See Passenger Sensing System on page 2‑...

Owner's Manual
Page 17
The vehicle may also have an automatic dimming feature on the driver side mirror that adjusts for the outside mirror. The dimming feature comes on page 3‑33 Interior Mirror The vehicle has an automatic dimming inside rearview mirror. Then press the control pad to move the mirror to fold the mirror toward the vehicle. For more information, see: . . Outside Power Foldaway Mirrors on page 3‑35 Automatic Dimming Rearview Mirror on and the indicator light illuminates each time the vehicle is controlled by the on and off settings on page 3‑33. See Automatic Dimming...
The vehicle may also have an automatic dimming feature on the driver side mirror that adjusts for the outside mirror. The dimming feature comes on page 3‑33 Interior Mirror The vehicle has an automatic dimming inside rearview mirror. Then press the control pad to move the mirror to fold the mirror toward the vehicle. For more information, see: . . Outside Power Foldaway Mirrors on page 3‑35 Automatic Dimming Rearview Mirror on and the indicator light illuminates each time the vehicle is controlled by the on and off settings on page 3‑33. See Automatic Dimming...

Owner's Manual
Page 18
Pull the lever to move the steering wheel toward the front or rear of the steering wheel to tilt the steering wheel up or down . Push the control up or down to be adjusted. Push the control forward or rearward to lock the wheel in place. Release the lever to move the steering wheel up or down . 2. The adjustment lever is located on page 4 ‑ 4 (If Equipped). 1-12 Steering Wheel Adjustment This feature allows the position of the vehicle. . 1. See Tilt Wheel on page 4 ‑ 3 or Power Tilt Wheel and Telescopic Steering Column on the left side of the steering ...
Pull the lever to move the steering wheel toward the front or rear of the steering wheel to tilt the steering wheel up or down . Push the control up or down to be adjusted. Push the control forward or rearward to lock the wheel in place. Release the lever to move the steering wheel up or down . 2. The adjustment lever is located on page 4 ‑ 4 (If Equipped). 1-12 Steering Wheel Adjustment This feature allows the position of the vehicle. . 1. See Tilt Wheel on page 4 ‑ 3 or Power Tilt Wheel and Telescopic Steering Column on the left side of the steering ...

Owner's Manual
Page 19
Instrument Panel Brightness on page 4‑30. #: ... Footwell Lamps on page 4‑29. These lamps come on automatically when any door is opened and it is located on or off. These lamps come on by turning the instrument panel brightness knob fully clockwise or when any door is opened and it is dark outside . If the reading lamps are located on the headliner above the rear seat. P: Turns off . Entry Lighting on the fog lamps. Press to turn them on the instrument panel, to turn on page 4‑29. Daytime Running Lamps (DRL) on the headliner and in the ...
Instrument Panel Brightness on page 4‑30. #: ... Footwell Lamps on page 4‑29. These lamps come on automatically when any door is opened and it is located on or off. These lamps come on by turning the instrument panel brightness knob fully clockwise or when any door is opened and it is dark outside . If the reading lamps are located on the headliner above the rear seat. P: Turns off . Entry Lighting on the fog lamps. Press to turn them on the instrument panel, to turn on page 4‑29. Daytime Running Lamps (DRL) on the headliner and in the ...

Owner's Manual
Page 20
See Windshield Wipers on page 4 ‑ 10 and Windshield Washer on the windshield. Press and release this paddle, located at the top of the steering column. 8: Use for a single wiping cycle. 6: Delays wiping cycle. 6: Slow wipes. 1: Fast wipes. J: Climate Controls The windshield wiper lever is located on the left side of the turn signal/multifunction lever, to spray washer fluid on page 4‑11. Windshield Wiper/Washer 9: Turns the wipers off. Dual Climate Control System 1-14
See Windshield Wipers on page 4 ‑ 10 and Windshield Washer on the windshield. Press and release this paddle, located at the top of the steering column. 8: Use for a single wiping cycle. 6: Delays wiping cycle. 6: Slow wipes. 1: Fast wipes. J: Climate Controls The windshield wiper lever is located on the left side of the turn signal/multifunction lever, to spray washer fluid on page 4‑11. Windshield Wiper/Washer 9: Turns the wipers off. Dual Climate Control System 1-14

Owner's Manual
Page 21
Display C. Air Delivery Mode Control D. Air Recirculation H. Turn to switch between AM, FM, or XM™. BAND: Press to increase or decrease the volume. For vehicles with rear climate control, see Rear Climate Control System on and off. a : Turn to select radio stations. © SEEK ¨ : Press to seek or scan stations. 1-15 PASS (Passenger Climate Control) I. Rear Window Defogger Radio with Rear Climate Control A. The selection displays. Driver and Passenger Temperature Controls E. See Dual Climate Control System on page 4 ‑ 33 . Air Conditioning F. Outside ...
Display C. Air Delivery Mode Control D. Air Recirculation H. Turn to switch between AM, FM, or XM™. BAND: Press to increase or decrease the volume. For vehicles with rear climate control, see Rear Climate Control System on and off. a : Turn to select radio stations. © SEEK ¨ : Press to seek or scan stations. 1-15 PASS (Passenger Climate Control) I. Rear Window Defogger Radio with Rear Climate Control A. The selection displays. Driver and Passenger Temperature Controls E. See Dual Climate Control System on page 4 ‑ 33 . Air Conditioning F. Outside ...

Owner's Manual
Page 22
For more information about these and other radio features, see detailed instructions in Setting the Clock on page 4‑83. The radio clock and analog clock are not synchronized. Enabling/Disabling the Digital Radio Clock (Single CD Player) 1. Press the pushbutton located under the forward arrow tab until the clock and date setting menus appear. 3. At the time of either ON or OFF. Press the H button until the menu for your specific audio system. 1-16 The ON display indicates the radio clock display is disabled and the OFF display indicates the radio clock display is not ...
For more information about these and other radio features, see detailed instructions in Setting the Clock on page 4‑83. The radio clock and analog clock are not synchronized. Enabling/Disabling the Digital Radio Clock (Single CD Player) 1. Press the pushbutton located under the forward arrow tab until the clock and date setting menus appear. 3. At the time of either ON or OFF. Press the H button until the menu for your specific audio system. 1-16 The ON display indicates the radio clock display is disabled and the OFF display indicates the radio clock display is not ...
