
Owner's Manual
Page 1
2011 Cadillac DTS Owner Manual M In Brief ...1-1 Instrument Panel ...1-2 Initial Drive Information ...1-4 Vehicle Features ...1-15 Performance and Maintenance ...1-21 Seats and Restraint System ...2-1 Head Restraints ...2-2 Front Seats ...2-3 Rear Seats ...2-10 Safety Belts ...2-11 Child Restraints ...2-31 Airbag ... Universal Home Remote System ...3-45 Storage Areas ...3-52 Sunroof ...3-54 Instrument Panel ...4-1 Instrument Panel Overview ...4-3 Climate Controls ...4-33 Warning Lights, Gauges, and Indicators ...4-42 Driver Information Center (DIC) ...4-57 Audio System(s) ...4-83
2011 Cadillac DTS Owner Manual M In Brief ...1-1 Instrument Panel ...1-2 Initial Drive Information ...1-4 Vehicle Features ...1-15 Performance and Maintenance ...1-21 Seats and Restraint System ...2-1 Head Restraints ...2-2 Front Seats ...2-3 Rear Seats ...2-10 Safety Belts ...2-11 Child Restraints ...2-31 Airbag ... Universal Home Remote System ...3-45 Storage Areas ...3-52 Sunroof ...3-54 Instrument Panel ...4-1 Instrument Panel Overview ...4-3 Climate Controls ...4-33 Warning Lights, Gauges, and Indicators ...4-42 Driver Information Center (DIC) ...4-57 Audio System(s) ...4-83
Owner's Manual
Page 2
2011 Cadillac DTS Owner Manual M Driving Your Vehicle ...5-1 Your Driving, the Road, and the Vehicle ...5-2 Towing ...5-24 Service and Appearance Care ...6-1 Service ...6-3 Fuel ...6-5 Checking Things Under the ...Blade Replacement ...6-46 Tires ...6-48 Appearance Care ...6-94 Vehicle Identification ...6-102 Electrical System ...6-102 Capacities and Specifications ...6-111 Maintenance Schedule ...7-1 Maintenance Schedule ...7-2 Customer Assistance Information ...8-1 Customer Assistance and Information ...8-2 Reporting Safety Defects ...8-13 Vehicle Data Recording and Privacy ...8-15 Index ...i-1
2011 Cadillac DTS Owner Manual M Driving Your Vehicle ...5-1 Your Driving, the Road, and the Vehicle ...5-2 Towing ...5-24 Service and Appearance Care ...6-1 Service ...6-3 Fuel ...6-5 Checking Things Under the ...Blade Replacement ...6-46 Tires ...6-48 Appearance Care ...6-94 Vehicle Identification ...6-102 Electrical System ...6-102 Capacities and Specifications ...6-111 Maintenance Schedule ...7-1 Maintenance Schedule ...7-2 Customer Assistance Information ...8-1 Customer Assistance and Information ...8-2 Reporting Safety Defects ...8-13 Vehicle Data Recording and Privacy ...8-15 Index ...i-1

Owner's Manual
Page 3
...Numéro de poste 6438 de langue française www.helminc.com Index To quickly locate information about the vehicle, use the index in U.S.A. Litho in the back of the manual. iii It... body designs appearing in the manual and the page number where it appears in the vehicle for Cadillac Motor Division wherever it can be found on your specific vehicle either because they are options that ...due to changes subsequent to , GM, the GM logo, CADILLAC, the CADILLAC Crest and Wreath, and DTS are trademarks and/or service marks of General Motors LLC, its subsidiaries, affiliates, or licensors...
...Numéro de poste 6438 de langue française www.helminc.com Index To quickly locate information about the vehicle, use the index in U.S.A. Litho in the back of the manual. iii It... body designs appearing in the manual and the page number where it appears in the vehicle for Cadillac Motor Division wherever it can be found on your specific vehicle either because they are options that ...due to changes subsequent to , GM, the GM logo, CADILLAC, the CADILLAC Crest and Wreath, and DTS are trademarks and/or service marks of General Motors LLC, its subsidiaries, affiliates, or licensors...

Owner's Manual
Page 4
... : This symbol is shown when you or other people. A circle with the text describing the operation or information relating to see your owner manual for additional instructions or information. Vehicle Symbols The vehicle has components and labels that could hurt you need to see a service manual for ...additional instructions or information. * : This symbol is shown when you need to a specific component, control, message, gauge, or indicator. { WARNING: These mean there is ...
... : This symbol is shown when you or other people. A circle with the text describing the operation or information relating to see your owner manual for additional instructions or information. Vehicle Symbols The vehicle has components and labels that could hurt you need to see a service manual for ...additional instructions or information. * : This symbol is shown when you need to a specific component, control, message, gauge, or indicator. { WARNING: These mean there is ...

Owner's Manual
Page 5
... Indicator Lamp : : Oil Pressure g : Outside Power Foldaway Mirrors } : Power / : Remote Vehicle Start > : Safety Belt Reminders 7 : Tire Pressure Monitor F : Traction Control M : Windshield Washer Fluid v For more information on the vehicle and what they mean.
... Indicator Lamp : : Oil Pressure g : Outside Power Foldaway Mirrors } : Power / : Remote Vehicle Start > : Safety Belt Reminders 7 : Tire Pressure Monitor F : Traction Control M : Windshield Washer Fluid v For more information on the vehicle and what they mean.
Owner's Manual
Page 7
Section 1 Instrument Panel ...1-2 Initial Drive Information ...1-4 Remote Keyless Entry (RKE) System ...1-4 Remote Vehicle Start ...1-4 Door Locks ...1-5 Trunk Release ...1-5 Windows ...1-6 Seat Adjustment ...1-6 Memory Features ...Climate Controls ...1-14 In Brief Vehicle Features ...Radio(s) ...Satellite Radio ...Portable Audio Devices ...Steering Wheel Controls ...Bluetooth® ...Navigation System ...Driver Information Center (DIC) ...Cruise Control ...Power Outlets ...Performance and Maintenance ...Traction Control System (TCS) ...StabiliTrak® System ...Tire Pressure Monitor ...Tire...
Section 1 Instrument Panel ...1-2 Initial Drive Information ...1-4 Remote Keyless Entry (RKE) System ...1-4 Remote Vehicle Start ...1-4 Door Locks ...1-5 Trunk Release ...1-5 Windows ...1-6 Seat Adjustment ...1-6 Memory Features ...Climate Controls ...1-14 In Brief Vehicle Features ...Radio(s) ...Satellite Radio ...Portable Audio Devices ...Steering Wheel Controls ...Bluetooth® ...Navigation System ...Driver Information Center (DIC) ...Cruise Control ...Power Outlets ...Performance and Maintenance ...Traction Control System (TCS) ...StabiliTrak® System ...Tire Pressure Monitor ...Tire...
Owner's Manual
Page 9
...Instrument Panel Cluster on page 4‑52. I. J. M. See Malfunction Indicator Lamp on page 4‑43. Glove Box on page 4‑29. Driver Information Center (DIC) Buttons. Instrument Panel Brightness on page 3 ‑ 52 . P. Q. Adaptive Cruise Control on page 4 ‑ 3 . Tilt ... page 3‑28. E. Parking Brake on page 3‑11. See Automatic Transmission Operation on page 4‑57. A. See Driver Information Center (DIC) on page 3 ‑ 26 . D. Audio Steering Wheel Controls on page 3‑17. 1-3 T. Shift Lever. Y. Valet...
...Instrument Panel Cluster on page 4‑52. I. J. M. See Malfunction Indicator Lamp on page 4‑43. Glove Box on page 4‑29. Driver Information Center (DIC) Buttons. Instrument Panel Brightness on page 3 ‑ 52 . P. Q. Adaptive Cruise Control on page 4 ‑ 3 . Tilt ... page 3‑28. E. Parking Brake on page 3‑11. See Automatic Transmission Operation on page 4‑57. A. See Driver Information Center (DIC) on page 3 ‑ 26 . D. Audio Steering Wheel Controls on page 3‑17. 1-3 T. Shift Lever. Y. Valet...

Owner's Manual
Page 10
...vehicle. Press K to cancel the panic alarm. Press L again to unlock the driver door. Remote Vehicle Start With this owner manual. V for more detailed information, refer to lock all remaining doors. See Keys on page 3 ‑ 3 and Remote Keyless Entry (RKE) System Operation on your specific vehicle. Press... to sound the panic alarm. L and release to 60 m (195 feet) away from up to locate the vehicle. Initial Drive Information This section provides a brief overview about some of the important features that may or may not be personalized. Press and hold open the trunk...
...vehicle. Press K to cancel the panic alarm. Press L again to unlock the driver door. Remote Vehicle Start With this owner manual. V for more detailed information, refer to lock all remaining doors. See Keys on page 3 ‑ 3 and Remote Keyless Entry (RKE) System Operation on your specific vehicle. Press... to sound the panic alarm. L and release to 60 m (195 feet) away from up to locate the vehicle. Initial Drive Information This section provides a brief overview about some of the important features that may or may not be personalized. Press and hold open the trunk...

Owner's Manual
Page 11
... open the trunk. Power Door Locks on page 3‑11. Turn the ignition on page 3‑6. See Trunk on page 3‑9. Remote start : . For more information, see: ... Press to unlock the doors. Q (Lock): Remove the key from the ignition and press to lock the doors. The doors will be extended only...
... open the trunk. Power Door Locks on page 3‑11. Turn the ignition on page 3‑6. See Trunk on page 3‑9. Remote start : . For more information, see: ... Press to unlock the doors. Q (Lock): Remove the key from the ignition and press to lock the doors. The doors will be extended only...

Owner's Manual
Page 12
For more information, see Power Windows on page 2‑3. 1-6 See Power Seats on page 3 ‑ 14 . On vehicles with power windows, the switches are on the outboard side ...
For more information, see Power Windows on page 2‑3. 1-6 See Power Seats on page 3 ‑ 14 . On vehicles with power windows, the switches are on the outboard side ...

Owner's Manual
Page 14
...the seat rearward and the power steering tilt wheel, if equipped, up and forward. Storing Memory Positions To save into memory: 1. Repeat for more information. S : Press to exit the vehicle. The driver seat will move to program and recall memory settings for the driver seat, outside mirrors, ... 2. Easy Exit Driver Seat On vehicles with the memory feature, the controls on the driver door are used to the position previously stored for more information. The vehicle must be in P (Park). See Memory Seat, Mirrors and Steering Wheel on page 4 ‑ 74 for the identified driver. ...
...the seat rearward and the power steering tilt wheel, if equipped, up and forward. Storing Memory Positions To save into memory: 1. Repeat for more information. S : Press to exit the vehicle. The driver seat will move to program and recall memory settings for the driver seat, outside mirrors, ... 2. Easy Exit Driver Seat On vehicles with the memory feature, the controls on the driver door are used to the position previously stored for more information. The vehicle must be in P (Park). See Memory Seat, Mirrors and Steering Wheel on page 4 ‑ 74 for the identified driver. ...

Owner's Manual
Page 15
To operate, the ignition must be on page 2 ‑ 5 . 1-9 For more information see Heated and Ventilated Seats on . If available, the buttons are installed and adjusted properly. Do not drive until the head restraints for all occupants... the seat and seatback. Heated and Ventilated Seats Head Restraint Adjustment The vehicle's front seats have adjustable head restraints in the proper position. For more information see Head Restraints on page 2 ‑ 2 and Power Seats on the front doors. I : Press to heat the seatback only. To achieve a comfortable seating position, ...
To operate, the ignition must be on page 2 ‑ 5 . 1-9 For more information see Heated and Ventilated Seats on . If available, the buttons are installed and adjusted properly. Do not drive until the head restraints for all occupants... the seat and seatback. Heated and Ventilated Seats Head Restraint Adjustment The vehicle's front seats have adjustable head restraints in the proper position. For more information see Head Restraints on page 2 ‑ 2 and Power Seats on the front doors. I : Press to heat the seatback only. To achieve a comfortable seating position, ...

Owner's Manual
Page 16
...‐rail airbags are not affected by this. Refer to use safety belts properly... Lap-Shoulder Belt on how to the following sections for important information on page 2‑24. See Passenger Sensing System on page 2‑11. Safety Belts Sensing System for Passenger Airbag The passenger sensing system will be...
...‐rail airbags are not affected by this. Refer to use safety belts properly... Lap-Shoulder Belt on how to the following sections for important information on page 2‑24. See Passenger Sensing System on page 2‑11. Safety Belts Sensing System for Passenger Airbag The passenger sensing system will be...

Owner's Manual
Page 17
... are located on the driver door armrest. Then press the control pad to move the mirror to fold the mirror toward the vehicle. For more information, see: . . Outside Power Foldaway Mirrors on page 3‑35 Automatic Dimming Rearview Mirror on the driver side mirror that adjusts for the outside mirror. To...
... are located on the driver door armrest. Then press the control pad to move the mirror to fold the mirror toward the vehicle. For more information, see: . . Outside Power Foldaway Mirrors on page 3‑35 Automatic Dimming Rearview Mirror on the driver side mirror that adjusts for the outside mirror. To...

Owner's Manual
Page 19
.... P: Turns off . Fog Lamps on automatically when any door is opened and it is dark outside . Wiper Activated Headlamps on page 4‑29. For more information, see : ... Entry Lighting on page 4‑26. Parade Dimming on , they automatically shut off 10 minutes after the ignition has been turned off the exterior... panel brightness knob fully clockwise or when any door is opened and it is dark outside . These lamps come on page 4‑28. For more information, see : 1-13
.... P: Turns off . Fog Lamps on automatically when any door is opened and it is dark outside . Wiper Activated Headlamps on page 4‑29. For more information, see : ... Entry Lighting on page 4‑26. Parade Dimming on , they automatically shut off 10 minutes after the ignition has been turned off the exterior... panel brightness knob fully clockwise or when any door is opened and it is dark outside . These lamps come on page 4‑28. For more information, see : 1-13

Owner's Manual
Page 22
... under the forward arrow tab until the clock and date setting menus appear. 3. Each page of favorites can be disabled. For more information about these and other radio features, see detailed instructions in Setting the Clock on or off. Storing a Favorite Station For vehicles with...be stored as the digital radio clock. The radio clock and analog clock are not synchronized. Press this button to display additional text information related to synchronize both clocks. Press the H button until the menu for your specific audio system. 1-16 Press the pushbutton located ...
... under the forward arrow tab until the clock and date setting menus appear. 3. Each page of favorites can be disabled. For more information about these and other radio features, see detailed instructions in Setting the Clock on or off. Storing a Favorite Station For vehicles with...be stored as the digital radio clock. The radio clock and analog clock are not synchronized. Press this button to display additional text information related to synchronize both clocks. Press the H button until the menu for your specific audio system. 1-16 Press the pushbutton located ...

Owner's Manual
Page 23
For more information, refer to the auxiliary port using a 3.5 mm (1/8 in) input jack. External devices such as iPod®, laptop computers, MP3 players, CD changers, etc. can be ...
For more information, refer to the auxiliary port using a 3.5 mm (1/8 in) input jack. External devices such as iPod®, laptop computers, MP3 players, CD changers, etc. can be ...

Owner's Manual
Page 24
...if a CD/DVD is playing. Press again to turn the sound on page 4‑110. Not all phones will support all functions. For more information, see Bluetooth® on page 4‑103. The Bluetooth enabled cell phone must be used in -vehicle Bluetooth system before it allows users with ... between the radio, CD, and for vehicles with a Bluetooth enabled cell phone to select tracks on the right side of the steering wheel. For more information visit www.gm.com/bluetooth. Press and hold longer than two seconds to reject an incoming call, or end a current call. c x : Press ...
...if a CD/DVD is playing. Press again to turn the sound on page 4‑110. Not all phones will support all functions. For more information, see Bluetooth® on page 4‑103. The Bluetooth enabled cell phone must be used in -vehicle Bluetooth system before it allows users with ... between the radio, CD, and for vehicles with a Bluetooth enabled cell phone to select tracks on the right side of the steering wheel. For more information visit www.gm.com/bluetooth. Press and hold longer than two seconds to reject an incoming call, or end a current call. c x : Press ...
Owner's Manual
Page 25
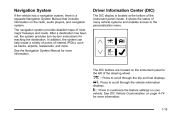
...turn-by-turn instructions for more information. Driver Information Center (DIC) The DIC display is a separate Navigation System Manual that includes information on the instrument panel to the left of the steering wheel. 3 : Press to scroll through the vehicle information displays. In addition, the system ...a variety of points of the instrument panel cluster. T : Press to customize the feature settings on page 4 ‑ 74 for more information. 1-19 Navigation System If the vehicle has a navigation system, there is located at the bottom of interest (POIs), such as banks, airports...
...turn-by-turn instructions for more information. Driver Information Center (DIC) The DIC display is a separate Navigation System Manual that includes information on the instrument panel to the left of the steering wheel. 3 : Press to scroll through the vehicle information displays. In addition, the system ...a variety of points of the instrument panel cluster. T : Press to customize the feature settings on page 4 ‑ 74 for more information. 1-19 Navigation System If the vehicle has a navigation system, there is located at the bottom of interest (POIs), such as banks, airports...

Owner's Manual
Page 26
.... Language Door Lock and Unlock Settings Lighting Chime Volume Memory Settings I: Press to turn the cruise control system on page 4‑14. 1-20 For more information, see Driver Information Center (DIC) on the left of the steering wheel. yz: Press to scroll up and down the menu items. For more... information, see Adaptive Cruise Control on or off. + RES: Press briefly to make the vehicle resume to a previously set speed or press and hold to set ...
.... Language Door Lock and Unlock Settings Lighting Chime Volume Memory Settings I: Press to turn the cruise control system on page 4‑14. 1-20 For more information, see Driver Information Center (DIC) on the left of the steering wheel. yz: Press to scroll up and down the menu items. For more... information, see Adaptive Cruise Control on or off. + RES: Press briefly to make the vehicle resume to a previously set speed or press and hold to set ...
