Owner's Manual
Page 1
2010 Cadillac STS Owner Manual M In Brief ...1-1 Instrument Panel ...1-2 Initial Drive Information ...1-4 Vehicle Features ...1-14 Performance and Maintenance ...1-20 Seats and Restraint System ...2-1 Front Seats ...2-2 Rear Seats ...2-7 ......3-56 Sunroof ...3-57 Vehicle Personalization ...3-58 Instrument Panel ...4-1 Instrument Panel Overview ...4-3 Climate Controls ...4-44 Warning Lights, Gages, and Indicators ...4-51 Driver Information Center (DIC) ...4-69 Audio System(s) ...4-94 Driving Your Vehicle ...5-1 Your Driving, the Road, and the Vehicle ...5-2 Towing ...5-29 Service and Appearance...
2010 Cadillac STS Owner Manual M In Brief ...1-1 Instrument Panel ...1-2 Initial Drive Information ...1-4 Vehicle Features ...1-14 Performance and Maintenance ...1-20 Seats and Restraint System ...2-1 Front Seats ...2-2 Rear Seats ...2-7 ......3-56 Sunroof ...3-57 Vehicle Personalization ...3-58 Instrument Panel ...4-1 Instrument Panel Overview ...4-3 Climate Controls ...4-44 Warning Lights, Gages, and Indicators ...4-51 Driver Information Center (DIC) ...4-69 Audio System(s) ...4-94 Driving Your Vehicle ...5-1 Your Driving, the Road, and the Vehicle ...5-2 Towing ...5-29 Service and Appearance...
Owner's Manual
Page 2
2010 Cadillac STS Owner Manual M Bulb Replacement ...6-49 Windshield Replacement ...6-50 Windshield Wiper Blade Replacement ...6-51 Tires ...6-52 Appearance Care ...6-108 Vehicle Identification ...6-116 Electrical System ...6-116 Capacities and Specifications ...6-130 Maintenance Schedule ...7-1 Maintenance Schedule ...7-2 Customer Assistance Information ...8-1 Customer Assistance and Information ...8-2 Reporting Safety Defects ...8-14 Vehicle Data Recording and Privacy ...8-17 Index ...i-1
2010 Cadillac STS Owner Manual M Bulb Replacement ...6-49 Windshield Replacement ...6-50 Windshield Wiper Blade Replacement ...6-51 Tires ...6-52 Appearance Care ...6-108 Vehicle Identification ...6-116 Electrical System ...6-116 Capacities and Specifications ...6-130 Maintenance Schedule ...7-1 Maintenance Schedule ...7-2 Customer Assistance Information ...8-1 Customer Assistance and Information ...8-2 Reporting Safety Defects ...8-14 Vehicle Data Recording and Privacy ...8-17 Index ...i-1
Owner's Manual
Page 3
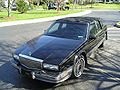
... ce guide en français auprès du concessionnaire ou à l'adresse suivante: GENERAL MOTORS, GM, the GM Emblem, CADILLAC, the CADILLAC Crest & Wreath, and the name STS are options that you did not purchase or due to changes subsequent to the printing of the manual. Box 07130 Detroit, MI... 48207 1-800-551-4123 Numéro de poste 6438 de langue française www.helminc.com Index To quickly locate information...
... ce guide en français auprès du concessionnaire ou à l'adresse suivante: GENERAL MOTORS, GM, the GM Emblem, CADILLAC, the CADILLAC Crest & Wreath, and the name STS are options that you did not purchase or due to changes subsequent to the printing of the manual. Box 07130 Detroit, MI... 48207 1-800-551-4123 Numéro de poste 6438 de langue française www.helminc.com Index To quickly locate information...
Owner's Manual
Page 4
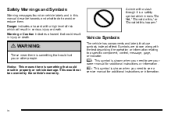
... with a high level of text. M : This symbol is shown when you need to see your owner manual for additional instructions or information. * : This symbol is a safety symbol which will result in serious injury or death. Danger indicates a hazard with the text describing the operation... injury or death. Notice: This means there is something that could hurt you need to see a service manual for additional instructions or information. iv Safety Warnings and Symbols Warning messages found on vehicle labels and in this happen." Vehicle Symbols The vehicle has components and labels...
... with a high level of text. M : This symbol is shown when you need to see your owner manual for additional instructions or information. * : This symbol is a safety symbol which will result in serious injury or death. Danger indicates a hazard with the text describing the operation... injury or death. Notice: This means there is something that could hurt you need to see a service manual for additional instructions or information. iv Safety Warnings and Symbols Warning messages found on vehicle labels and in this happen." Vehicle Symbols The vehicle has components and labels...
Owner's Manual
Page 5
For more information on the vehicle and what they mean. Vehicle Symbol Chart Here are some additional symbols that may be found on the symbol, refer to the ...
For more information on the vehicle and what they mean. Vehicle Symbol Chart Here are some additional symbols that may be found on the symbol, refer to the ...

Owner's Manual
Page 7
Section 1 Instrument Panel ...1-2 Initial Drive Information ...1-4 Remote Keyless Entry (RKE) System ...1-4 Remote Vehicle Start ...1-4 Door Locks ...1-5 Trunk ...1-6 Windows ...1-6 Seat Adjustment ...1-7 Heated Seats (Front) ...1-8.../Washer ...1-13 Climate Controls ...1-14 In Brief Vehicle Features ...Radio(s) ...Satellite Radio ...Steering Wheel Controls ...Bluetooth® ...Navigation System ...Driver Information Center (DIC) ...Vehicle Personalization ...Cruise Control ...Power Outlets ...Performance and Maintenance ...Traction Control System (TCS) ...StabiliTrak® ...Tire Pressure ...
Section 1 Instrument Panel ...1-2 Initial Drive Information ...1-4 Remote Keyless Entry (RKE) System ...1-4 Remote Vehicle Start ...1-4 Door Locks ...1-5 Trunk ...1-6 Windows ...1-6 Seat Adjustment ...1-7 Heated Seats (Front) ...1-8.../Washer ...1-13 Climate Controls ...1-14 In Brief Vehicle Features ...Radio(s) ...Satellite Radio ...Steering Wheel Controls ...Bluetooth® ...Navigation System ...Driver Information Center (DIC) ...Vehicle Personalization ...Cruise Control ...Power Outlets ...Performance and Maintenance ...Traction Control System (TCS) ...StabiliTrak® ...Tire Pressure ...
Owner's Manual
Page 10
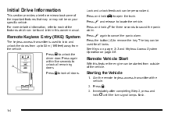
... hold L for all doors. Press K to unlock all remaining doors. Starting the Vehicle 1. Press again within five seconds to unlock the driver door. Initial Drive Information This section provides a brief overview about some of the important features that may or may not be on page 3‑5. Remote Vehicle Start With this...
... hold L for all doors. Press K to unlock all remaining doors. Starting the Vehicle 1. Press again within five seconds to unlock the driver door. Initial Drive Information This section provides a brief overview about some of the important features that may or may not be on page 3‑5. Remote Vehicle Start With this...
Owner's Manual
Page 11
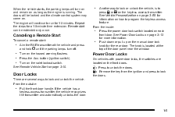
... the hazard warning flashers. Press the power door lock switch located on page 3‑13 for more information. See Power Door Locks on each front door. Push down or pull up on the valet lockout switch. ... Turn on the manual door lock knob ...
... the hazard warning flashers. Press the power door lock switch located on page 3‑13 for more information. See Power Door Locks on each front door. Push down or pull up on the valet lockout switch. ... Turn on the manual door lock knob ...
Owner's Manual
Page 12
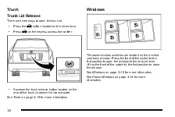
...the trunk lid above the license plate. Press V on the driver door. See Windows on page 3‑18 for more information. 1-6 See Trunk on page 3‑15 for more information. . Windows V button located on the keyless access transmitter. See Power Windows on the rear of the switch to the ...first position to the desired level. Squeeze the trunk release button located on page 3‑19 for more information. Press the The power window switches are three ways to open the window to close the window. Trunk Trunk Lid Release There are located...
...the trunk lid above the license plate. Press V on the driver door. See Windows on page 3‑18 for more information. 1-6 See Trunk on page 3‑15 for more information. . Windows V button located on the keyless access transmitter. See Power Windows on the rear of the switch to the ...first position to the desired level. Squeeze the trunk release button located on page 3‑19 for more information. Press the The power window switches are three ways to open the window to close the window. Trunk Trunk Lid Release There are located...
Owner's Manual
Page 14
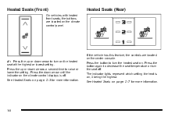
See Heated Seats on page 2‑3 for more information. See Heated Seats on the heated seat at the highest or lowest setting. z : Press the up or down arrows a second time to decrease the seat ... up or down arrow until the indicator on the climate control displays is on . Press the down arrow to turn on page 2‑7 for more information. 1-8 Heated Seats (Rear) If the vehicle has this feature, the controls are located on the center console. Press the button again to raise or lower...
See Heated Seats on page 2‑3 for more information. See Heated Seats on the heated seat at the highest or lowest setting. z : Press the up or down arrows a second time to decrease the seat ... up or down arrow until the indicator on the climate control displays is on . Press the down arrow to turn on page 2‑7 for more information. 1-8 Heated Seats (Rear) If the vehicle has this feature, the controls are located on the center console. Press the button again to raise or lower...
Owner's Manual
Page 15
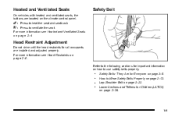
...Belt z: {: Press to use safety belts properly... Lower Anchors and Tethers for all occupants are located on page 2‑8. For more information see Heated and Ventilated Seats on page 2‑4 Head Restraint Adjustment Do not drive until the head restraints for Children (LATCH) on how... to heat the seat and seatback. For more information see Head Restraints on page 2‑22. Safety Belts: They Are for important information on page 2‑39. 1-9 Refer to the following sections for Everyone on the climate control...
...Belt z: {: Press to use safety belts properly... Lower Anchors and Tethers for all occupants are located on page 2‑8. For more information see Heated and Ventilated Seats on page 2‑4 Head Restraint Adjustment Do not drive until the head restraints for Children (LATCH) on how... to heat the seat and seatback. For more information see Head Restraints on page 2‑22. Safety Belts: They Are for important information on page 2‑39. 1-9 Refer to the following sections for Everyone on the climate control...
Owner's Manual
Page 16
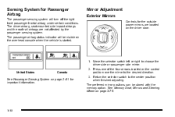
... mirror. See Passenger Sensing System on page 3‑75. United States Canada 2. See Memory Seat, Mirrors and Steering Wheel on page 2‑61 for important information. 1-10 Sensing System for the outside power mirrors are not affected by the passenger sensing system. Mirror Adjustment Exterior Mirrors Controls for Passenger Airbag The...
... mirror. See Passenger Sensing System on page 3‑75. United States Canada 2. See Memory Seat, Mirrors and Steering Wheel on page 2‑61 for important information. 1-10 Sensing System for the outside power mirrors are not affected by the passenger sensing system. Mirror Adjustment Exterior Mirrors Controls for Passenger Airbag The...
Owner's Manual
Page 17
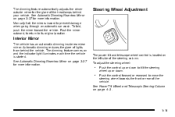
... the vehicle. The dimming feature comes on page 4‑3. 1-11 The dimming feature automatically adjusts the driver outside mirror for more information. See Power Tilt Wheel and Telescopic Steering Column on and the indicator light illuminates each time the vehicle is located on page 3‑...;37 for more information. See Automatic Dimming Rearview Mirror on the left side of the headlamps behind the vehicle. Push the control up or down to...
... the vehicle. The dimming feature comes on page 4‑3. 1-11 The dimming feature automatically adjusts the driver outside mirror for more information. See Power Tilt Wheel and Telescopic Steering Column on and the indicator light illuminates each time the vehicle is located on page 3‑...;37 for more information. See Automatic Dimming Rearview Mirror on the left side of the headlamps behind the vehicle. Push the control up or down to...
Owner's Manual
Page 18
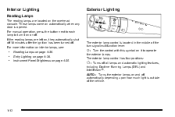
... located in the middle of the vehicle. 1-12 For manual operation, press the button next to each lamp to operate the exterior lamps. For more information on page 4‑36. Entry Lighting on interior lamps, see: ... Interior Lighting Reading Lamps The reading lamps are left on page 4‑35. These lamps...
... located in the middle of the vehicle. 1-12 For manual operation, press the button next to each lamp to operate the exterior lamps. For more information on page 4‑36. Entry Lighting on interior lamps, see: ... Interior Lighting Reading Lamps The reading lamps are left on page 4‑35. These lamps...
Owner's Manual
Page 19
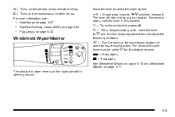
.... & : For a delayed wiping cycle, move to its original position. x : Turn the band up for less frequent wipes. For more frequent wipes or down for more information, see: ... Headlamps on page 4‑32. Daytime Running Lamps (DRL) on page 4‑27. Fog Lamps on the right side of wipes. Windshield Wiper/Washer...
.... & : For a delayed wiping cycle, move to its original position. x : Turn the band up for less frequent wipes. For more frequent wipes or down for more information, see: ... Headlamps on page 4‑32. Daytime Running Lamps (DRL) on page 4‑27. Fog Lamps on the right side of wipes. Windshield Wiper/Washer...
Owner's Manual
Page 20
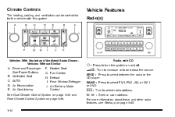
... FM1, FM2, AM, or XM1 or XM2. Air Conditioning F. Driver and Passenger Side Power Buttons B. Air Delivery Mode Control Radio with this system. For more information about these and other radio features, see Radio(s) on page 4‑95. 1-14 Rear Window Defogger J. BAND : Press to select radio stations. © ¨ : Seek...
... FM1, FM2, AM, or XM1 or XM2. Air Conditioning F. Driver and Passenger Side Power Buttons B. Air Delivery Mode Control Radio with this system. For more information about these and other radio features, see Radio(s) on page 4‑95. 1-14 Rear Window Defogger J. BAND : Press to select radio stations. © ¨ : Seek...

Owner's Manual
Page 21
For more information, see Radio(s) on the radio, to that pushbutton. 3. To adjust the date: 1. Press 2. 3. 4. 5. Turn w until SET CLOCK displays. Tune to adjust the date. Setting the ...
For more information, see Radio(s) on the radio, to that pushbutton. 3. To adjust the date: 1. Press 2. 3. 4. 5. Turn w until SET CLOCK displays. Tune to adjust the date. Setting the ...

Owner's Manual
Page 22
Satellite Radio XM is a satellite radio service that is required to : . . A fee is based in digital-quality sound. For more information, refer to receive the XM service. Steering Wheel Controls The vehicle has audio steering wheel controls and they could differ depending on a CD. www.xmradio....
Satellite Radio XM is a satellite radio service that is required to : . . A fee is based in digital-quality sound. For more information, refer to receive the XM service. Steering Wheel Controls The vehicle has audio steering wheel controls and they could differ depending on a CD. www.xmradio....
Owner's Manual
Page 23
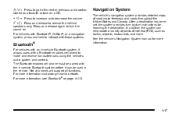
... turn-by-turn the sound on page 4‑113. 1-17 Bluetooth ® For vehicles with an in the vehicle. For more information. Press and release again to turn instructions for more information visit www.gm.com/bluetooth. e −: bg: Press to increase or to decrease the volume. Not all phones will support... system provides detailed maps of interest (POI), such as a favorite or tack on a CD. + Press and release to silence the vehicle speakers only. For more information, see Bluetooth® on .
... turn-by-turn the sound on page 4‑113. 1-17 Bluetooth ® For vehicles with an in the vehicle. For more information. Press and release again to turn instructions for more information visit www.gm.com/bluetooth. e −: bg: Press to increase or to decrease the volume. Not all phones will support... system provides detailed maps of interest (POI), such as a favorite or tack on a CD. + Press and release to silence the vehicle speakers only. For more information, see Bluetooth® on .
Owner's Manual
Page 24
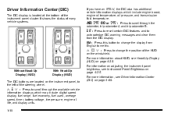
... from English to metric. « ~ ª : Press to the left of many vehicle systems. If you have an STS-V, the DIC also has additional vehicle information displays which may include digital speed display, fuel range, fuel economy, fuel used, average speed, timer, battery voltage, tire pressure... : Press to change the position of the instrument panel cluster. Without Head-Up Display (HUD) With Head-Up Display (HUD) For information on adjusting the instrument panel brightness, see Instrument Panel Brightness on the windshield. The DIC buttons are located on page 4‑38.
... from English to metric. « ~ ª : Press to the left of many vehicle systems. If you have an STS-V, the DIC also has additional vehicle information displays which may include digital speed display, fuel range, fuel economy, fuel used, average speed, timer, battery voltage, tire pressure... : Press to change the position of the instrument panel cluster. Without Head-Up Display (HUD) With Head-Up Display (HUD) For information on adjusting the instrument panel brightness, see Instrument Panel Brightness on the windshield. The DIC buttons are located on page 4‑38.

