
Owner's Manual
Page 23
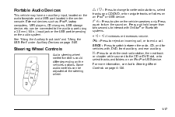
... port using a 3.5 mm (1/8 in the center console. See "Using the Auxiliary Input Jack" and "Using the USB Port" under Auxiliary Devices on the audio faceplate and a USB port located in .) input jack or the USB port depending on the vehicle's options. Portable Audio Devices This vehicle may ...have an auxilliary input, located on page 5‑85. External devices such as iPod®, laptop computers,...
... port using a 3.5 mm (1/8 in the center console. See "Using the Auxiliary Input Jack" and "Using the USB Port" under Auxiliary Devices on the audio faceplate and a USB port located in .) input jack or the USB port depending on the vehicle's options. Portable Audio Devices This vehicle may ...have an auxilliary input, located on page 5‑85. External devices such as iPod®, laptop computers,...

Owner's Manual
Page 271
... for rear seat passengers only. Driver Control of the Audio System The driver has basic control of this section for more information. An indicator light located on the headphones comes on the headphones. The wireless headphones have an On/Off button, channel 1/2 switch, and a volume control. If the temperature of the... below 140°F (60°C). Before Driving The RSE is designed for the RSE system is within the operating range. These headphones are dedicated to A/V jacks, or the auxiliary input jack, if the vehicle has this system.
... for rear seat passengers only. Driver Control of the Audio System The driver has basic control of this section for more information. An indicator light located on the headphones comes on the headphones. The wireless headphones have an On/Off button, channel 1/2 switch, and a volume control. If the temperature of the... below 140°F (60°C). Before Driving The RSE is designed for the RSE system is within the operating range. These headphones are dedicated to A/V jacks, or the auxiliary input jack, if the vehicle has this system.
Owner's Manual
Page 273
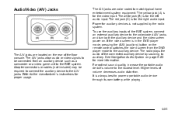
... battery while playing. Power for proper usage. 4-81 To use the auxiliary inputs of the RSE system, connect an external auxiliary device to the A/V jacks. The white jack (B) is not supplied by sourcing to auxiliary. Higher levels of volume decreases audio distortion. The radio plays the audio of the connected auxiliary device...;60 for the left audio input. For optimal sound quality, increase the portable audio device's volume to match typical home entertainment system equipment. Audio/Video (A/V) Jacks The A/V jacks are located on the rear of the floor console.
... battery while playing. Power for proper usage. 4-81 To use the auxiliary inputs of the RSE system, connect an external auxiliary device to the A/V jacks. The white jack (B) is not supplied by sourcing to auxiliary. Higher levels of volume decreases audio distortion. The radio plays the audio of the connected auxiliary device...;60 for the left audio input. For optimal sound quality, increase the portable audio device's volume to match typical home entertainment system equipment. Audio/Video (A/V) Jacks The A/V jacks are located on the rear of the floor console.
Owner's Manual
Page 274
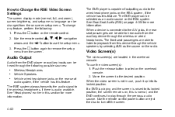
...use, push it up into its locked position, the screen remains on the overhead console. 2. To use the setup menu. Push the release button located on , this feature. If a DVD is playing and the screen is normal, and the DVD continues to its locked position. Use the remote... Screen(s) The video screen(s) are be heard through the previous audio source. When the video screen is connected to the A/V jacks, the rear seat passengers are located in this device through the wireless or wired headphones. The RSE system always transmits the audio signal to the wireless headphones, if...
...use, push it up into its locked position, the screen remains on the overhead console. 2. To use the setup menu. Push the release button located on , this feature. If a DVD is playing and the screen is normal, and the DVD continues to its locked position. Use the remote... Screen(s) The video screen(s) are be heard through the previous audio source. When the video screen is connected to the A/V jacks, the rear seat passengers are located in this device through the wireless or wired headphones. The RSE system always transmits the audio signal to the wireless headphones, if...
Owner's Manual
Page 282
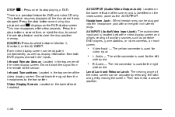
... display screen. Infrared Remote Sensor: Located in the top center of auxiliary sources such as display information from both DVD players and both A/V inputs. Level Lock and Release Latch: The viewing angle of the disc where it into the headphone jack with one-eighth inch stereo plugs.... AV INPUT: (Audio/Video Input Jack): The audio/video input jack is used for video input. This feature resumes playback of the video screen can be adjusted by releasing the latch and gently moving the screen. AV OUTPUT (Audio/Video Output Jack): Located ...
... display screen. Infrared Remote Sensor: Located in the top center of auxiliary sources such as display information from both DVD players and both A/V inputs. Level Lock and Release Latch: The viewing angle of the disc where it into the headphone jack with one-eighth inch stereo plugs.... AV INPUT: (Audio/Video Input Jack): The audio/video input jack is used for video input. This feature resumes playback of the video screen can be adjusted by releasing the latch and gently moving the screen. AV OUTPUT (Audio/Video Output Jack): Located ...

Owner's Manual
Page 529
Flat Tire The following information explains how to access the tools by pulling up on the finger depression under the storage tray, which is located on the driver's side trim panel (over the rear wheelhouse). Remove the tray to use the jack and change a tire. Removing the Spare Tire and Tools The equipment you will need is stored under the jack symbol. 7-81 A. Regular Wheelbase shown, Extended Wheelbase similar. 1. Wheel Block B.
Flat Tire The following information explains how to access the tools by pulling up on the finger depression under the storage tray, which is located on the driver's side trim panel (over the rear wheelhouse). Remove the tray to use the jack and change a tire. Removing the Spare Tire and Tools The equipment you will need is stored under the jack symbol. 7-81 A. Regular Wheelbase shown, Extended Wheelbase similar. 1. Wheel Block B.

Owner's Manual
Page 531
... 2. Tire/Wheel Retainer H. Remove it clockwise and then pull the lock out. Hoist Assembly B. Spare Tire (Valve Stem Pointed Down) I. To access the spare tire: 1. Jack Handle Extensions E. Open the hoist shaft access cover (C) on the bumper to remove the hitch cover. Hoist Cable G. To reach the hoist shaft access cover... first need to access the spare tire lock (K). 3. To remove the spare tire lock insert the ignition key, turn it by turning the two fasteners located at the bottom of Extension Tool K. Hoist Shaft Access Cover/Hole D.
... 2. Tire/Wheel Retainer H. Remove it clockwise and then pull the lock out. Hoist Assembly B. Spare Tire (Valve Stem Pointed Down) I. To access the spare tire: 1. Jack Handle Extensions E. Open the hoist shaft access cover (C) on the bumper to remove the hitch cover. Hoist Cable G. To reach the hoist shaft access cover... first need to access the spare tire lock (K). 3. To remove the spare tire lock insert the ignition key, turn it by turning the two fasteners located at the bottom of Extension Tool K. Hoist Shaft Access Cover/Hole D.

Owner's Manual
Page 534
Do not remove the wheel nuts yet. 7-86 Removing the Flat Tire and Installing the Spare Tire 1. Do a safety check before proceeding. Rear Position 3. Jacking Locations (Overall View) A. To remove the center cap, place the chiseled end of the wheel wrench in the slot on page 7‑80 for more information. 2. Front Position B. Turn the wheel wrench counterclockwise to loosen all the wheel nuts. See Changing a Flat Tire on the wheel and gently pry the cap out. Use the wheel wrench to loosen the wheel nuts.
Do not remove the wheel nuts yet. 7-86 Removing the Flat Tire and Installing the Spare Tire 1. Do a safety check before proceeding. Rear Position 3. Jacking Locations (Overall View) A. To remove the center cap, place the chiseled end of the wheel wrench in the slot on page 7‑80 for more information. 2. Front Position B. Turn the wheel wrench counterclockwise to loosen all the wheel nuts. See Changing a Flat Tire on the wheel and gently pry the cap out. Use the wheel wrench to loosen the wheel nuts.

Owner's Manual
Page 535
...the vehicle, you could be sure to use the jack handle and only one jack handle extension. Raise the vehicle far enough off the jack, you will need to fit the jack lift head into the proper location before raising the vehicle. 4. Position the jack under the vehicle as shown. Never get under a... vehicle when it is jacked up is dangerous. Attach the wheel wrench to raise ...
...the vehicle, you could be sure to use the jack handle and only one jack handle extension. Raise the vehicle far enough off the jack, you will need to fit the jack lift head into the proper location before raising the vehicle. 4. Position the jack under the vehicle as shown. Never get under a... vehicle when it is jacked up is dangerous. Attach the wheel wrench to raise ...


