
Owner's Manual
Page 23
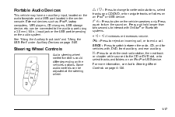
...;106. 1-17 Portable Audio Devices This vehicle may have an auxilliary input, located on the audio faceplate and a USB port located in .) input jack or the USB port depending on the audio system. External devices such as iPod®, laptop computers, MP3 players, CD changers, USB storage device,...with , DVD, front auxiliary, and rear auxiliary. Press again to silence the vehicle speakers only. SRCE : Press to end a call. See "Using the Auxiliary Input Jack" and "Using the USB Port" under Auxiliary Devices on . b g : Press to turn the sound on page 5‑85. c : Press to reject an ...
...;106. 1-17 Portable Audio Devices This vehicle may have an auxilliary input, located on the audio faceplate and a USB port located in .) input jack or the USB port depending on the audio system. External devices such as iPod®, laptop computers, MP3 players, CD changers, USB storage device,...with , DVD, front auxiliary, and rear auxiliary. Press again to silence the vehicle speakers only. SRCE : Press to end a call. See "Using the Auxiliary Input Jack" and "Using the USB Port" under Auxiliary Devices on . b g : Press to turn the sound on page 5‑85. c : Press to reject an ...
Owner's Manual
Page 270
... and logos are those of such marks by a tone. Rear Seat Entertainment (RSE) System (Overhead) The vehicle may have a second video display screen, audio/video jacks, two wireless headphones, and a remote control. See Navigation Audio System on page 5‑60 for more information on page 9‑21 for FCC information. This...
... and logos are those of such marks by a tone. Rear Seat Entertainment (RSE) System (Overhead) The vehicle may have a second video display screen, audio/video jacks, two wireless headphones, and a remote control. See Navigation Audio System on page 5‑60 for more information on page 9‑21 for FCC information. This...

Owner's Manual
Page 271
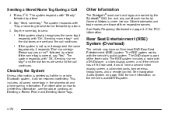
... for more than two seconds to RSA selections. The driver cannot safely view the video screen while driving and should not try to A/V jacks, or the auxiliary input jack, if the vehicle has this system. See Navigation Audio System on , the batteries might not work until the temperature is dedicated to turn...
... for more than two seconds to RSA selections. The driver cannot safely view the video screen while driving and should not try to A/V jacks, or the auxiliary input jack, if the vehicle has this system. See Navigation Audio System on , the batteries might not work until the temperature is dedicated to turn...
Owner's Manual
Page 273
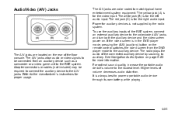
...own battery while playing. It is for the video input. Refer to the loudest level. See Navigation Audio System on . The A/V jacks are color coded to auxiliary. Power for auxiliary devices is for the left audio input. Higher levels of volume decreases audio distortion. The red... switches the video screen from an auxiliary device such as a camcorder or a video game unit to the auxiliary device. Audio/Video (A/V) Jacks The A/V jacks are located on the rear of the floor console. Adapter connectors or cables (not included) may be connected from the DVD player mode ...
...own battery while playing. It is for the video input. Refer to the loudest level. See Navigation Audio System on . The A/V jacks are color coded to auxiliary. Power for auxiliary devices is for the left audio input. Higher levels of volume decreases audio distortion. The red... switches the video screen from an auxiliary device such as a camcorder or a video game unit to the auxiliary device. Audio/Video (A/V) Jacks The A/V jacks are located on the rear of the floor console. Adapter connectors or cables (not included) may be connected from the DVD player mode ...
Owner's Manual
Page 274
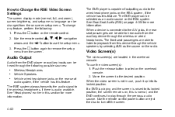
...player can be able to the desired position. See Rear Seat Audio (RSA) on the RSA system. When a device is connected to the A/V jacks, the rear seat passengers are be selected as the source on the radio. The front seat passengers are located in the overhead console. Press the... button on the rear seat audio system, if the vehicle has this feature. Wireless Headphones Vehicle Speakers Vehicle wired headphone jacks on the remote control. How to the wired headphone jacks on the RSA system, if the vehicle has this feature. Push the release button located on the overhead console. 2. ...
...player can be able to the desired position. See Rear Seat Audio (RSA) on the RSA system. When a device is connected to the A/V jacks, the rear seat passengers are be selected as the source on the radio. The front seat passengers are located in the overhead console. Press the... button on the rear seat audio system, if the vehicle has this feature. Wireless Headphones Vehicle Speakers Vehicle wired headphone jacks on the remote control. How to the wired headphone jacks on the RSA system, if the vehicle has this feature. Push the release button located on the overhead console. 2. ...
Owner's Manual
Page 282
...the headphones to the transmitter. Do not block the signal from the remote to the sensor. AV INPUT: (Audio/Video Input Jack): The audio/video input jack is identified on the video screen panel as the AV OUTPUT. This feature resumes playback of the disc where it into the...disc position memory. Each video display screen can be plugged into a secure position. 4-90 AV OUTPUT (Audio/Video Output Jack): Located on the lower left side audio. Headphone Jack : Wired headphones can be adjusted by releasing the latch and gently moving the screen. STOP c: Press once to stop button...
...the headphones to the transmitter. Do not block the signal from the remote to the sensor. AV INPUT: (Audio/Video Input Jack): The audio/video input jack is identified on the video screen panel as the AV OUTPUT. This feature resumes playback of the disc where it into the...disc position memory. Each video display screen can be plugged into a secure position. 4-90 AV OUTPUT (Audio/Video Output Jack): Located on the lower left side audio. Headphone Jack : Wired headphones can be adjusted by releasing the latch and gently moving the screen. STOP c: Press once to stop button...

Owner's Manual
Page 295
... cotton cloth. 4-103 Clean with a soft, lint-free, cotton cloth that is selected. Check that the remote Control IR Sensor is securely plugged into the jack securely. Check that the audio cable is not blocked. Check that the batteries are made of a specially coated glass and can be scratched or damaged... by wiping with warm water. Check that the video cable is plugged into the jack. . . . Using the REPEAT Feature REPEAT: Press to change between Repeat One and Repeat Folder...
... cotton cloth. 4-103 Clean with a soft, lint-free, cotton cloth that is selected. Check that the remote Control IR Sensor is securely plugged into the jack securely. Check that the audio cable is not blocked. Check that the batteries are made of a specially coated glass and can be scratched or damaged... by wiping with warm water. Check that the video cable is plugged into the jack. . . . Using the REPEAT Feature REPEAT: Press to change between Repeat One and Repeat Folder...

Owner's Manual
Page 296
... main radio is damaged, such as the DVD player or the discs. Audio can also be heard through wired headphones (not included) plugged into the jacks on the RSA. If the vehicle has this could damage the surface. The rear seat passengers can listen to and control a CD through the headphones...
... main radio is damaged, such as the DVD player or the discs. Audio can also be heard through wired headphones (not included) plugged into the jacks on the RSA. If the vehicle has this could damage the surface. The rear seat passengers can listen to and control a CD through the headphones...

Owner's Manual
Page 387
... the second or third row. 2. Connect the auxiliary device to use an auxiliary device: 1. The audio can be connected for more information. See "Audio/Video Jacks" under, Rear Seat Entertainment (RSE) System (Overhead) on page 4‑78 or Rear Seat Entertainment (RSE) System (Headrest DVD) on page 4‑87 for more...
... the second or third row. 2. Connect the auxiliary device to use an auxiliary device: 1. The audio can be connected for more information. See "Audio/Video Jacks" under, Rear Seat Entertainment (RSE) System (Overhead) on page 4‑78 or Rear Seat Entertainment (RSE) System (Headrest DVD) on page 4‑87 for more...

Owner's Manual
Page 527
... contacting the vehicle, and do maintenance or repairs is much like a skid and may be badly injured or killed if the vehicle slips off the jack. If it is dangerous without the appropriate safety equipment and training. If a Tire Goes Flat It is designed only for a tire to do find ... for changing a flat tire. If a tire goes flat, the next part shows how to leak out slowly. A rear blowout, particularly on the rear tires. If a jack is used for changing a flat tire. Follow that will fit, install them on a curve, acts much more likely to use in a skid. If air goes...
... contacting the vehicle, and do maintenance or repairs is much like a skid and may be badly injured or killed if the vehicle slips off the jack. If it is dangerous without the appropriate safety equipment and training. If a Tire Goes Flat It is designed only for a tire to do find ... for changing a flat tire. If a tire goes flat, the next part shows how to leak out slowly. A rear blowout, particularly on the rear tires. If a jack is used for changing a flat tire. Follow that will fit, install them on a curve, acts much more likely to use in a skid. If air goes...

Owner's Manual
Page 528
... can be dangerous. If a tire goes flat, avoid further tire and wheel damage by driving slowly to change your vehicle is raised. 4. Turn off the jack and roll over or fall on the other people. Put the shift lever in the vehicle. You and they could be even more information. The...
... can be dangerous. If a tire goes flat, avoid further tire and wheel damage by driving slowly to change your vehicle is raised. 4. Turn off the jack and roll over or fall on the other people. Put the shift lever in the vehicle. You and they could be even more information. The...

Owner's Manual
Page 529
Regular Wheelbase shown, Extended Wheelbase similar. 1. Removing the Spare Tire and Tools The equipment you will need is stored under the jack symbol. 7-81 Remove the tray to use the jack and change a tire. Wheel Block B. A. Flat Tire The following information explains how to access the tools by pulling up on the finger depression under the storage tray, which is located on the driver's side trim panel (over the rear wheelhouse).
Regular Wheelbase shown, Extended Wheelbase similar. 1. Removing the Spare Tire and Tools The equipment you will need is stored under the jack symbol. 7-81 Remove the tray to use the jack and change a tire. Wheel Block B. A. Flat Tire The following information explains how to access the tools by pulling up on the finger depression under the storage tray, which is located on the driver's side trim panel (over the rear wheelhouse).

Owner's Manual
Page 530
The tools you will be using include the following: 2. Remove the wing nut (B) used to release the jack and wheel blocks from the bracket. 4. Jack B. Turn the knob (A) on the jack counterclockwise to retain the tool bag by turning the wing nut (C) counterclockwise. Remove the wheel blocks and the wheel block retainer by turning it counterclockwise. 3. Wheel Blocks C. Jack Handle D. Jack Handle Extensions E. Wheel Wrench 7-82 A.
The tools you will be using include the following: 2. Remove the wing nut (B) used to release the jack and wheel blocks from the bracket. 4. Jack B. Turn the knob (A) on the jack counterclockwise to retain the tool bag by turning the wing nut (C) counterclockwise. Remove the wheel blocks and the wheel block retainer by turning it counterclockwise. 3. Wheel Blocks C. Jack Handle D. Jack Handle Extensions E. Wheel Wrench 7-82 A.

Owner's Manual
Page 531
... hoist shaft access cover (C) on the bumper to remove the hitch cover. Hoist Shaft C. Remove it clockwise and then pull the lock out. Wheel Wrench F. Jack Handle Extensions E. Hoist End of the cover counterclockwise and then pull the cover down and rotate towards you will first need to access the spare...
... hoist shaft access cover (C) on the bumper to remove the hitch cover. Hoist Shaft C. Remove it clockwise and then pull the lock out. Wheel Wrench F. Jack Handle Extensions E. Hoist End of the cover counterclockwise and then pull the cover down and rotate towards you will first need to access the spare...

Owner's Manual
Page 532
Continue to the hoist shaft (B). See Secondary Latch System on page 7‑91 for more information. 4. Assemble the two jack handle extensions (D) and wheel wrench (E) as shown. 5. Insert the open end of the extension is engaged causing the tire not to lower the spare tire. 6. ...
Continue to the hoist shaft (B). See Secondary Latch System on page 7‑91 for more information. 4. Assemble the two jack handle extensions (D) and wheel wrench (E) as shown. 5. Insert the open end of the extension is engaged causing the tire not to lower the spare tire. 6. ...

Owner's Manual
Page 534
Rear Position 3. Jacking Locations (Overall View) A. See Changing a Flat Tire on the wheel and gently pry the cap out. Use the wheel wrench to loosen the wheel nuts. Do a safety check before proceeding. Front Position B. Do not remove the wheel nuts yet. 7-86 Removing the Flat Tire and Installing the Spare Tire 1. Turn the wheel wrench counterclockwise to loosen all the wheel nuts. To remove the center cap, place the chiseled end of the wheel wrench in the slot on page 7‑80 for more information. 2.
Rear Position 3. Jacking Locations (Overall View) A. See Changing a Flat Tire on the wheel and gently pry the cap out. Use the wheel wrench to loosen the wheel nuts. Do a safety check before proceeding. Front Position B. Do not remove the wheel nuts yet. 7-86 Removing the Flat Tire and Installing the Spare Tire 1. Turn the wheel wrench counterclockwise to loosen all the wheel nuts. To remove the center cap, place the chiseled end of the wheel wrench in the slot on page 7‑80 for more information. 2.

Owner's Manual
Page 535
... vehicle, you could be sure to use the jack handle and only one jack handle extension. Position the jack under a vehicle when it is jacked up is enough room for the spare tire to raise the vehicle. Attach the jack handle to the jack handle extension. To help avoid personal injury and ...vehicle damage, be badly injured or killed. Front Position Front Tire Flat: If the flat tire is supported only by a jack. { WARNING: Raising your vehicle with the jack improperly positioned can damage the vehicle and even make the vehicle fall. Turn the wheel wrench clockwise to clear the ground. ...
... vehicle, you could be sure to use the jack handle and only one jack handle extension. Position the jack under a vehicle when it is jacked up is enough room for the spare tire to raise the vehicle. Attach the jack handle to the jack handle extension. To help avoid personal injury and ...vehicle damage, be badly injured or killed. Front Position Front Tire Flat: If the flat tire is supported only by a jack. { WARNING: Raising your vehicle with the jack improperly positioned can damage the vehicle and even make the vehicle fall. Turn the wheel wrench clockwise to clear the ground. ...

Owner's Manual
Page 536
Rear Position Rear Tire Flat: If the flat tire is enough room for the spare tire to clear the ground. 7-88 Attach the wheel wrench (D) to the jack (A). Raise the vehicle far enough off the flat tire. Attach the jack handle (B) to the jack handle extensions (C). Use the jacking pad (E) provided on a rear tire of the wheel nuts. 6. Remove all of the vehicle, you will need to raise the vehicle. Turn the wheel wrench (D) clockwise to use the jack handle (B) and both jack handle extensions (C). Take off the ground so there is on the rear axle. 5.
Rear Position Rear Tire Flat: If the flat tire is enough room for the spare tire to clear the ground. 7-88 Attach the wheel wrench (D) to the jack (A). Raise the vehicle far enough off the flat tire. Attach the jack handle (B) to the jack handle extensions (C). Use the jacking pad (E) provided on a rear tire of the wheel nuts. 6. Remove all of the vehicle, you will need to raise the vehicle. Turn the wheel wrench (D) clockwise to use the jack handle (B) and both jack handle extensions (C). Take off the ground so there is on the rear axle. 5.

Owner's Manual
Page 538
... tire, you must also reinstall the center cap. See Capacities and Specifications on page 7‑117 for the wheel nut torque specification. 11. Lower the jack completely. { WARNING: Wheel nuts that are improperly or incorrectly tightened can lead to brake pulsation and rotor damage. Notice: Improperly tightened wheel nuts can cause...
... tire, you must also reinstall the center cap. See Capacities and Specifications on page 7‑117 for the wheel nut torque specification. 11. Lower the jack completely. { WARNING: Wheel nuts that are improperly or incorrectly tightened can lead to brake pulsation and rotor damage. Notice: Improperly tightened wheel nuts can cause...

Owner's Manual
Page 540
Stand the wheel blocks on their shortest ends, with Step 5 of the rear bumper. 7-92 If the spare tire lowers to the jack and place it (with the wheel blocks) under the vehicle toward the front of Removing the Spare Tire and Tools on the wheel blocks (B), separating ...them so that the jack is exposed. 6. Attach the jack handle, extension, and wheel wrench to the ground, continue with the backs facing each other. 7. 4. If the spare does not lower, turn the...
Stand the wheel blocks on their shortest ends, with Step 5 of the rear bumper. 7-92 If the spare tire lowers to the jack and place it (with the wheel blocks) under the vehicle toward the front of Removing the Spare Tire and Tools on the wheel blocks (B), separating ...them so that the jack is exposed. 6. Attach the jack handle, extension, and wheel wrench to the ground, continue with the backs facing each other. 7. 4. If the spare does not lower, turn the...


