Owner's Manual
Page 1
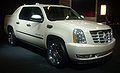
2010 Cadillac Escalade/Escalade ESV Owner Manual M In Brief ...1-1 Instrument Panel ...1-2 Initial Drive Information ...1-4 Vehicle Features ...1-16 Performance and Maintenance ...1-22 Seats and Restraint System ...2-1 Head Restraints ...2-2 Front Seats ...2-4 Rear Seats ...2-10 ...
2010 Cadillac Escalade/Escalade ESV Owner Manual M In Brief ...1-1 Instrument Panel ...1-2 Initial Drive Information ...1-4 Vehicle Features ...1-16 Performance and Maintenance ...1-22 Seats and Restraint System ...2-1 Head Restraints ...2-2 Front Seats ...2-4 Rear Seats ...2-10 ...
Owner's Manual
Page 2
2010 Cadillac Escalade/Escalade ESV Owner Manual M Navigation System ...5-1 Overview ...5-2 Features and Controls ...5-12 Navigation Audio System ...5-60 Voice Recognition ...5-86 Driving Your Vehicle ...6-1 Your Driving, the Road, and the Vehicle ...6-2 Towing ...6-...
2010 Cadillac Escalade/Escalade ESV Owner Manual M Navigation System ...5-1 Overview ...5-2 Features and Controls ...5-12 Navigation Audio System ...5-60 Voice Recognition ...5-86 Driving Your Vehicle ...6-1 Your Driving, the Road, and the Vehicle ...6-2 Towing ...6-...
Owner's Manual
Page 3
...çais auprès du concessionnaire ou à l'adresse suivante: GENERAL MOTORS, GM, the GM Emblem, CADILLAC, the CADILLAC Crest & Wreath, and the names ESCALADE and ESV are options that you did not purchase or due to changes subsequent to confirm each of the features ...found . Part No. 25854764 B Second Printing © 2010 General Motors LLC. Canadian Owners Propriétaires Canadiens A French language copy of this manual...
...çais auprès du concessionnaire ou à l'adresse suivante: GENERAL MOTORS, GM, the GM Emblem, CADILLAC, the CADILLAC Crest & Wreath, and the names ESCALADE and ESV are options that you did not purchase or due to changes subsequent to confirm each of the features ...found . Part No. 25854764 B Second Printing © 2010 General Motors LLC. Canadian Owners Propriétaires Canadiens A French language copy of this manual...

Owner's Manual
Page 4
Symbols are shown along with the text describing the operation or information relating to see your owner manual for additional instructions or information. * : This symbol is shown when you need to a specific component, control, message, gauge, or indicator. { WARNING: These ...there is shown when you or other people. Vehicle Symbols The vehicle has components and labels that could hurt you need to see a service manual for additional instructions or information. This would not be covered by the vehicle's warranty. Safety Warnings and Symbols Warning messages found on vehicle ...
Symbols are shown along with the text describing the operation or information relating to see your owner manual for additional instructions or information. * : This symbol is shown when you need to a specific component, control, message, gauge, or indicator. { WARNING: These ...there is shown when you or other people. Vehicle Symbols The vehicle has components and labels that could hurt you need to see a service manual for additional instructions or information. This would not be covered by the vehicle's warranty. Safety Warnings and Symbols Warning messages found on vehicle ...

Owner's Manual
Page 10
... the features which can be found later in this feature the engine can be personalized. & to open the liftglass. Remote Vehicle Start With this owner manual. For more detailed information, refer to open or close the liftgate. Press and hold alarm. Press K to locate the vehicle. Immediately after completing Step 2, press...
... the features which can be found later in this feature the engine can be personalized. & to open the liftglass. Remote Vehicle Start With this owner manual. For more detailed information, refer to open or close the liftgate. Press and hold alarm. Press K to locate the vehicle. Immediately after completing Step 2, press...

Owner's Manual
Page 11
...) transmitter or the key in the driver door. Repeat the steps for 10 minutes. Programmable Automatic Door Locks on the manual lock knob. 1-5 To lock or unlock the door with the manual locks, push down or pull up on page 3 ‑ 11 . Q : Remove the key from the ignition and ...press to run for a 10-minute time extension. For more information, see: . From outside, use the power door locks or the manual door locks. Turn on page 3‑7. . See Remote Vehicle Start on the hazard warning flashers. The engine will continue to lock the doors. Remote ...
...) transmitter or the key in the driver door. Repeat the steps for 10 minutes. Programmable Automatic Door Locks on the manual lock knob. 1-5 To lock or unlock the door with the manual locks, push down or pull up on page 3 ‑ 11 . Q : Remove the key from the ignition and ...press to run for a 10-minute time extension. For more information, see: . From outside, use the power door locks or the manual door locks. Turn on page 3‑7. . See Remote Vehicle Start on the hazard warning flashers. The engine will continue to lock the doors. Remote ...

Owner's Manual
Page 15
... seat, outside mirrors, steering wheel position, and the adjustable throttle and brake pedal feature, if the vehicle has it. These seats will have either the manual fold and tumble feature or the automatic seat release fold and tumble feature. Second Row Seats If the vehicle has a 60/40 split bench or...
... seat, outside mirrors, steering wheel position, and the adjustable throttle and brake pedal feature, if the vehicle has it. These seats will have either the manual fold and tumble feature or the automatic seat release fold and tumble feature. Second Row Seats If the vehicle has a 60/40 split bench or...

Owner's Manual
Page 18
... located on and the indicator light illuminates each time the vehicle is started. Hold the mirror in to see clearly behind the vehicle. Vehicles with a manual rearview mirror can be adjusted to the folded position. Press (C) to fold the mirrors out to side. Move it up or down and side to...
... located on and the indicator light illuminates each time the vehicle is started. Hold the mirror in to see clearly behind the vehicle. Vehicles with a manual rearview mirror can be adjusted to the folded position. Press (C) to fold the mirrors out to side. Move it up or down and side to...

Owner's Manual
Page 22
...plus/minus buttons, located on page 4 ‑ 42 for current driving conditions. The Driver Information Center (DIC) display will show the message MANUAL SHIFT on the first line and the current gear will be used. To enable the DSC feature, move the column shift lever to : ....the 48 contiguous United States and 10 Canadian provinces. XM satellite radio has a wide variety of gears for more information, refer to the M (Manual) position. See Automatic Transmission Operation on page 4 ‑ 26 (If Equipped). See Dual Automatic Climate Control System on page 4 ‑ 20...
...plus/minus buttons, located on page 4 ‑ 42 for current driving conditions. The Driver Information Center (DIC) display will show the message MANUAL SHIFT on the first line and the current gear will be used. To enable the DSC feature, move the column shift lever to : ....the 48 contiguous United States and 10 Canadian provinces. XM satellite radio has a wide variety of gears for more information, refer to the M (Manual) position. See Automatic Transmission Operation on page 4 ‑ 26 (If Equipped). See Dual Automatic Climate Control System on page 4 ‑ 20...

Owner's Manual
Page 24
... to the personalization menu. For more information, see Bluetooth® on the units selected. 1-18 In addition, the system can be shown in the owner's manual for reaching the destination. The DIC buttons are located on the instrument panel, next to display the odometer, trip odometer, fuel range, average economy, fuel...
... to the personalization menu. For more information, see Bluetooth® on the units selected. 1-18 In addition, the system can be shown in the owner's manual for reaching the destination. The DIC buttons are located on the instrument panel, next to display the odometer, trip odometer, fuel range, average economy, fuel...

Owner's Manual
Page 30
... diagnostics, and calling services. OnStar® uses several innovative technologies and live advisors to provide a wide range of a new Cadillac, you are automatically enrolled in sensors can automatically alert an OnStar advisor who will be sent to get you the help . Automatic...OnStar Advisor who is a complimentary service that includes online service reminders, vehicle maintenance tips, online owner manual, special privileges and more. Sign up today at: www.gmownercenter.com/cadillac (U.S.) or www.gm.ca (Canada). 1-24 OnStar® Roadside Service and OnStar If you need....
... diagnostics, and calling services. OnStar® uses several innovative technologies and live advisors to provide a wide range of a new Cadillac, you are automatically enrolled in sensors can automatically alert an OnStar advisor who will be sent to get you the help . Automatic...OnStar Advisor who is a complimentary service that includes online service reminders, vehicle maintenance tips, online owner manual, special privileges and more. Sign up today at: www.gmownercenter.com/cadillac (U.S.) or www.gm.ca (Canada). 1-24 OnStar® Roadside Service and OnStar If you need....

Owner's Manual
Page 35
Pull the head restraint up and down . 2-3 The rear seat has head rests that it . The head restraints are not designed to make sure that can be removed. To lower the head restraint, press the button, located on the head restraint after the button is released to be adjusted up to raise it is locked in the outboard seating positions. The vehicle may also be equipped with manually tilting head restraints in place. Push down on the top of the seatback, and push the restraint down .
Pull the head restraint up and down . 2-3 The rear seat has head rests that it . The head restraints are not designed to make sure that can be removed. To lower the head restraint, press the button, located on the head restraint after the button is released to be adjusted up to raise it is locked in the outboard seating positions. The vehicle may also be equipped with manually tilting head restraints in place. Push down on the top of the seatback, and push the restraint down .

Owner's Manual
Page 42
... for low. Press the button to cycle through the temperature settings of , or on . Rear Seats Heated Seats The rear outboard seats have either the manual fold and tumble feature or the automatic seat release fold and tumble feature. The heated seats will have the heated seat feature.... Manual Fold and Tumble Feature Driver's Side RSA Heated Seat Button Only shown M (Heated Seat): To heat the seat cushion, press the button with the safety ...
... for low. Press the button to cycle through the temperature settings of , or on . Rear Seats Heated Seats The rear outboard seats have either the manual fold and tumble feature or the automatic seat release fold and tumble feature. The heated seats will have the heated seat feature.... Manual Fold and Tumble Feature Driver's Side RSA Heated Seat Button Only shown M (Heated Seat): To heat the seat cushion, press the button with the safety ...

Owner's Manual
Page 47
... seats and is not twisted. { WARNING: If either seatback is not locked, it is improperly routed, not properly attached, or twisted will have either the manual fold and tumble feature or the automatic seat release fold and tumble feature. 2-15 Make sure that the safety belts are properly routed and attached...
... seats and is not twisted. { WARNING: If either seatback is not locked, it is improperly routed, not properly attached, or twisted will have either the manual fold and tumble feature or the automatic seat release fold and tumble feature. 2-15 Make sure that the safety belts are properly routed and attached...

Owner's Manual
Page 49
Lift the lever, located on the seat. Manual Fold and Tumble Feature Folding and Tumbling the Seat(s) To fold and tumble the seat, do the following: 1. Always unbuckle the safety belts and return them to release the seatback. 2-17 Notice: Folding a rear seat with the safety belts still fastened may cause damage to the seat or the safety belts. Make sure that there is nothing under, in front of, or on the outboard side of the seat, to their normal stowed position before folding a rear seat. 2.
Lift the lever, located on the seat. Manual Fold and Tumble Feature Folding and Tumbling the Seat(s) To fold and tumble the seat, do the following: 1. Always unbuckle the safety belts and return them to release the seatback. 2-17 Notice: Folding a rear seat with the safety belts still fastened may cause damage to the seat or the safety belts. Make sure that there is nothing under, in front of, or on the outboard side of the seat, to their normal stowed position before folding a rear seat. 2.

Owner's Manual
Page 58
..., they could have a crash, you do with seats and safety belts. See Safety Belt Reminders on page 4 ‑ 29 for Everyone This section of the manual describes how to buckle the safety belts. A few crashes are not wearing safety belts, the injuries can be much worse. Be sure everyone in between...
..., they could have a crash, you do with seats and safety belts. See Safety Belt Reminders on page 4 ‑ 29 for Everyone This section of the manual describes how to buckle the safety belts. A few crashes are not wearing safety belts, the injuries can be much worse. Be sure everyone in between...

Owner's Manual
Page 88
... in the vehicle using the vehicle's safety belt or LATCH system, following the instructions that came with that child restraint and the instructions in this manual. See Lower Anchors and Tethers for Children (LATCH) on page 2 ‑ 59 for more information. A booster seat (C-D) is a child restraint designed to see out the...
... in the vehicle using the vehicle's safety belt or LATCH system, following the instructions that came with that child restraint and the instructions in this manual. See Lower Anchors and Tethers for Children (LATCH) on page 2 ‑ 59 for more information. A booster seat (C-D) is a child restraint designed to see out the...

Owner's Manual
Page 89
... statistics, children and infants are safer when properly restrained in a child restraint system or infant restraint system secured in a booklet, or both, and to this manual. a child riding in a forward-facing child seat;
... statistics, children and infants are safer when properly restrained in a child restraint system or infant restraint system secured in a booklet, or both, and to this manual. a child riding in a forward-facing child seat;

Owner's Manual
Page 91
... sure it . Do not use the LATCH system in the center front seat position. This system is always better to attach a child restraint with this manual. The following the instructions that an unsecured child restraint can move around in a collision or sudden stop and injure people in the center front seat...
... sure it . Do not use the LATCH system in the center front seat position. This system is always better to attach a child restraint with this manual. The following the instructions that an unsecured child restraint can move around in a collision or sudden stop and injure people in the center front seat...

Owner's Manual
Page 96
... per anchor. According to accident statistics, children and infants are safer when properly restrained in a child restraint system or infant restraint system secured in this manual. { WARNING: Children can be seriously injured or strangled if a shoulder belt is not attached to anchors, the child restraint will not be able to protect...
... per anchor. According to accident statistics, children and infants are safer when properly restrained in a child restraint system or infant restraint system secured in this manual. { WARNING: Children can be seriously injured or strangled if a shoulder belt is not attached to anchors, the child restraint will not be able to protect...


